Sometimes it is necessary to connect an external USB storage drive (flash drive) directly to a VMware ESXi host. This might be necessary for offline transfer of virtual machine files or ISO images directly to ESXi (without using the network) or for backing up VMs to external media. This post covers connecting a USB drive to ESXi and using it as a VMFS datastore, or directly copying files from a FAT32/NTFS/Ext3 partition on an external drive.
Using a USB Drive as a VMFS Datastore on VMware ESXi
An external USB drive that is connected directly to an ESXi host can be formatted with the VMFS file system. This USB drive can be used as a data storage device to copy/transfer virtual machine files and to run VMs from the datastore. Suppose you want to connect a USB drive to an ESXi host and create a VMFS datastore on it to copy/move files and images of virtual machines conveniently.
Starting with VMware ESXi 6.5, when connecting USB devices to the host, a single USB driver, vmkusb, is used instead of several different drivers (xhci, ehci-hcd, usb-uhci, usb-storage). By default, when you connect a USB drive to an ESXi host, it becomes available to the VMs on ESXi via USB passthrough. To make the attached USB disk available for local use by the ESXi host itself, you must disable this mode:
- It is possible to completely disable USB passthrough for all devices by stopping the USB arbitrator service.
- Or use the advanced USB Quirks settings to make an exception in USB passthrough for a specific hardware model.
lsusb
Copy an ID for your USB drive, formatted as follows:
0xDeviceID:0xVendorIDDisable USB passthrough for a specific USB device model, for example:
esxcli system settings advanced set -o /USB/quirks -s 0x0781:0x5571:0:0xffff:UQ_MSC_NO_UNCLAIMYou can completely disable the USB arbitrator service from the vSphere Client or via CLI:
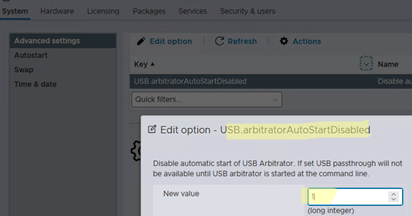
- Open the vSphere ESXi host client and navigate to Manage -> System -> Advanced System Settings
- Find the option
USB.arbitratorAutoStartDisabledand change its value to 1.
- Restart ESXi.
To disable the USB Arbitrator service from the CLI:
- Connect to the ESXi host console via SSH;
- Stop the USB arbitrator service:
# /etc/init.d/usbarbitrator stop - No reboot required
- If you don’t want the USB Arbitrator to start after the host reboots, run:
# chkconfig usbarbitrator off
VMFS datastore can be created on a USB drive from the vSphere Client GUI in ESXi 7.x and 8.x
- Connect a blank USB drive to the ESXi host
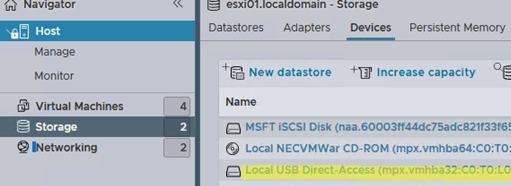
- Go to Storage -> Devices and click Rescan
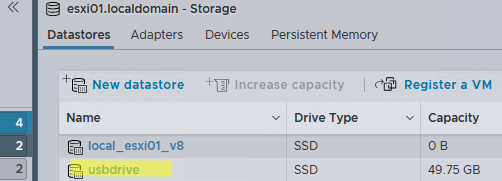
- Verify that the local USB drive appears in the list of available storage devices.
- Click New Datastore and select USB disk as the storage device. Follow the wizard steps to create a VMFS datastore on a USB drive.
If your USB device doesn’t appear in the list of available devices in the New Datastore wizard, or if you are using a version of ESXi earlier than 7.0, you can manually format the USB drive and create a datastore on it from the command line:
- Get the device name assigned to the USB drive on the ESXi host. Use one of the following commands:
vdq -q
or
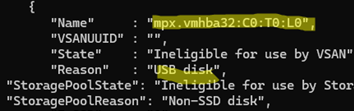
ls /dev/disks/The name of the USB drive can be either mpx.vmhbaX or naa.X. In this example, it is mpx.vmhba32:C0:T0:L0 - Create a shell variable containing the full disk path. For example:
DISK="/vmfs/devices/disks/mpx.vmhba0:C0:T1:L0" - Create a GPT partition table on the USB storage:
# partedUtil mklabel ${DISK} gptAll data will be deleted! - Now create a partition on the disk. This requires you to specify the start and end sectors on the disk. View disk sector info:
# partedUtil getptbl ${DISK} - The start sector is always 2048. The end sector number can be calculated with the command :
# eval expr $(partedUtil getptbl ${DISK}| tail -1 | awk '{print $1 " \\* " $2 " \\* " $3}') – 1In our example, it is 104856254If a partition already exists on the disk, you can delete it;# partedUtil delete ${DISK} 1 - Manually create a VMFS volume (the GUID of such a partition is always AA31E02A400F11DB9590000C2911D1B8):
# partedUtil setptbl /${DISK} gpt "1 2048 104856254 AA31E02A400F11DB9590000C2911D1B8 0"
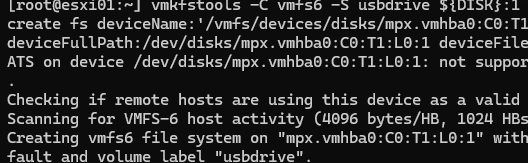
- Format this partition to the VMFS6 file system:
# vmkfstools -C vmfs6 -S usbdrive ${DISK}:1
- Open the VMware Web Client and go to the Storages section. Your USB drive will appear in the list of available datastores.
- Get the device name assigned to the USB drive on the ESXi host. Use one of the following commands:


Connecting USB drive with VMFS to ESXI
When a USB drive with a VMFS file system is connected to the ESXi host, it should be automatically detected and appear in the list of available datastores. In some cases, a VMFS datastore that is stored on external media may be incorrectly recognized as a snapshot.
List the datastores that have been identified as snapshots:
esxcli storage vmfs snapshot list
Find your USB drive in the list and mount it by VMFS UUID:
esxcli storage vmfs snapshot mount -u <uuid>
Now the external USB datastore should appear in the web interface.
How to Copy Files from USB Drive to ESXi Datastore
If you don’t want to change a file system on the USB drive to VMFS (there is a little trick to access VMFS from Windows), you can access files on NTFS/FAT32/EXT3 formatted partitions directly from the ESXi console and copy the files.
To access FAT32 formatted partitions from ESXi, you can use the mcopy tool. To access an NTFS partition on a USB drive, use ntfscat (available in ESXi 5.x and 6.x). The ext3 file system is supported natively. The basic restrictions are:
- FAT32 and Ext3 partitions are available to read and write;
- NTFS drives are read-only ( you can copy data from an NTFS USB drive to an ESXi host, but not vice versa).
To copy a file from a FAT32 USB device to ESXi, use this command:
# /bin/mcopy -i "/dev/disks/naa.5000000000000001:2" ::/some.iso /vmfs/volumes/12345678-ddd654321-4321-aaaabbbb2222/iso/some.iso
where /some.iso is a path to a file on your USB drive. The second path specifies where to place the file on the ESXi host (for example, directly to the VMFS datastore).
To copy a file from ESXi to USB, swap the paths in the command.
# split -b 3221225472 /vmfs/volumes/xx/vm1/vm1.vmdk
The main problem with FAT32 is that it does not support files larger than 4GB. Therefore, it is quite difficult to copy VMDK files of virtual machines. In this case, you can split a source file (for example, 3GB each) before copying:
# split -b 3221225472 /vmfs/volumes/xx/vm1/vm1.vmdk
Now you can copy all the parts to a USB drive and assemble them on the target ESXi host:
# cat vm1* > vm1.vmdk
To copy a file from an NTFS-formatted USB drive to an ESXi host, use the command
# /bin/ntfscat -f /dev/disks/naa.5000000000000001:2" some.iso > /vmfs/volumes/12345678-ddd654321-4321-aaaabbbb2222/iso/some.iso
The ntfscat command is missing in ESXi 7.x and 8.x, so if you need to copy VM files between ESXi and NTFS media, it is easier to copy them over the network. Connect the USB drive to any computer (Windows or Linux) and copy the necessary files via SSH (using scp, WinSCP, or similar tools).
5 comments
Hi,
Thank you so much for this blog. I tried lots of blog and none of them worked but this one for copying file from USB to ESXi while the host was down. The mcopy tool worked flawlessly.
Thank you
[…] stick as a datastore to store your .zip file while you install it, you’ll just need to follow this guide to enable […]
Thanks for this post, this is the most comprehensive and simple to follow. Resolved my issue in under 15 mins
NTFSCAT command not found error … ESXi 7
Looks like ntfscat was only available in esxi 5.x and 6.x