The digital signature of a PowerShell script (*.PS1 file) allows you to verify that a known trusted publisher signs the script and that its code has not been modified. The special Code Signing certificates should be used to sign PowerShell script files.
This type of certificate:
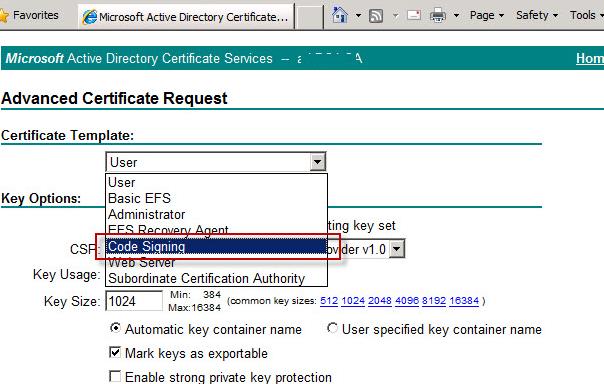
- Can be requested from an internal corporate Certificate Authority(CA).If you have deployed PKI on Active Directory Certificate Services, enable the Code Signing template and request a certificate using that template.

- It can be purchased from an external commercial authority.
- You can issue a self-signed certificate.
So you should have a private key certificate file in .PFX (X509) format. Import this certificate into the local certificate store on your computer:
$PlainTextCertificatePassword = "MyCertPassw0rd123456"
 $pfxpass = $PlainTextCertificatePassword |ConvertTo-SecureString -AsPlainText -Force
 Import-PfxCertificate -filepath "C:\PS\test.pfx" cert:\LocalMachine\my -Password $pfxpass
If you want to use a self-signed certificate, you can generate the code signing cert by using the New-SelfSignedCertificate PowerShell command:
$certFile = New-SelfSignedCertificate -Subject "Certificate to sign PowerShell my scripts" -Type CodeSigningCert -DnsName $env:computername -CertStoreLocation cert:\LocalMachine\my
Sign the PowerShell Script Code with a Code Signing Certificate
List the available code signing certificate in the specified local cert store:
Get-ChildItem cert:\LocalMachine\my -CodeSigningCert
Select a certificate by its fingerprint:
$signcert = Get-ChildItem -Path "cert:\LocalMachine\my" | ? Thumbprint -eq F00AB752B63F3B840A44BF6A20F6EF0E25DEF4D
To sign the code of the specified PowerShell script file, run
$PSScript = "C:\PS\HardwareReadiness.ps1"
 $TimestampServer = "http://timestamp.verisign.com/scripts/timstamp.dll"
 Set-AuthenticodeSignature -FilePath $PSScript -Certificate $signcert -TimestampServer $TimestampServer
Set-AuthenticodeSignature : Cannot sign code. The specified certificate is not suitable for code signing.

The Set-AuthenticodeSignature cmdlet adds a digital signature block, to the end of the PS1 text file:
# SIG # Begin signature block
...........
...........
# SIG # End signature block
The signature block contains a script hash, encrypted using the private key

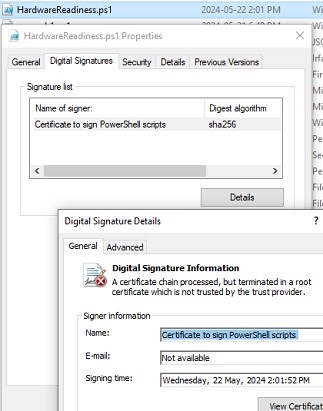
Open the PS1 file properties and navigate to the Digital Signatures tab. Information about the file’s digital signature and certificate can be found here.
Running Signed PowerShell Scripts on Windows
The default PowerShell script execution policy settings in Windows block the execution of all PS1 scripts (Restricted mode). If you try to run the script now, you will get the error:
File C:\PS\HardwareReadiness.ps1 cannot be loaded because running scripts is disabled on this system.
Change the Execution policy setting to AllSigned. This allows only signed PowerShell script files to run. Execution policy settings can be changed:
- Using the command:
Set-ExecutionPolicy AllSigned –Force - Via Group Policy: enable the Turn on Script Execution policy under Computer Configuration -> Policies -> Administrative Templates -> Windows Components -> Windows PowerShell and change the value to Allow only signed scripts
Check the current execution policy settings:
Get-ExecutionPolicy
![]()
If you try to run a signed PowerShell script, an error occurs:
File C:\PS\HardwareReadiness.ps1 cannot be loaded. A certificate chain processed, but terminated in a root certificate which is not trusted by the trust provider.

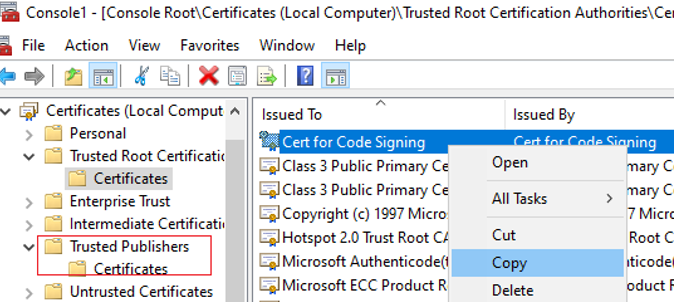
Add the certificate’s thumbprint to the root trusted certificates to run the signed PowerShell script file. You can copy and paste a code-signed certificate you have used from the Personal store to the Trusted Root Certification Authority and Trusted Publisher stores using the certlm.msc graphical console.
Remember to regularly check the Windows certificate store for suspicious certificates and update lists of trusted root certificates.
Now the signed PowerShell script will run without warnings.
![]()
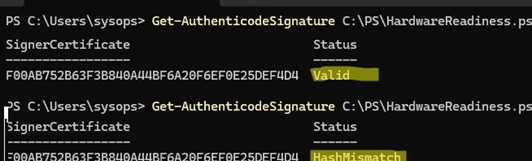
To check that a PowerShell script has a valid signature, run:
Get-AuthenticodeSignature C:\PS\HardwareReadiness.ps1
- Valid status indicates that the PowerShell script code is signed with a trusted digital signature and has not been modified.
- If the command returns HashMismatch, it means that the script code has been modified after signing and the certificate is no longer valid. The execution of such a script will be blocked with an error:
File .ps1 cannot be loaded. The contents of file .ps1 might have been changed by an unauthorized user or process, because the hash of the file does not match the hash stored in the digital signature.
This means that if any changes are made to the code of a signed PS1 file or if the certificate has expired, it must be re-signed on the computer with the private key.
Signing is recommended for all PowerShell scripts that run at elevated domain or server administrator levels, and PowerShell startup/logon scripts in domain GPOs.
1 comment
Great job detailing this process. I recently began forcing signed only (for security reasons) and your process is the cleanest I have seen.