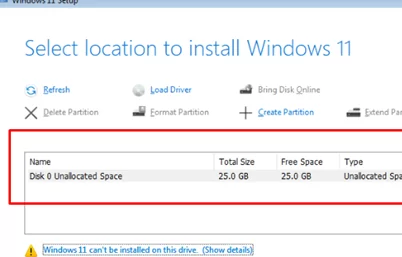
During a clean installation of Windows 11 on a computer with an NVMe drive in an M.2 SSD slot, the OS installer may fail to detect the connected drive. As a result, it will not be possible to install the Windows 11 on such a device.
In my case, at the Windows 11 installation disk selection stage, no local disks are detected.
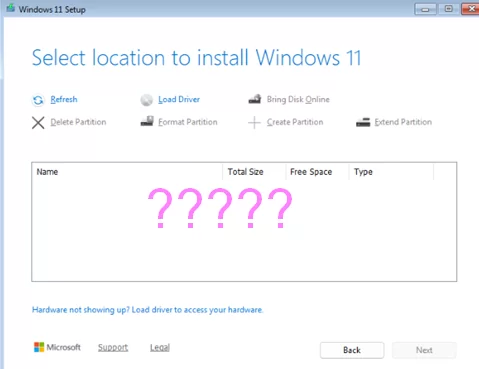
This may indicate that the Windows installer lacks drivers for your storage controller (most common cause) or that the NVMe drive (M.2 controller) is not physically connected to the computer.
To see the unknown devices that the Windows 11 Setup detected, but for which drivers are missing, press SHIFT+F10 (or Fn+Shift+F10 on laptops) during installation, and run the following command:
pnputil /enum-devices /problem
This command will list devices without suitable drivers.
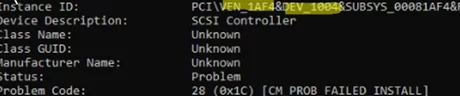
devmgmt.msc command, which opens the graphical Device Manager snap-in, is not available in the WinPE environment.The Device Description field in my case indicates that the installer doesn’t recognize the device “Intel RST VMD Managed Controller 09AB“. As an alternative, you can identify an unknown device by its VEN and DEV ID (highlighted in the screenshot). This will help you identify the storage controller model and find its driver. This driver can be loaded dynamically during the installation of Windows 11.
If no disk controller-like devices appear in the unknown device list, you need to check the following:
- Make sure the NVMe drive is securely connected to the storage controller: the SSD is fully inserted into the slot, and the interface or connector is not damaged.
- Check if your computer’s motherboard detects the NVMe drive. Access the UEFI (BIOS) settings by pressing the F1, F2, or Delete (most often) keys while the device is booting up. Check that your NMVe drive appears in the list of available devices. The name of the BIOS/UEFI section depends on the firmware version and may be Storage, NVMe Configuration, SATA Configuration, and so on.
- On most modern computers with desktop Intel chipsets, the VMD controller is enabled by default. The Intel RST VMD Controller is a hardware controller that provides RAID support for NVMe SSDs, hot-swappable NVMe, and other features that are generally unused on desktop systems.
If you are not using RAID, disable the Intel RST (Rapid Storage Technology) VMD Controller in the UEFI settings. In this case, if you are not using Intel VMD, the Windows 11 installer will detect your NVMe SSD.
 In this case, if you are not using Intel VMD, the Windows 11 installer will detect your NVMe SSD.
Alternatively, you can download the Intel RST VMD (IRST) driver, which is necessary for detecting drives connected via VMD, and load a driver during Windows setup. This applies to any other storage controllers whose drivers are not included in the Windows installer.
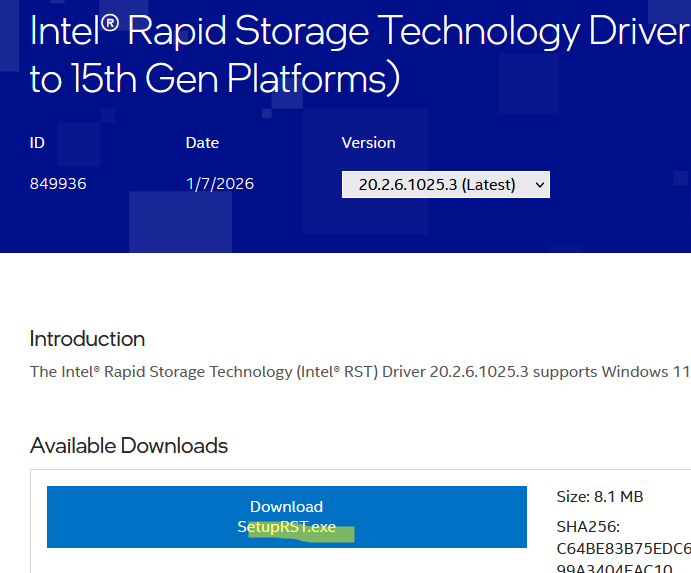
- Use a different computer to download the drivers for your disk controller model from the vendor’s website. The controller model can be determined by the computer specification or by the DEV/VEN ID, as indicated above. In my case, I needed the Intel® Rapid Storage Technology Driver Installation Software with Intel® Optane™ Memory (12th to 15th Gen Platforms)

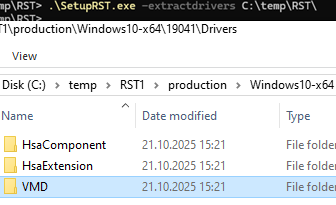
- The drivers are packaged into the SetupRST.exe installer. Extract the file to a local folder on your computer. Open the command prompt and run:
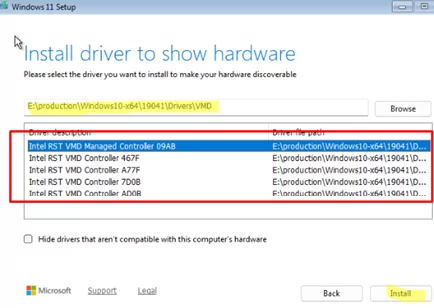
.\SetupRST.exe -extractdrivers C:\TEMP\RST\Or immediately extract the driver to a Windows 11 installation USB stick. - Copy the directory containing the storage drivers to the installation USB flash drive. In our case, this is the VMD folder containing the
iaStorVD.inf,iaStorVD.cat, andiaStorVD.sysfiles. - Boot from the USB drive and start the Windows installation. At the drive selection stage, click the Load Driver button.
- Specify the path to the directory with the drivers on the USB stick.
- I chose to load the
Intel RST VMD Managed Controller 09ABdriver into the WinPEFor example, if you create a Windows virtual machine in Proxmox, during installation, you need to load the drivers for the Red Hat VirtIO SCSI pass-through controller from the virtio ISO image. - After loading the Intel RST driver, the connected NVMe SSD drive will appear in the list of drives available for installing the OS image.
- Proceed with the normal Windows installation.
If you are deploying multiple computers from the same Windows installation image, you can use DISM to add storage controller drivers into the install.wim and boot.wim images.
ventoy.json file within the Ventoy folder:{
"injection": [
{
"parent": "/iso/windows_11_25h2.iso",
"archive": "/drivers/intelrst-vmd-2026.zip"
}
]
}
Now, when installing the OS from the Windows 11 ISO image, the driver archive will be automatically unpacked and mounted to the drive letter X: