Some sections of the classic Control Panel or the modern Windows Settings app may display the message Some of settings are managed by your organization. What does this message mean and can it be removed in Windows 10 and 11?
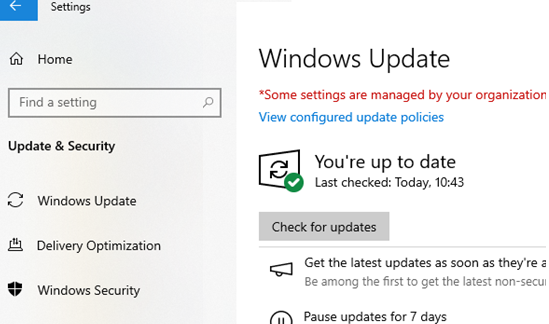
This message indicates that some system settings in this Control Panel cannot be edited directly (protected from changes) because they are configured by Windows Group Policies. In the example shown in the screenshot, the message “Some settings are managed by the organization” is displayed in the Windows Update section. This means that some Windows Update settings are configured via GPO.
There are several reasons why some of the Windows settings on a computer might be set using Group Policy:
- You implemented some system changes using the local GPO editor (see below), or by manually editing the policy registry keys (with
\Policies\in the path). - The computer is joined to an Active Directory domain and has some domain GPOs applied to it. AD Group Policies are used by administrators to set the same settings on all computers in a domain. This also usually means that the user cannot override the settings assigned to a computer by domain GPOs and cannot remove the subject message in Control Panel.
- The computer originally had a custom (modified) Windows image (build) installed, with several changes made using the local GPO.
- Third-party apps or tools can change some settings in the local GPO.
How to find out which Windows settings are set using Group Policies. To do this, you must generate a report of the resulting policy settings applied to a computer. This is done using the Resultant Set of Policy (RSOP) graphical snap-in or the gpresult console command. RSOP is easier for beginners.
- Run the
rsop.msccommand and wait for the GPO report to be generated - A console appears, displaying only those parameters that are set by Group Policies.
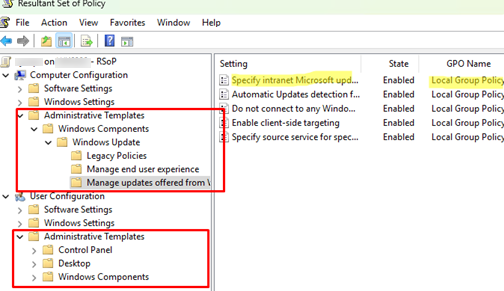
- In my example, there are some settings configured in the Computer Configuration -> Administrative Templates -> Windows Components -> Windows Update -> Manage Update offered from Windows Server Update Server section. The GPO name column indicates that the settings were applied by a Local Group Policy. If the source of the changes is a domain GPO, its name will be listed here.

- GPO settings can be configured for both the computer (Computer Configuration section) and users (User Configuration section).
To disable changes to Windows made by a local GPO, open the local Group Policy Editor by pressing Win + R and running the gpedit.msc command.
To disable a specific local GPO parameter, locate it in the GPO tree and change the parameter value to Not Configured (the RSOP console displays the path to each GPO parameter).

Turn off any local policy parameters that prevent you from managing Windows settings.
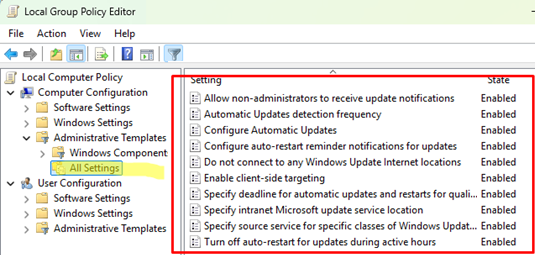
For convenience, you can view all configured local GPO settings in a flat list (rather than navigating through the Group Policy tree).
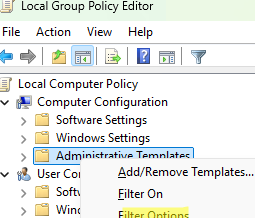
- Right-click the Administrative Templates in the GPO console and select Filter Options.
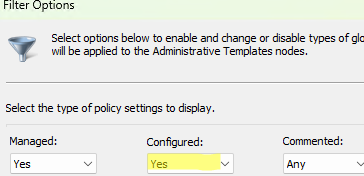
- In the Filter dialog, specify that you want to display only configured GPO options. Change the value in the Configured option to Yes. Save the changes.
- A new “All Settings” section will be added to the Group Policy Object (GPO) console, encompassing all configured Group Policy settings on the computer.
- This is a convenient way to disable all policy settings from a single location without having to search the GPO tree for each option.
After you disable the configured GPO options, run the gpupdate /force command or restart the computer to update (refresh) Group Policy settings. After you apply the GPO, the message about Windows settings being managed by the organization should disappear.
RD /S /Q "%WinDir%\System32\GroupPolicy"
 RD /S /Q "%WinDir%\System32\GroupPolicyUsers"
 gpupdate /force
However, all settings that are set by GPO can also be configured by editing the registry directly. Disabling the GPO option doesn’t reset manually set registry settings in the Policies registry keys. To manually remove all values (!!!) set in the policy registry keys, execute the following commands sequentially with administrator privileges:
 REG DELETE HKLM\SOFTWARE\Microsoft\Windows\CurrentVersion\Group Policy /f
 REG DELETE "HKCU\Software\Microsoft\Windows\CurrentVersion\Policies" /f
 REG DELETE "HKCU\Software\Policies" /f
 REG DELETE "HKLM\Software\Microsoft\Policies" /f
 REG DELETE "HKLM\Software\Microsoft\Windows\CurrentVersion\Policies" /f
 REG DELETE "HKLM\Software\Policies" /f
 REG DELETE "HKLM\Software\WOW6432Node\Microsoft\Policies" /f
 REG DELETE "HKLM\Software\WOW6432Node\Microsoft\Windows\CurrentVersion\Policies" /f
This resets all policy settings that are defined in the registry.
Your IT administrator has limited access to some areas of this app
To unlock the Defender UI, run the following command:
Set-MpPreference -UILockdown $false
3 comments
This is completely stupid. rsop.msc isn’t even available.
Which version of Windows are you using?
They don’t have an RSOP tool, and all the changes are applied via the registry.
Hello,
I never receive a report after I type the initial prompt. A black screen flashes on my screen, then disappears.
I went to users and found the administrator and under it a default (?) user, which must be me because it has the most data usage. I’m afraid that if I delete it, I will lose everything.
Thanks for any help.