Windows OS Hub
  • Windows
    • Windows 11
    • Windows Server 2022
    • Windows 10
    • Windows Server 2019
    • Windows Server 2016
  • Microsoft
    • Active Directory (AD DS)
    • Group Policies (GPOs)
    • Exchange Server
    • Azure and Microsoft 365
    • Microsoft Office
  • Virtualization
    • VMware
    • Hyper-V
  • PowerShell
  • Linux
  • Home
  • About

Windows OS Hub

  • Windows
    • Windows 11
    • Windows Server 2022
    • Windows 10
    • Windows Server 2019
    • Windows Server 2016
  • Microsoft
    • Active Directory (AD DS)
    • Group Policies (GPOs)
    • Exchange Server
    • Azure and Microsoft 365
    • Microsoft Office
  • Virtualization
    • VMware
    • Hyper-V
  • PowerShell
  • Linux

 Windows OS Hub / Exchange / Save Sent Items in Shared Mailbox on Exchange (Microsoft 365)

March 15, 2024

Save Sent Items in Shared Mailbox on Exchange (Microsoft 365)

You can allow users to send e-mails on behalf of the shared mailbox in Exchange Server and Microsoft 365 (Exchange Online). However, such an e-mail, once it has been sent, will not be saved in the Sent Items folder of the shared (owner’s) mailbox. It is only stored in your personal mailbox’s Sent Items folder. This is very inconvenient when several users are working with a single shared mailbox, as it is not clear who has replied to the incoming e-mail or sent the specific message.

Let’s assume your account has been granted Send as and/or Send on behalf permissions to the HelpDesk shared mailbox. You need to have copies of all e-mails that you (or other delegates) have sent on behalf of the shared mailbox available in its Sent Items folder.

Connect to your on-premises Exchange Server using PowerShell:

$Session = New-PSSession -ConfigurationName Microsoft.Exchange -ConnectionUri http://mun-mbex1.woshub.com/PowerShell/ -Authentication Kerberos -Credential
Import-PSSession $Session

Or connect to Microsoft 365 using the Exchange Online PowerShell (EXOv3) module:

Connect-ExchangeOnline

Run the following command to automatically save e-mail items, sent via Send to a Sent Items folder in a shared mailbox:

Set-Mailbox helpdesk -MessageCopyForSentAsEnabled $True

You can also save messages sent using Send On Behalf.

Set-Mailbox helpdesk -MessageCopyForSendOnBehalfEnabled $True

Check the current settings:

Get-Mailbox helpdesk | select MessageCopyForSentAsEnabled, MessageCopyForSendOnBehalfEnabled

PowerShell: enable mailbox options MessageCopyForSentAsEnabled and MessageCopyForSendOnBehalfEnabled

This cmdlet is available in Exchange Server 2013 CU9/2016/2019 and Exchange Online.

You can enable these options for all shared mailboxes:

Get-Mailbox -ResultSize unlimited -Filter {(RecipientTypeDetails -eq 'SharedMailbox')} | Set-Mailbox -MessageCopyForSendOnBehalfEnabled $true -MessageCopyForSentAsEnabled $true

You can also enable or disable this option using the Microsoft 365 Admin Center:

  1. Sign in to the Microsoft 365 Admin Center;
  2. Navigate to Teams and Groups -> Shared mailboxes;
  3. Select the shared mailbox you want to configure;
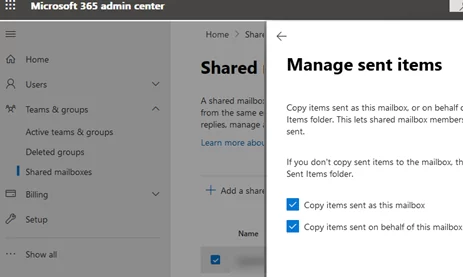
  4. Locate the Sent Items section in the mailbox settings and click Edit;
  5. There are two options available here:
    Copy items sent as this mailbox
    Copy items sent on behalf of this mailbox

    microsoft 365: enable copy sent items for shared mailbox

  6. Enable the options you want and save the changes.

It is possible to use the MessageCopyForSendOnBehalfEnabled and MessageCopyForSentAsEnabled parameters to save only copy messages sent on behalf of the shared mailbox. If you want to save messages sent on behalf of a common user mailbox (or for Exchange Server 2010 mailboxes), you need to enable the Outlook registry option DelegateSentItemsStyle (or convert a user mailbox to a shared mailbox).

Value name: DelegateSentItemsStyle
Value Type: REG_DWORD
Value: 1
  • Outlook 2016/2019/2021/365:
    HKEY_CURRENT_USER\Software\Microsoft\Office\16.0\Outlook\Preferences
  • Outlook 2013:
    HKEY_CURRENT_USER\Software\Microsoft\Office\15.0\Outlook\Preferences
  • Outlook 2010:
    HKEY_CURRENT_USER\Software\Microsoft\Office\14.0\Outlook\Preferences
The DelegateSentItemsStyle parameter allows you to save messages sent on behalf of other mailboxes but is only effective on the current computer for the configured Outlook profile. You can deploy this registry option on domain computers with a GPO.

You can use the Set-MailboxSentItemsConfiguration cmdlet in order to change the sent items retention settings for mailboxes on Exchange Server 2010 SP 2 Update Rollup 4:

Set-MailboxSentItemsConfiguration helpdesk -SendAsItemsCopiedTo Sender -SendOnBehalfOfItemsCopiedTo SenderAndFrom

For this feature to work, Outlook must be in Online or Cached Exchange mode. The DelegateSentItemsStyle registry option must be disabled.

Now, when you send an e-mail on behalf of another mailbox, it will be saved in the Sent Items folder of the owner’s mailbox.

Outlook: save copy of sent messages in the owner mailbox

If the e-mails still do not appear in the Sent Items folder of the shared mailbox, check that it is configured to only receive emails from authenticated users:

Get-Mailbox helpdesk | fl *auth*

RequireSenderAuthenticationEnabled : True

You can change this behavior like this:

Set-Mailbox helpdesk -RequireSenderAuthenticationEnabled $false

0 comment
0
Facebook Twitter Google + Pinterest
Azure and Microsoft 365ExchangePowerShell
previous post
How to Run Program without Admin Privileges and Bypass UAC Prompt
next post
Import-CSV: Reading CSV Files with PowerShell

Related Reading

Outlook Keeps Asking for Password on Windows

March 17, 2024

How to Block Sender Domain or Email Address...

March 17, 2024

Get a List of Mailboxes a User Has...

March 15, 2024

How to Manually Configure Exchange or Microsoft 365...

March 17, 2024

PowerShell: Configure Certificate-Based Authentication for Exchange Online (Azure)

March 17, 2024

How to Delete or Rename Default Mailbox Database...

March 17, 2024

How to Enable Maintenance Mode on Exchange Server

March 12, 2024

Send Emails with Microsoft Graph API and PowerShell

March 17, 2024

Leave a Comment Cancel Reply

join us telegram channel https://t.me/woshub
Join WindowsHub Telegram channel to get the latest updates!

Recent Posts

  • Map a Network Drive over SSH (SSHFS) in Windows

    May 13, 2025
  • Configure NTP Time Source for Active Directory Domain

    May 6, 2025
  • Cannot Install Network Adapter Drivers on Windows Server

    April 29, 2025
  • Change BIOS from Legacy to UEFI without Reinstalling Windows

    April 21, 2025
  • How to Prefer IPv4 over IPv6 in Windows Networks

    April 9, 2025
  • Load Drivers from WinPE or Recovery CMD

    March 26, 2025
  • How to Block Common (Weak) Passwords in Active Directory

    March 25, 2025
  • Fix: The referenced assembly could not be found error (0x80073701) on Windows

    March 17, 2025
  • Exclude a Specific User or Computer from Group Policy

    March 12, 2025
  • AD Domain Join: Computer Account Re-use Blocked

    March 11, 2025

Follow us

  • Facebook
  • Twitter
  • Telegram
Popular Posts
  • Outlook Keeps Asking for Password on Windows
  • Checking User Sign-in Logs in Entra ID (Microsoft 365)
  • How to Manually Configure Exchange or Microsoft 365 Account in Outlook 365/2019/2016
  • Search and Delete Emails from User Mailboxes on Exchange Server (Microsoft 365) with PowerShell
  • Removing Built-in Teams Chat in Windows 11
  • Fix: Microsoft Outlook Search Not Working on Windows 10/11
  • Blank Sign-in Screen in Office 365 Apps (Outlook, Teams, etc.)
Footer Logo

@2014 - 2024 - Windows OS Hub. All about operating systems for sysadmins


Back To Top