A separate account of type Computer is created for a computer when you join it to an Active Directory domain. A computer object in AD has several mandatory attributes: sAMAccountName, distinguishedName, SID, Windows version and build (operatingSystem, operatingSystemVersion), userAccountControl, lastLogonTimeStamp, etc. In the non-mandatory computer attributes, you can store information about its owner, location, description, IP address. This article shows you how to change the attribute values of an AD computer account using ADUC and PowerShell.
Modify Computer Properties using the Active Directory (ADUC) Snap-In
An administrator can use the ADUC graphical snap-in interface to change the values of the computer attributes in the Active Directory.
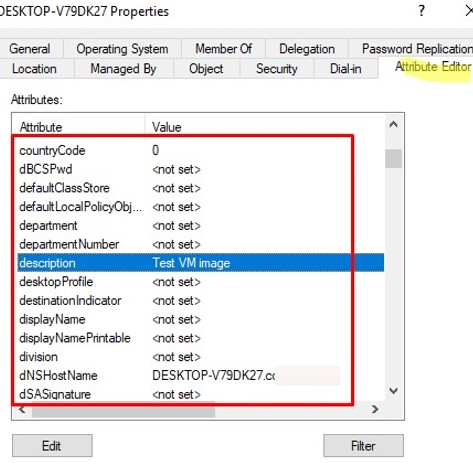
Open the Active Directory Users and Computers console (dsa.msc), Find the account of the computer you need (how to search objects in AD), and open its properties. Here you can set a computer description, its location, assign the responsible user (Managed by), etc.

The Attribute Editor tab allows you to set the values of other computer attributes. Be careful when editing mandatory computer attributes. The object attribute editor in AD does not check the data entered (it only checks the data type and length of the value), so if the values of the computer’s attributes are incorrect, it may break the workstation’s trust relationship with the domain.
PowerShell: Changing Computer Attribute Values with Set-ADComputer
You can use the Set-ADComputer cmdlet (from the PowerShell Active Directory module) to change the attributes of a computer account in Active Directory.
For example, you want to add the location, company name, and department it belongs to a computer’s properties in AD.
To change the value of basic computer attributes, you can use built-in parameters such as -Description, -DisplayName, -DNSHostName, -HomePage, -Location, etc. For example, set the computer’s location:
Set-ADComputer –Identity LON-MAN01 –Location "UK/London"
You can also change the value of any computer attribute using the -Add, -Replace, -Clear, and -Remove parameters. Set a new computer account description:
Set-ADComputer -Identity LON-MAN01 -Add @{"description"="Infrastructure management server"}
If you need to set more than one computer parameter, you can use this PowerShell script:
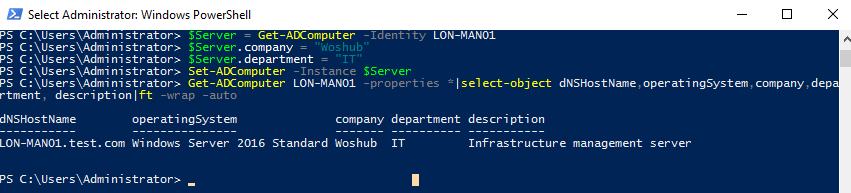
$Server = Get-ADComputer -Identity LON-MAN01
 $Server.company = "Woshub"
 $Server.department = "IT"
 Set-ADComputer -Instance $Server
The Get-ADComputer command allows you to list the current attribute values:
Get-ADComputer LON-MAN01 -properties *|select-object dNSHostName,operatingSystem,company,department, description
You can now find all the computers in AD that belong to Contoso’s IT department:
Get-ADComputer -Filter {(company -eq 'woshub') -and (department -eq "IT")} -properties *|select-object dNSHostName,operatingSystem,company,department,description | ft
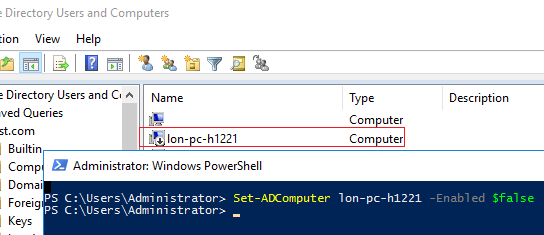
The Set-ADComputer cmdlet also allows you to disable or enable a computer object account in AD:
Set-ADComputer lon-pc-h1221 -Enabled $false
How to Add UserName and IP Adress to AD Computer Properties
You can automatically add certain information to computer properties. For example, you might want the computer’s attributes in AD to include its current IP address and the name of the last logged-on user. We’ll use the Description attribute to store the IP address of the computer, and the ManagedBy attribute to store the username currently logged on to the computer.
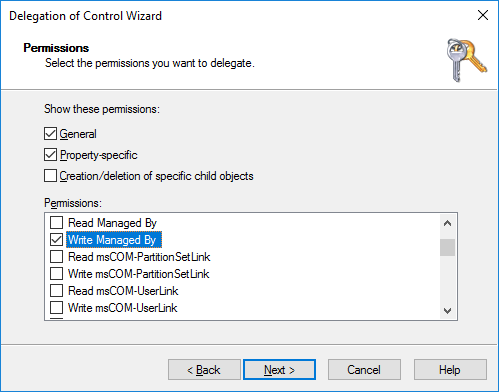
Delegate AD permissions to the Domain Users group on the OU containing the computer accounts to change values in the Computer object attributes: ManagedBy and description (Write Description + Write Managed By).
Then create a new Group Policy with the following PowerShell logon script (User Configuration -> Policies -> Windows Settings -> Scripts -> Logon) to be run when a user logs on to the computer:
$curhostname=$env:computername
 $env:HostIP = (
 Get-NetIPConfiguration |
 Where-Object {
 $_.IPv4DefaultGateway -ne $null -and
 $_.NetAdapter.Status -ne "Disconnected"
 }
 ).IPv4Address.IPAddress
 $currus_cn=(get-aduser $env:UserName -properties *).DistinguishedName
 $ADComp = Get-ADComputer -Identity $curhostname
 $ADComp.ManagedBy = $currus_cn
 $ADComp.description = $env:HostIP
 Set-ADComputer -Instance $ADComp
This PowerShell script runs under a user account, detects the computer’s IP address and the current user’s CanonicalName (CN), and saves them to the computer properties in AD. The AD PowerShell module must be installed on the user computers for the script to work (you can deploy the RSAT-AD-PowerShell module without installing RSAT).
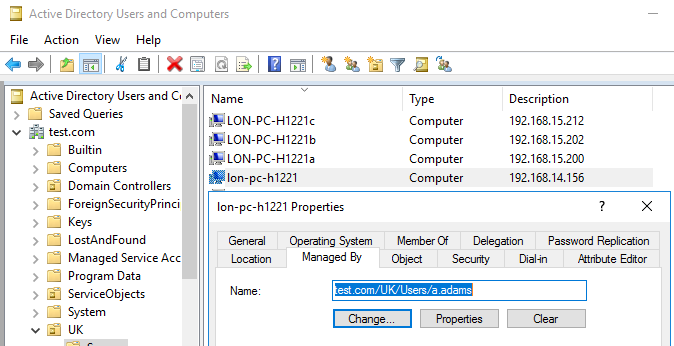
The ADUC console now displays the IP addresses of the computers. The Managed by tab of Computer Properties contains a link to the user account last logged on to this machine.
Now you can quickly find computers in a domain by IP address:
get-adcomputer -filter {description -like "192.168.15.*"} -properties *|select name,description,managedBy
Or you find all computers in a domain where a particular user account is logged on (the Get-ADUser cmdlet is used to get the DistinguishedName of the user).
$user='a.adams'
 $user_cn=(get-aduser $user -properties *).DistinguishedName
 Get-ADComputer -Filter "ManagedBy -eq '$user_cn'" -properties *|select name,description,managedBy|ft

Similarly, you can write any information about a workstation or user into the properties of computer accounts in AD and use it to search for computers in AD by those criteria. The article at the link describes how to add the last logged username and host hardware information to the computer description in AD.