Windows OS Hub
  • Windows
    • Windows 11
    • Windows Server 2022
    • Windows 10
    • Windows Server 2019
    • Windows Server 2016
  • Microsoft
    • Active Directory (AD DS)
    • Group Policies (GPOs)
    • Exchange Server
    • Azure and Microsoft 365
    • Microsoft Office
  • Virtualization
    • VMware
    • Hyper-V
  • PowerShell
  • Linux
  • Home
  • About

Windows OS Hub

  • Windows
    • Windows 11
    • Windows Server 2022
    • Windows 10
    • Windows Server 2019
    • Windows Server 2016
  • Microsoft
    • Active Directory (AD DS)
    • Group Policies (GPOs)
    • Exchange Server
    • Azure and Microsoft 365
    • Microsoft Office
  • Virtualization
    • VMware
    • Hyper-V
  • PowerShell
  • Linux

 Windows OS Hub / Virtualization / VMware / Set up SSH Key-Based Authentication on VMware ESXi

April 11, 2024

Set up SSH Key-Based Authentication on VMware ESXi

You can configure SSH key-based authentication to log in to VMware ESXi hosts instead of using a username and password pair. This can be useful if you need to remotely manage an ESXi host using external scripts (for example, to send a shutdown command to ESXi on a power outage event on UPS), or if you need to manage VMware ESXi hosts with Ansible.

Generate private and public keys on the administrator’s computer. Use RSA keys with a minimum length of 4096 bits. To generate a 4096-length RSA key pair on Windows, run the command

ssh-keygen -t rsa -b 4096

Learn more about SSH key-based auth on Windows.

ssh-keygen: generate key pair

It is recommended to use the Ed25519 protocol instead of RSA keys in new OpenSSH builds (use RSA/SHA256 when testing usability of private keys as some systems are starting to disable RSA/SHA1 in libcrypto). In ESXi 8.0, I was only able to establish an SSH connection using the Ed25519 key pair after disabling the FipsMode no option in /etc/ssh/sshd_config.

To generate Ed25519 keys (id_ed25519 and id_ed25519.pub), run:

ssh-keygen -t ed25519

The utility creates two files in the current user’s profile directory (%USERPROFILE%\.ssh):

  • id_rsa – private key
  • id_rsa.pub – public (open) key
If you are using the Puttygen tool to generate keys, you will need to export them in OpenSSH format.

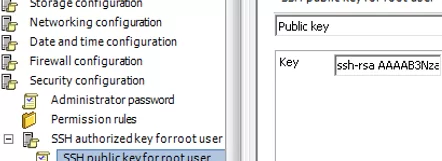
Copy the public key (id_rsa.pub) from your computer to the VMware ESXi host This key must be added to the file /etc/ssh/keys-$USER/authorized_keys. If this is a key for the root user, the path to the file will be as follows: /etc/ssh/keys-root/authorized_keys.

Connect to the ESXi server using SSH.

You can edit the file manually (you can store multiple keys in one file) or add it to the ESXi server by using the PowerShell command:

cat c:\users\admin\.ssh\id_rsa.pub | ssh [email protected] 'cat >> /etc/ssh/keys-root/authorized_keys'

Copy public key to authorized_keys on VMware ESXi

The /etc/ssh/sshd_config file contains the OpenSSH server on the ESXi host.

Use this option to enable or disable root access:

PermitRootLogin yes

Turn off SSH password logins:

ChallengeResponseAuthentication no # deprecated
KbdInteractiveAuthentication no
PasswordAuthentication no

disable keyboard-interactive SSH login in VMware ESXi

Restart SSH server on ESXi:

# /etc/init.d/SSH restart

You can also use VMware Host Profiles to deploy open SSH keys to ESXi hosts (Security Configuration -> SSH authorized key for root user -> Add public key)

VMware Host Profiles: Add public key

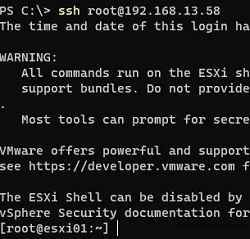
You can now connect to the ESXi host without a password using the private key. On Windows computers with ssh-agent enabled, the private key from the user profile is automatically used when connecting to the host:

ssh [email protected]

Log into a ESXi using SSH key

You can also use the -i parameter to specify the path to the private key:

ssh [email protected] -i "C:\Users\administrator\.ssh\id_rsa"

Now you can remotely run any command in the ESXi console. For example, shutdown a specific virtual machine:

ssh [email protected] vim-cmd vmsvc/power.shutdown VMID

0 comment
1
Facebook Twitter Google + Pinterest
VMware
previous post
Prevent Server Manager from Starting at Logon on Windows Server
next post
Installing Windows 11 without Network and Internet Connection

Related Reading

How to Fix ‘An Operating System Wasn’t Found’...

August 24, 2023

Adding ESXi Host to VMware vCenter Server (vCSA)

March 12, 2024

Reset Root Password in VMware ESXi

October 6, 2023

Unmounting an NFS Datastore from VMware ESXi

March 12, 2024

How to Migrate (Import) VMs from VMware ESXi...

July 24, 2024

Managing VMware Infrastructure with Ansible

December 11, 2023

How to Create a Virtual Machine on VMWare...

March 12, 2024

How to Enable Copy and Paste for a...

March 12, 2024

Leave a Comment Cancel Reply

join us telegram channel https://t.me/woshub
Join WindowsHub Telegram channel to get the latest updates!

Recent Posts

  • Map a Network Drive over SSH (SSHFS) in Windows

    May 13, 2025
  • Configure NTP Time Source for Active Directory Domain

    May 6, 2025
  • Cannot Install Network Adapter Drivers on Windows Server

    April 29, 2025
  • Change BIOS from Legacy to UEFI without Reinstalling Windows

    April 21, 2025
  • How to Prefer IPv4 over IPv6 in Windows Networks

    April 9, 2025
  • Load Drivers from WinPE or Recovery CMD

    March 26, 2025
  • How to Block Common (Weak) Passwords in Active Directory

    March 25, 2025
  • Fix: The referenced assembly could not be found error (0x80073701) on Windows

    March 17, 2025
  • Exclude a Specific User or Computer from Group Policy

    March 12, 2025
  • AD Domain Join: Computer Account Re-use Blocked

    March 11, 2025

Follow us

  • Facebook
  • Twitter
  • Telegram
Popular Posts
  • How to Fix ‘An Operating System Wasn’t Found’ Error on Windows
  • How to Install Free VMware Hypervisor (ESXi)
  • Reset Root Password in VMware ESXi
  • How to Migrate (Import) VMs from VMware ESXi to Proxmox
  • How to Enable Copy and Paste for a VMware Virtual Machine
  • Unmounting an NFS Datastore from VMware ESXi
  • How to Increase Virtual Machine Disk Size in VMware
Footer Logo

@2014 - 2024 - Windows OS Hub. All about operating systems for sysadmins


Back To Top