In this article, we’ll show how to configure a tagged VLAN interface on Windows 10/11 and Windows Server 2019 (2022/2016/2012R2). The VLAN (Virtual LAN) specification is described in the IEEE 802.1Q standard and involves marking traffic with tags (vlanid) so that a network packet may be referred to a particular virtual network. VLANs are used to separate and segment networks, restrict broadcast domains, and isolate network segments to improve security. On Windows, you can configure multiple logical network interfaces with different VLAN IDs on a single physical NIC using different tools.
To use VLAN on Windows, you need to reconfigure the physical switch port to which your computer/server is connected to. The port must be switched from access mode to trunk mode. By default, all VLANs are allowed on a trunk port, but you can set the list of allowed VLAN numbers (1 to 4094) available at this Ethernet switch port.
Creating Multiple VLAN Interfaces on Windows 10 and 11
Windows desktop editions don’t natively support VLAN tagging. By default, most network adapter drivers ignore all VLAN tags in network packets and external VLANs become inaccessible.
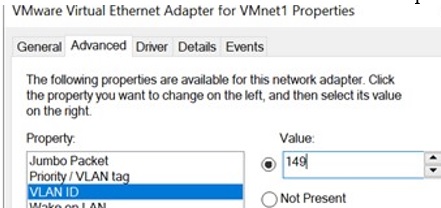
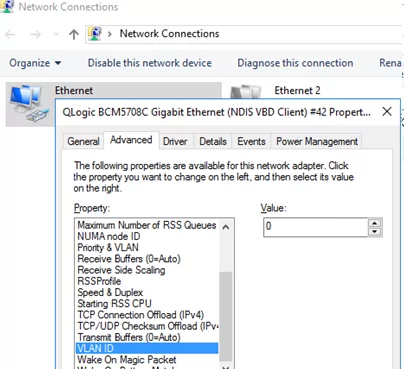
For some network adapters, you can set the VLAN number in the driver properties:
- Run the Device Manager (
devmgmt.msc); - Expand the Network adapters section and open the properties of your network adapter;
- Go to the Advanced tab and find the VLAN ID option;

- You can set the VLAN number here;
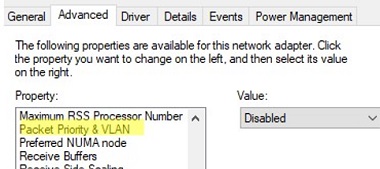
- For some NICs, you first need to enable the Packet Priority and VLAN option.

In modern versions of Windows 10 and 11, you can set one VLAN tag for a network interface adapter. You can use PowerShell to manage network settings. For example, you want to set VLAN ID 24 for your network interface named Ethernet0:
Set-NetAdapter –Name "Ethernet0" -VlanID 24
For some NICs (from Intel, Broadcom, HP, Realtek), special tools are available that allow you to create a virtual network interface in Windows with a VLAN ID. To do this, you need to install a special driver on your computer that supports 802.1Q tagged traffic and the official configuration tool from the vendor.
Create Multiple VLANs on a Realtek NIC in Windows 10 or 11
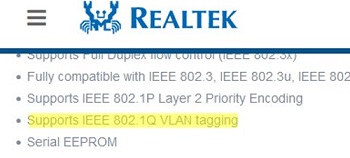
For Realtek NICs, you can configure multiple virtual NICs with different VLANs using the Realtek Ethernet Diagnostic Utility. Find the description of your Realtek network controller on the vendor’s website, and check that this model supports VLAN. For example, the specification for the RTL8169SC(L) network controller has this option:
Supports IEEE 802.1Q VLAN tagging
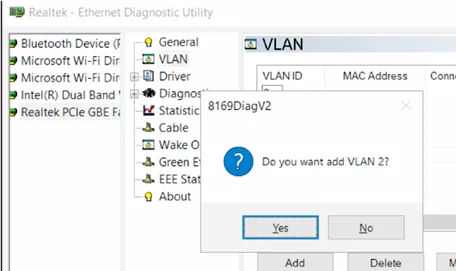
Download and install the latest network driver for your Realtek adapter and run the Realtek Ethernet Diagnostic Utility (Diagnostic Program for Win7/Win8/Win10/Win11).
Go to the VLAN section, click Add, and add the required VLAN ID. After that, a new network interface will appear in Windows.
After creating network interfaces for your VLANs, you can assign the IP addresses from the corresponding IP network.
How to Setup VLAN on an Intel Ethernet Network Adapter?
Intel has its own Intel Advanced Network Services (Intel® ANS) tool for configuring VLAN interfaces. Your network adapter model, of course, must support VLAN (for example, VLAN is not supported for NICs such as Intel PRO/100 or PRO/1000). When installing the driver, select the Intel PROSet for Windows Device Manager and Advanced Network Services options.
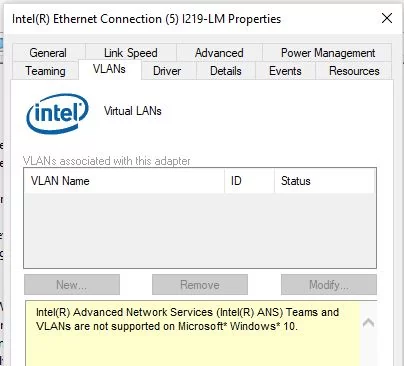
Then a separate VLANs tab appears in the properties of your physical Intel network adapter, where you can create multiple VLAN interfaces.
However, this method works on all previous versions of Windows (up to Windows 10 1809). In modern Windows 10/11 builds, the following message is displayed in the VLANs tab:
Intel(R) Advanced Network (Intel(R) ANS) Teams and VLANs are not supported on Microsoft Windows 10.
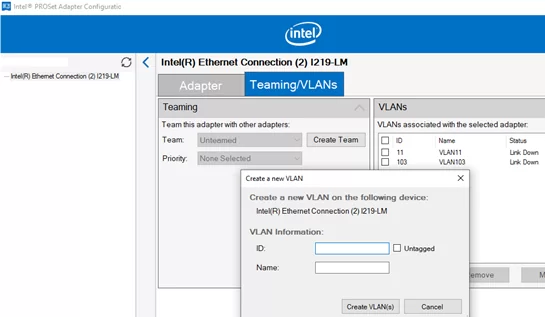
Intel recently released new network adapter drivers and the Intel PROSet adapter configuration tool for the latest builds of Windows 10 and 11. Download and install the latest Intel driver and Intel PROset utility.
Run the configuration tool, go to the Teaming/VLANs tab, click the New button, and specify the name of the network interface and its VLANID.
In addition, you can add/remove/view the list of VLANs on Intel NICs using the PowerShell cmdlets from the IntelNetCmdlets module. Import the module into your PowerShell session:
Import-Module -Name "C:\Program Files\Intel\Wired Networking\IntelNetCmdlets\IntelNetCmdlets" -Scope Local
You can create an untagged virtual network adapter (usually used with native-vlan-id):
Add-IntelNetVLAN -ParentName "Intel(R) Ethernet Connection I219-LM" -VLANID 0
To create an Intel NIC with a specific VLAN number:
Add-IntelNetVLAN -ParentName "Intel(R) Ethernet Connection I219-LM" -VLANID 103
To list all virtual Intel network adapters:
Get-NetAdapter
Remove VLAN interface:
Remove-IntelNetVLAN -ParentName "Intel(R) Ethernet Connection I219-LM" -VLANID 103

How to Configure Multiple VLANs on Windows Server 2022/2019/2016?
In Windows Server 2022/2019/2016/2012R2, you can configure multiple VLANs on the same network interface using built-in tools (without installing third-party drivers and tools). Let’s try to configure multiple VLANs on the same physical NIC in Windows Server 2019 using NIC Teaming.
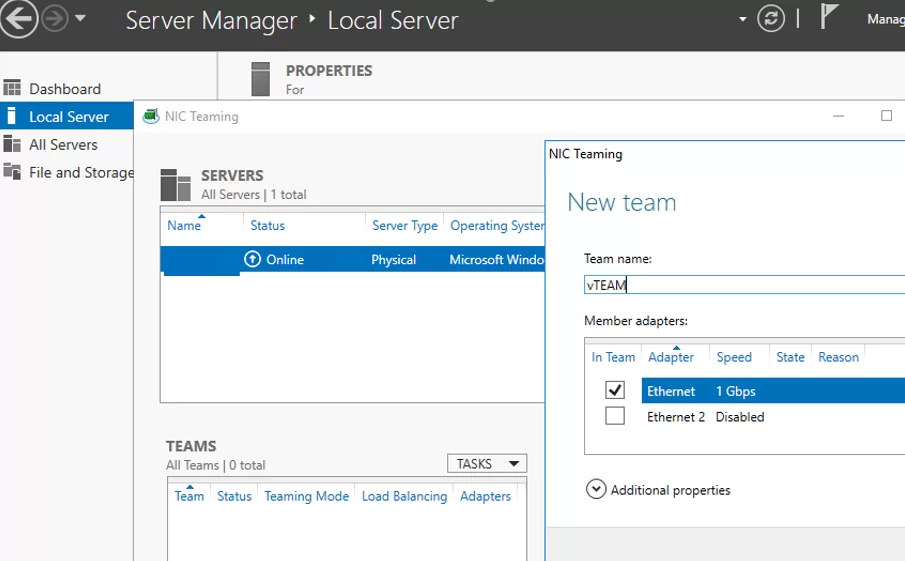
- Open the Server Manager -> Local and click the NIC Teaming link;
- In the Teams section, click Task -> New Team. Specify the group name and select network adapters to add;
 You can create a NIC Teaming group using PowerShell:
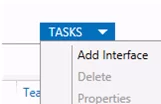
New-NetLbfoTeam -Name vTeam -TeamMembers "Ethernet1","Ethernet2" -TeamingMode SwitchIndependent -LoadBalancingAlgorithm Dynamic - Then in the “Adapter and Interfaces” section, add virtual network interfaces. Click Tasks -> Add Interface;
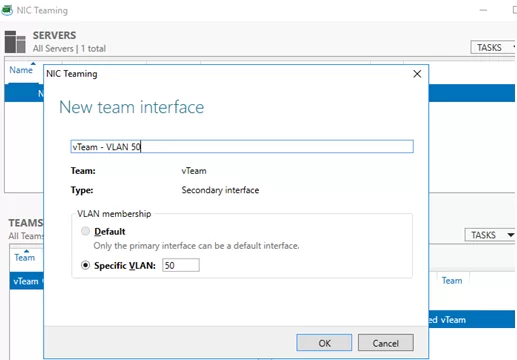
- Enter the name of the interface you are going to create and a VLAN number; You can add a network interface and set a VLAN for it in PowerShell:
Add-NetLbfoTeamNic -Team vTeam -VlanID 24 -Name VLAN24 - In the same way, you can add as many VLAN network interfaces as you need;Please note that Windows Server 2022/2019/2016 supports a maximum of 32 NICs (and unique VLANs) per NIC Teaming group.
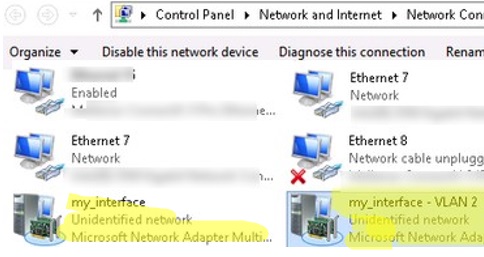
- A separate virtual network adapter will appear in the list of network connections in
ncpa.cpl;
- Now you can configure the IP settings for each VLAN interface in the properties of the network adapter or using PowerShell cmdlets:
New-NetIPAddress -InterfaceAlias your_VLAN_interface -IPAddress 192.168.10.10 -PrefixLength 24 -DefaultGateway 192.168.10.1
 Set-DnsClientServerAddress -InterfaceAlias your_VLAN_interface -ServerAddresses 192.168.100.12
Create Multiple VLANs with Windows Hyper-V Role
You can programmatically handle multiple VLANs in Windows through the Hyper-V subsystem (available in both Windows Server and desktop Windows 10/11 Pro and Enterprise editions). You can create a virtual switch with a network adapter in a specific VLAN.
To do this, you need to install Hyper-V components:
Enable-WindowsOptionalFeature -Online -FeatureName:Microsoft-Hyper-V -All
Create a new virtual switch through Hyper-V Manager or using PowerShell commands (see an example in the article on how to configure Hyper-V Server).
Then run the following commands for each VLAN you want to create:
Add-VMNetworkAdapter -ManagementOS -Name VLAN24 -StaticMacAddress "11-11-AA-BB-CC-DD" -SwitchName vSwitch2
 Set-VMNetworkAdapterVlan -ManagementOS -VMNetworkAdapterName VLAN24 -Access -VlanId 24
So a network adapter with the VLAN you want will appear in Windows.
If you have VMs running on your Hyper-V server, you can put them in different VLANs. To switch the virtual network adapter of a VM on Hyper-V to Access mode and allow it to receive traffic only with a specific VLAN ID, use the command:
Set-VMNetworkAdapterVlan -VMName MyVMName1 -Access -VlanId 30
Display a list of VMs and their assigned VLANs:
Get-VMNetworkAdapterVLAN
In Windows Server 2022 with the Hyper-V role, you won’t be able to bind a virtual switch to such a teaming interface. The fact is that LBFO NIC Teaming is a deprecated feature on Windows Server 2022 (https://aka.ms/lbfodeprecation). Instead of NIC Teaming, it is proposed to use Switch Embedded Teaming (SET).
Let’s create a virtual adapter and assign a VLAN to it on Windows Server 2022 Hyper-V using SET.
Create a virtual switch connected to the host’s physical adapters:
New-VMSwitch -Name HVVLANSwitch1 -NetAdapterName "Ethernet3","Ethernet4" -EnableEmbeddedTeaming $true
Now create a virtual adapter connected to the virtual switch:
Add-VMNetworkAdapter -ManagementOS -Name "VLAN22" -StaticMacAddress "XX-XX-XX-XX-XX-XX" -SwitchName HVVLANSwitch1
Assign a VLAN tag to your virtual adapter:
Set-VMNetworkAdapterVlan -ManagementOS -VMNetworkAdapterName "VLAN22" -Access -VlanId 22
You can enable the virtual Hyper-V adapter to receive packets from multiple VLANs using the command:
Get-VMNetworkAdapter -Name youradaptername | Set-VMNetworkAdapterVlan -Trunk -AllowedVlanIdList 40-69 -NativeVlanId 0
-NativeVlanId 0 parameter is required. In this case, we tell Hyper-V that VLAN:0 is used as native for untagged traffic.
16 comments
How have you managed to make this so unnecessarily difficult? What is wrong with you people? No really, it’s astounding how bad you are at even the most basic of system interfaces.
I actually want to know the answer to this question, why is adding a VLAN to an interface so convoluted?
Just realized this website is not officially associated with Windows. Still I pity you, may God have mercy on your soul for there is a special place in hell for Microsoft and all it’s affiliates.
It is indeed strange that Microsoft has not included a generic framework for VLAN-tagging. The natural evolution of functionality is for it to first be implemented in proprietary vendor software before making its way into the OS. Microsoft has done this for all sorts of other functionality, be it for graphics, sound, printing — and networking.
It’s not like VLAN tagging is a new invention, and other operating systems such as Linux has had a generic interface for this for close to two decades.
Why is Microsoft committing such atrocities in 2024?
I came from the network/Linux world. I’m also shocked that the basic network feature is missing and how complex the workarounds are. It’s just 1-2 lines/commands in any other system/platform.
Thanks, that was helpful – and it does work on Windows 11 as well.
What doesn’t work, however, is to see a tagged VLAN on WSL2. I can only reach an untagged VLAN from, e.g., Ubuntu.
Many thanks for this. I’m still dumbfounded Microsoft has made it so complex but the Hyper-V role solution is actually reasonably simple.
Everything above is Null and void for Windows Server 2016 and 2019. Per Intels documentation:
https://www.intel.com/content/www/us/en/support/articles/000005667/ethernet-products.html
“Intel ANS isn’t supported on Windows Server 2016*/2019*. Microsoft Windows Server 2012 R2* is the last Windows Server operating system version that supports Intel ANS.”
So to those claiming this is an option for any OS above 10/11, please stop making this seem so easy.
The one off variables make this completely unsupportable.
Back to Windows Server 2012 R2 I go!
Thank you very much for How to Configure Multiple VLANs on Windows Server 2022/2019/2016. i wanted to use 25Gbps on one port for two vlans FOR HOST, and this actually works. also, can add virutal adapters as external vswitches, so it works for VM too. just great
Realtek ethernet diagnostic utility does not work on windows 11. it launches yes. but it does not show any of the options to change anything. can only look at general and about.
I can confirm that this worked for me. Downloaded the drivers from realtek website. The ethernet diagnostic utility must be run as administrator. I was able to create 4 Realtek virtual Adapters and they are picking up the correct tags from my switch. Only major issue was that driver disables TCP/IP and Microsoft Client services on the ‘root’/physical adapter by default. Re-enabling them allowed me to again communicate on the default/native VLAN again.
Minor Issue: The diagnostic utility is really wonky and caused device manager to go a bit crazy every time it added an adapter. Giving it about 60 seconds each time to settle down and everything just works.
Is there cmd command to show VLAN IP on already confiogured NIC.
I believe the utility will work only if you have the Realtek drivers installed, as opposed to the generic Microsoft drivers.
“Intel recently released new network adapter drivers and the Intel PROSet adapter configuration tool for the latest builds of Windows 10 and 11. Download and install the latest Intel driver and Intel PROset utility.”
Where can I find the Intel driver and Intel PROset utility with ANS support for windows 11 ?
Unfortunately, Intel has discontinued PROSet/ANS support for Windows 11 and later versions.
Intel now recommends using the built-in Windows tools or Ethernet Cmdlets for modern systems (https://www.intel.com/content/www/us/en/download/19814/ethernet-cmdlets-for-microsoft-windows-for-powershell.html)
It is possible to configure VLAN Tagging on windows 11 without Proset drivers. You can do this by installing Hyper-V role on Win 11. With the Hyper-V platform installed, you can add virtual switches and adapters that will allow tagging specific VLANs
MS is really behaving rediculous… I have Win11 Pro and need to connect one NIC to 3 VLANs from an external switch trunk. This is in order to minimize port consumtion on the external Switch. Man! I have a professional Workstation and a PROfessional OS (I thought!). The WS has a built-in Marvell AQtion 10G NIC. 10G is more than enough for my three VLANs to share the bandwidth. I tried it with Hyper-V and virtual switch + vNICs. BUT: one of my VLANs ist used for Audinate’s “Dante Virtual Sound Card” and this application is very picky because of PTP-timing sensitivity. So It dows not show any of the vNICs by design. WRF? I have to use additional HW-NICs and 3 wires that consume 3 precious access-ports on the expensive external switch. And all the HW is serious stuff not toys. But MS is spoiling my plan. I t is kind of Windows-Home-Feeling on a so called “professional Edition”.
So what I have had to do is use only NICs from realtech. And then only use the win 10 driver.
I can then use the realtech management software to make multiple vlans on the one NIC.
This also does work with Intel NICs but Intel has stopped updating/supporting the network utility from my understanding.
But I’m with you. How can windows professional editions not have what would be basic functionality in my view as standard.