SR-IOV (Single Root Input/Output Virtualization) is a host hardware device virtualization technology that allows virtual machines to have direct access to host devices. It can virtualize different types of devices, but most often it is used to virtualize network adapters. In this article, we’ll show you how to enable and configure SR-IOV for virtual machine network adapters on a Windows Hyper-V server.
SRV-IOV is supported in Hyper-V 2012+, including the free Windows Hyper-V Server. We won’t dive into SR-IOV principles in detail, since you can get full guidelines on the Web. For a practical understanding, it is enough to know that SR-IOV allows to provide direct access to physical network adapters of the host for VMs and bypass traffic processing by Hyper-V virtual switches. One physical network adapter in SR-IOV mode can serve multiple virtual machines.
Due to using SR-IOV for Hyper-V virtual machines, you will be able to significantly increase throughput, reduce network latency and CPU load caused by the processing of network traffic by Hyper-V software.
In order to enable SRV-IOV on your Hyper-V host, some requirements must be met.
First of all, enable SRV-IOV and virtualization support in your server’s BIOS. Depending on the vendor, the settings may vary.
- Virtualization support: Intel (Virtualization Technology, Intel VT, VT-d, Vanderpool), AMD (SVM, AMD-V)
- IOMMU
- SR-IOV
- ASPM
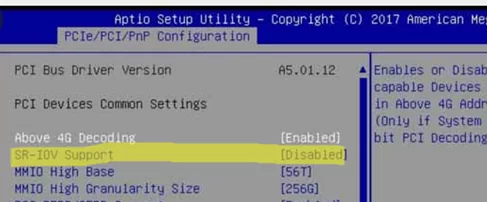
You may not have every item, even no SR-IOV. But it doesn’t mean that SR-IOV is not supported by your server. For example, Supermicro motherboards may not have SR-IOV in BIOS, but there is ASPM disabled by default. If you enable ASPM and virtualization support, SR-IOV will be enabled automatically.
You can make sure if SR-IOV is supported by your Hyper-V server at the hardware level using PowerShell:
(get-vmhost).IovSupport
 (get-vmhost).IovSupportReasons

If your server supports the feature, IovSupport will contain True. If it doesn’t, it will be False. In this case, the IovSupportReasons item shows the reason why SR-IOV is not supported. Usually, the reason is described in detail. Here are the typical reasons:
- The chipset on the system does not do interrupt remapping, without which SR-IOV cannot be supported.
- SR-IOV cannot be used on this computer because the processor does not support second-level address translation (SLAT). For Intel processors, this feature might be referred to as Extended Page Tables (EPT). For AMD processors, this feature might be referred to as Rapid Virtualization Indexing (RVI) or Nested Page Tables (NPT).
- SR-IOV cannot be used on this system as the PCI Express hardware does not support Access Control Services (ACS) at any root port. Contact your system vendor for further information.
- To use SR-IOV on this computer, the BIOS must be updated because it contains incorrect information describing the hardware capabilities. Contact your computer manufacturer for an update.
- The chipset on the system does not do DMA remapping, without which SR-IOV cannot be supported.
- SR-IOV cannot be used on this system as it has been configured to disable the use of I/O remapping hardware.
- To use SR-IOV on this system, the system BIOS must be updated to allow Windows to control PCI Express. Contact your system manufacturer for an update.
- Ensure that the system has chipset support for SR-IOV and that I/O virtualization is enabled in the BIOS.
- SR-IOV cannot be used on this system as it is reporting that there is no PCI Express Bus. Contact your system manufacturer for further information.
The full output of the get-vmswitch | fl *iov* command contains some useful information. For example:
IovVirtualFunctionCount : 6
IovVirtualFunctionsInUse : 3
The numbers show how many IOV virtual devices are available and how many of them are used by virtual machines.
When creating a Hyper-V virtual switch, check the SR-IOV support option — Enable single-root I/O virtualization (SR-IOV).
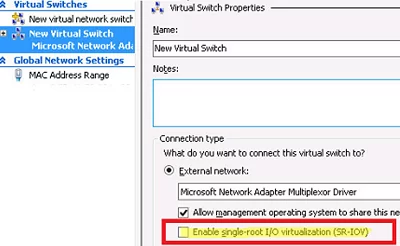
Or enable the EnableIOV option when creating a virtual switch using PowerShell:
New-VMSwitch -Name "VMNetExt" -NetAdapterName "Ethernet 2" -EnableIov 1
If SR-IOV is supported by a hypervisor host, it doesn’t mean that it will work on a specific virtual switch. The switch must be bound to a network adapter with SR-IOV support.
There is another important thing. A motherboard may have multiple network adapters, but SR-IOV may be supported only by some of them. Moreover, if SR-IOV is supported by an adapter according to its datasheet, it doesn’t mean that it is working on your motherboard.
So, after you have configured a switch, check it using the command:
get-vmswitch | select IovSupport, IovSupportReasons, IovEnabled
The IovEnabled option shows if SR-IOV is enabled.
You can display a list of network adapters with SR-IOV support using PowerShell:
Get-NetAdapterSriov | sort name | ft Name, InterfaceDescription, SriovSupport
After you have enabled SR-IOV on the hypervisor and virtual switch levels, you can enable it on your virtual machines (it is disabled by default). You can find Enable SR-IOV option in the Hardware Acceleration section of your virtual machine network adapter.
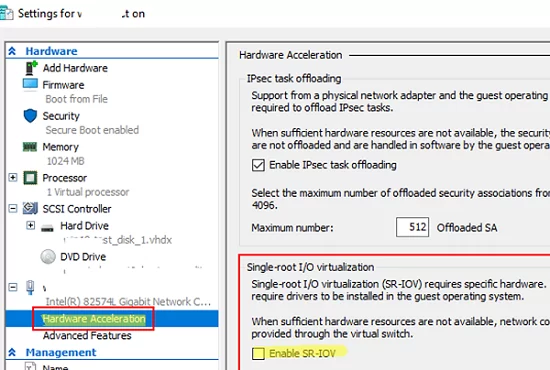
Or you can enable SR-IOV for the virtual machine’s network adapter via PowerShell:
Set-VMNetworkAdapter -VMName mytestvm -VMNetworkAdapterName “Network Adapter” -IovWeight 100
You can find all SR-IOV errors and events in Hyper-V with a separate Event Viewer log:
Application and Services Logs -> Microsoft -> Windows -> Hyper-V-SynthNic -> Admin.
If SR-IOV is working properly, you will see the following entries in the Event Viewer at the virtual machine startup:
12597 Network adapter (%NIC_ID%) Connected to virtual network.
12582 Network adapter (%NIC_ID%) started successfully.
12584 Network adapter (%NIC_ID%) allocated a virtual function.
12588 Network adapter (%NIC_ID%) assigned a virtual function.
SR-IOV boosts the network performance of virtual machines and a hypervisor. You may see the highest results of using SR-IOV on Hyper-V hosts with high traffic of virtual machines causing heavy load on host CPUs.
1 comment
SR-IOV is compatible with SET (SWitch Embedded Teaming).