When you perform a clean installation of Windows 11 or the latest builds of Windows 10, the Setup wizard prompts you to sign in with your online Microsoft account. If your computer is on a network that is isolated (disconnected) from the Internet, you don’t have a Microsoft account, or you don’t want to use one, you won’t be able to log on to your device.
In Windows 11 21H2, a Microsoft account was only required for the Home edition of Windows. The presence of an Internet connection and a Microsoft account is indicated in the system requirements for this Windows edition. However, already in Windows 11 22H2, the dialogue for creating a local account is now missing in the Pro edition. In this article, we will show you how to install Windows 11 22H2 with a local account (without using a Microsoft account).
If your computer is connected to the Internet, but you still want to use a local Windows 11 account:
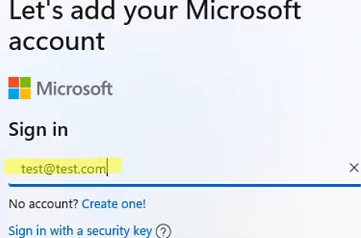
- When the Windows 11 installer asks you for a Microsoft account, enter the email address [email protected]. In the next step, specify the password as test;

- This should bring up an error:
Oops, something went wrong
Someone has entered an incorrect password for this this account too many times. To help protect you, we’ve temporarily locked your account – please try again later.
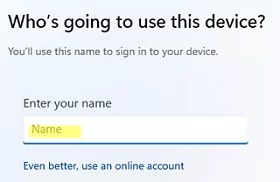
- Click on the Next button and a window will appear asking you to create a local Windows user account;
- This method allows you to skip the Microsoft account creation step in both Home and Pro editions of Windows 11.

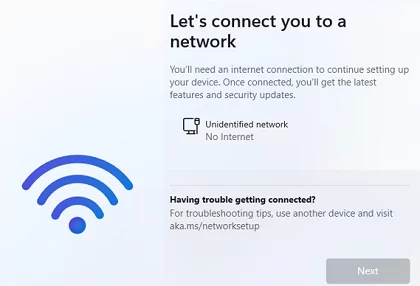
In case your computer is on an isolated network (not connected to the Internet), you can skip the Microsoft account credentials prompt and go straight to the creation of a local Windows user:
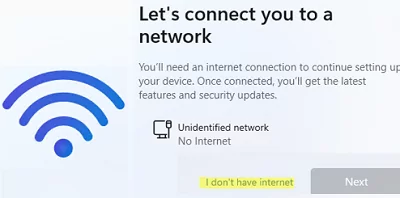
- If your computer isn’t connected to the Internet, the Out Of Box Experience (OOBE) wizard won’t allow you to complete the installation of Windows 11 22H2 without a network connection;
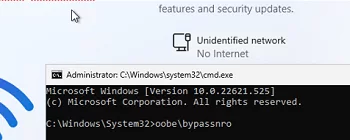
- You can bypass this screen. Press
Shift+F10to open the command prompt; - Run the
oobe\bypassnrocommand and your computer will restart automatically;
- The “I don’t have Internet” button should now appear in OOBE. If you click it, then select “Continue with limited setup“, and you will be able to create a local Windows user in the next step.
If you use the Rufus tool to create a Windows 11 installation USB drive, you can check the Remove requirements for an online Microsoft account box. This also allows you to skip the Microsoft Account prompt in Windows Setup and install Windows 11 using a local account.
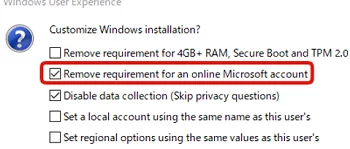
Remove requirement for 4Gb+ RAM, Secure Boot and TPM 2.0).You can also create an autounattend.xml response file and copy it to the root of your Windows 11 installation media.
<?xml version="1.0" encoding="utf-8"?>
<unattend xmlns="urn:schemas-microsoft-com:unattend">
<settings pass="specialize">
<component name="Microsoft-Windows-Deployment" processorArchitecture="amd64" language="neutral" xmlns:wcm="http://schemas.microsoft.com/WMIConfig/2002/State" xmlns:xsi="http://www.w3.org/2001/XMLSchema-instance" publicKeyToken="31bf3856ad364e35" versionScope="nonSxS">
<RunSynchronous>
<RunSynchronousCommand wcm:action="add">
<Order>1</Order>
<Path>reg add HKLM\SOFTWARE\Microsoft\Windows\CurrentVersion\OOBE /v BypassNRO /t REG_DWORD /d 1 /f</Path>
</RunSynchronousCommand>
</RunSynchronous>
</component>
</settings>
</unattend>
The installer will apply this answer file and prompt you to create a local Windows user.