In older Windows Server versions prior to Windows Server 2016, you could create a failover cluster only between the servers in the same Active Directory domain. The new version allows to create two- (or more) nodes failover cluster between servers joined to different domains, and even between workgroup servers (not AD domain joined) – a so-called Workgroup Cluster.
Obviously, Windows Server 2016 has to be installed on all cluster nodes. The following cluster scenarios are supported:
| Service | Status | Comment |
| SQL server | Supported | It is recommended to use the integrated SQL Server authentication |
| File server
| Supported, but not recommended | Kerberos authentication for SMB is not supported |
| Hyper-V
| Supported, but not recommended | Live Migration is not supported, only Quick migration is available |
| Message Queuing (MSMQ) | Not supported | MSMQ stores its properties in Active Directory
|
On all future cluster nodes, you have to:
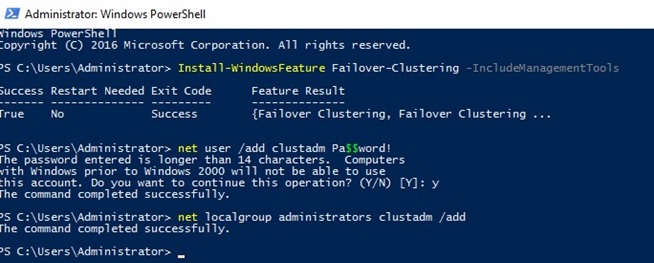
- Install Failover Clustering role:
Install-WindowsFeature Failover-Clustering –IncludeManagementTools< - Create a local account with the administrator privileges (or use the integrated administrator account) with the same passwords:
net user /add clustadm Sup33P@ssw0Rd!
 net localgroup administrators clustadm /add
- If the error Requested Registry access is not allowed appears, edit the remote UAC parameter in the registry (this parameter enables the remote access to the administrative shares):
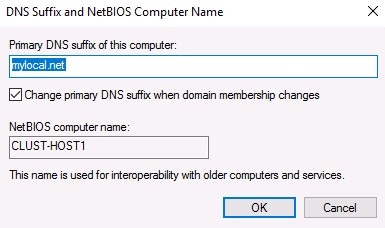
New-ItemProperty -Path HKLM:\SOFTWARE\Microsoft\Windows\CurrentVersion\Policies\System -Name LocalAccountTokenFilterPolicy -Value 1 - Set the same primary DNS suffix. It enables the cluster servers to communicate each other by FQDN names.

- Uncheck Register DNS connection addresses in the Advanced TCP/IP Settings.

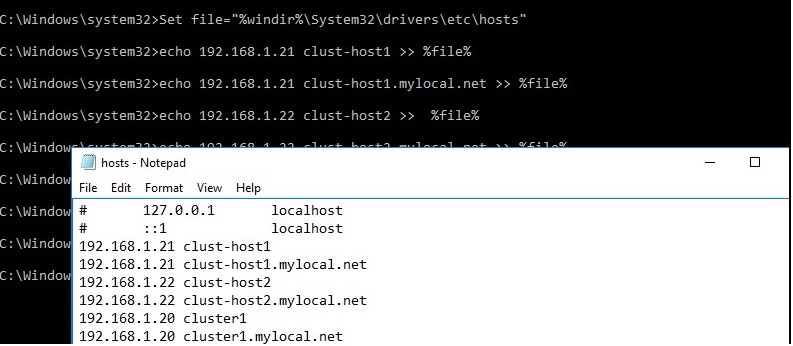
- Make changes to hosts file so that the servers could resolve the names of other cluster members and the name of the cluster (including FQDN names). You can add the names to c:\windows\system32\drivers\etc\hosts as follows:
Set file="%windir%\System32\drivers\etc\hosts"
 echo 192.168.1.21 clust-host1 >> %file%
 echo 192.168.1.21 clust-host1.mylocal.net >> %file%
 echo 192.168.1.22 clust-host2 >>  %file%
 echo 192.168.1.22 clust-host2.mylocal.net >> %file%
 echo 192.168.1.20 cluster1 >> %file%
 echo 192.168.1.20 cluster1.mylocal.net>> %file%

To validate cluster nodes, you can use the following command:
test-cluster -node "clust-host1.mylocal.net"," clust-host2.mylocal.net"
To create a cluster using PowerShell, run this command:
New-Cluster -Name cluster1 -Node clust-host1.mylocal.net, clust-host2.mylocal.net -AdministrativeAccessPoint DNS -StaticAddress 192.168.1.20
Now you can check the status of the cluster and its components with the help of get-cluster and get-clusterresource cmdlets.
To connect (and remotely manage) the cluster through a GUI, you need to use Failover Cluster Manager snap-in (included in RSAT for Windows 10).
Now, using Connect to cluster menu item, you can connect to the created cluster. If the cluster has even number of servers, you will have to configure a witness resource. Note that you cannot use the SMB shared folder as a quorum witness. Two modes are supported: Disk Witness — a shared disk (with the simultaneous access to it from both nodes), or Cloud Witness — a cloud disk resource in Azure.
3 comments
What is the purpose of creating the user “clustadm” ?
This local account needs to be provisioned on the all cluster nodes (with the same password) for mutual authentication in order to add nodes to the cluster or to create a new WSFC cluster.
When I follow this step:
Uncheck Register DNS connection addresses
.. the machine loses network access entirely, and since it’s a VM I have to reimage it. Any idea why this happens?