In Windows, you can attach (mount) virtual hard disk files in the VHD and VHDX formats directly from the Disk Management console. Windows administrator can mount a VHD or VHDX image file in the File Explorer and assign a drive letter to it. However, these virtual hard disks must be mounted manually each time Windows is restarted.
In this article, we will configure the task to automatically mount VHD/VHDX files when Windows starts.
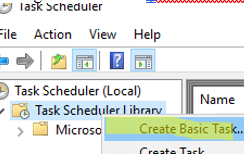
- Open the Task Scheduler management console (
Taskschd.msc); - Create a new Basic Task;

- Set the task name:
AutoMount_VHDX_G - For Trigger, select When the computer starts;
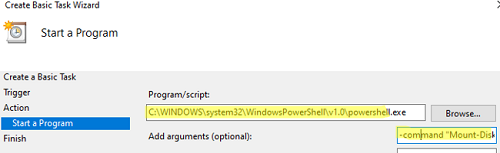
- Action -> Start a program ;Program/script:
C:\WINDOWS\system32\WindowsPowerShell\v1.0\powershell.exe
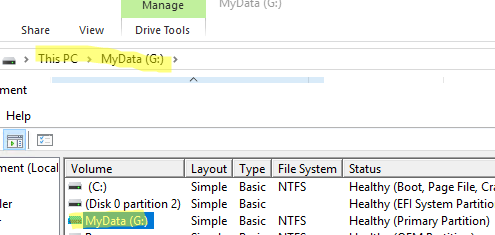
Add argument:-command "Mount-DiskImage -ImagePath C:\vhd\lab_data.vhdx –PassThru | Get-Disk | Get-Partition | Set-Partition -NewDriveLetter G"
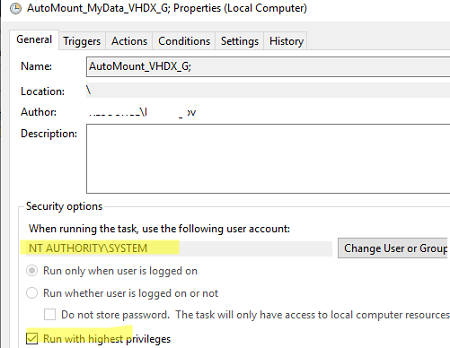
This PowerShell command mounts the C:\vhd\lab_data.vhdx file and assigns the drive letter G: to the first image partition. Learn more about managing partitions and drives with PowerShell. - Open the task properties and specify that it should run as NT AUTHORITY\SYSTEM (Change User or group ->
SYSTEM); - Restart Windows and check to see if the VHDX disk is automatically mounted.
If you want to mount the VHDX to a folder instead of a separate drive, change the PowerShell command code as follows:
Mount-DiskImage -ImagePath C:\vhd\lab_data.vhdx –PassThru | Get-Disk | Get-Partition | Add-PartitionAccessPath -AccessPath "C:\LAB"
15 comments
Simple VHD Manager is portable freeware which helps VHD users simplify some of these operations:
– You can easily create VHD/VHDX files
– You can attach and detach VHD/VHDX/ISO files via drag and drop
– You can permanently attach a virtual hard disk in Windows 10 , Windows 8,1 , Windos 8, Windows 7
– You can easily add and/or remove VHD/VHDX/ISO files to the boot menu
http://www.sordum.org/8705/simple-vhd-manager-v1-1/
As always, answer is in the comments, thank you.
It broke my computer…
Virustotal found a couple of trojans in Simple VHD Manager
Yes all of them from China 🙂
Nice Article, thanks
Exactly what I was looking for; unfortunately it didn’t work for me!
I found that letting the Task Scheduler call diskpart with the added arguments did nothing for some reason: it executes the task on start-up, but without any results.
The work-around: In C:\Scripts I added another file ‘diskpart.cmd’ with the single line
diskpart /s “C:\Scripts\attach_vhd.txt”
In the Actions tab, I then simply called ‘C:\Scripts\diskpart.cmd’, instead, without any arguments.
This fixed the issue, although i have no idea what the problem was.
Thanks to Herbert and you others!
This has been a big problem for me! I did not get it to work, and have spent lot of time trying to solve it. But now it works!
I used a cmd-file “Attach_vhd.cmd” with the contents:
diskpart / s “C: \ Scripts \ attach_vhd.txt”
The file attach_vhd are as described above:
select VDisk file = “F: \ imagedisk.vhdx”
attach VDisk
assign letter = M
It works! Beware the sign ” that must be correct (Ascii 34), it can maybe be wrong when copying from the web-site.
“Beware the sign ” that must be correct (Ascii 34), it can maybe be wrong when copying from the web-site.”
Thank you for this tip! When I copied and pasted my Action argument into Notepad, I could see that the problem was with the incorrect quotation marks. After correcting this everything seems to be working. Finally!
Get rid of the quotes in the argument and this procedure works fine. Should be: / s C: \ Scripts \ attach_vhd.txt with no quotes. Delete the spaces in my argument if you’re copying and pasting . It also helps if you configure for Windows 7, if you’re using 7. And delay the task for one minute while everything else starts up.
Great article, simple and yet with all the necessary detail.
Thanks a lot, I happened to find this problem just yesterday when I rebooted a client’s machine and a VHDx wasn’t mounted. What a life saver 🙂
Cheers,
Ivo Pereira
Portugal
Ran into a bunch of issues with this article. Then found this one:
https://angler.wordpress.com/2010/03/11/windows-7-auto-mount-vhds-at-startup/
Worked without any issues at all and a little less complicated
You’re better off using PowerShell.
Manually mount the VHDX in Disk Management (diskmgmt.msc) and assign it a drive letter and volume label. Once you do this it will remember the drive letter and volume name the next time it is mounted.
Then create a .ps1 file and enter
Mount-DiskImage -ImagePath ‘D:\VHDS\MyVirtualDrive.vhdx’ -StorageType VHDX
amending where necessary for the file name and if it is different file extension such as VHD or ISO
Then create a scheduled task, set the trigger to be at startup. Set the action to run Powershell. In the arguments box add -File “D:\VHDS\AutoMountVHDX.ps1”
I need to mount multiple vhd(x) before startup:
Windows11.vhd, ProgramFiles.vhd, Data.vhd
Some solutions(e.g. : windows Task, windows services) are not early enough.
I need to mount multiple vhd(x) as early as possible, because some programs(in ProgramFiles.vhd) are also be executed very early on startup.
—————————————————————————————-
Can i mount multiple vhd(x) by using BcdEdit commandline?such as:
Windows Boot Loader
——————-
identifier {default}
device vhd=[D:]\windows11.vhd
path \Windows\system32\winload.efi
description Windows 11
……
osdevice vhd=[D:]\windows11.vhd
systemroot \Windows
……
otherdevice1 vhd=[D:]\ProgramFiles.vhd
otherdevice2 vhd=[D:]\Data.vhd
otherdevice3 ……
——————————————————————————————
Or are there any other solutions?
This works nicely on my Windows 11