This article describes configuring Windows to boot from a hard disk with a GPT partition table on a computer with classic (non-UEFI) BIOS firmware or in Legacy BIOS mode.
The Windows operating system on a BIOS-based computer can only be booted from an MBR disk, not from a GPT. To get around this restriction, we are going to create a bootable USB stick with an MBR partition table that will start the EFI Windows bootloader on a GPT disk. This allows you to use the full capacity of large hard drives in Windows (the maximum available partition on the MBR table is limited to 2 TB). The guide can be used to boot either Windows 10/11, Windows 7, or Windows 8.1.
All versions of Windows support GPT disks, but only 64-bit versions of Windows installed on computers that support the modern UEFI specification can boot from GPT volumes. In this article, we will use an external USB flash drive or small-capacity SD card as an MBR boot loader, which will provide the initial boot of the system and pass the control to the main Windows bootloader on the GPT volume.
We are going to consider two scenarios:
- If Windows is already installed: you will need to convert the disk partition table from MBR to GPT (without data loss) and move the Windows boot manager and BCD configuration file to an external USB stick;
- If you want to perform a clean installation of Windows: you can first prepare a boot USB flash containing the open-source Clover boot manager and run Windows installations in UEFI mode from it.
Converting MBR Partition Table to GPT without Loss Data in Windows
If you have Windows installed on a BIOS-based computer with an MBR disk, you can use gptgen tool to convert the partition table to GPT without losing data. The gptgen tool allows you to convert the partition table on the fly, without having to delete the existing partitions.
Download the Gptgen archive and extract it to your computer:
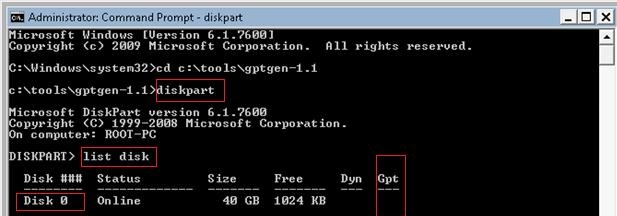
- Open the elevated command prompt and run the command:
diskpart - List available drives:
list disk
- In this example, there is one 40 GB disk with 0 index (Disk 0) available. As you can see, this disk has an MBR partition table (the Gpt column is empty);
- Convert the partition table of Disk 0 from MBR into GPT using the command:
gptgen.exe -w \\.\\physicaldrive0A warning will appear stating that the developers do not guarantee that you will be able to boot from a partition on this disk after it has been converted to GPT.
gptgen.exe: Partition table converter v1.1
Boot: 1, Type: 0×7, Start: sector 2048, Length: 204860 sectors
Boot: 0, Type: 0×7, Start: sector 206858, Length: 83685636 sectors
WARNING: Boot partition(s) found. This tool cannot guarantee that
such partitions will remain bootable after conversion.
Do you want to continue? [Y/N] y
Writing primary GPT and protective MBR to LBA address 0…
Writing secondary GPT to LBA address 83786657…
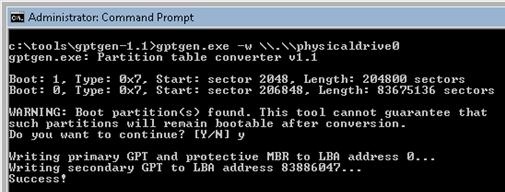
The partition table has been successfully converted to GPT.
Move the Windows Bootloader to a USB Flash Drive
Restart Windows and make sure that the BIOS-based computer cannot boot from a GPT partitioned disk. Connect a small, empty USB stick or SD card to your computer.
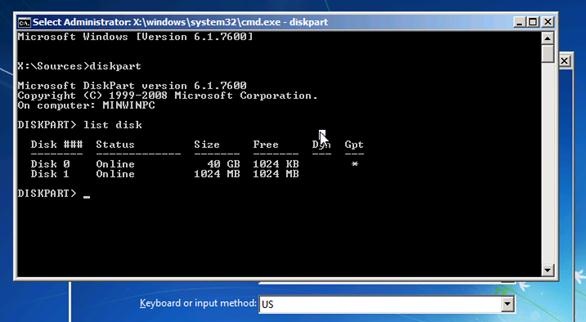
Then boot your computer from an external boot drive with WinPE (this can be a USB drive containing a Windows 10/11 installation image, or any LiveCD). Press the Shift + F10 key on the Windows Setup screen to open the command prompt:
- Run the command:
diskpart - List available drives:
list disk. In this case, the system has two disks: Disk 0 is a 40 GB hard drive with the OS installed (* in the Gpt column indicates that this disk contains the GPT partition table) and Disk 1 is a 1 GB USB flash drive;
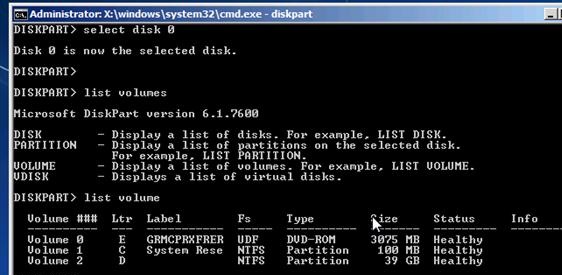
- Let’s look at the disks, partitions, and assigned drive letters. Select your fixed local disk (HDD/SSD):
select disk 0and list volumes on it:list volume According to the size of the volumes, you can see that Windows is installed on Volume 2, which is assigned the drive letter D:. It may be different from the system drive letter shown in Windows itself;
 - Create a boot partition on the external USB stick:
select disk 1(select your USB flash drive)
clean(this command deletes all data on the disk)
create partition primary size=1000(create a primary partition of 1GB on the USB drive)
format fs=fat32(format the partition with the FAT32 file system)
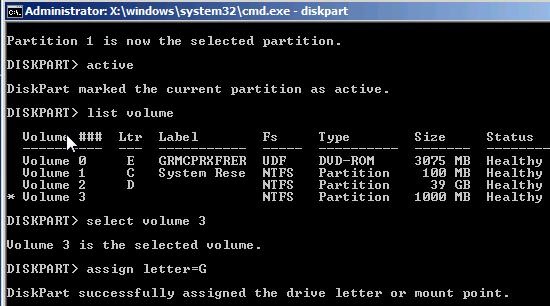
select partition 1(select the first partition on the USB flash drive)
active(mark the partition as active)
list volume(display the list of volumes again. In this example, you can see that the volume we have created has an index 3)
select volume 3(select it)
assign letter=G(assign any free drive letter to it, for example, G:)

list volume(check that the G: drive letter is assigned to the partition on the USB drive)
exit(quit diskpart) - Copy the Windows boot environment files from the system volume to the USB flash drive:
bcdboot d:\Windows /l en-us /s g: - Write the bootmgr (Windows Boot Manager) boot code to the MBR (Master boot record) of the USB flash drive:
bootsect /nt60 G: /mbr /force - Reboot the computer;
- Go to the BIOS settings, change the boot order, and assign your USB flash drive as the primary boot device.

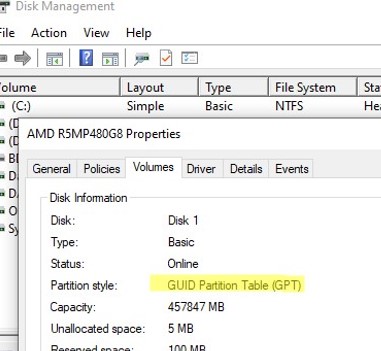
If you have done everything correctly, your Windows should boot. Open the Disk Manager (diskmgmt.msc) and check that the GPT partition style (GUID Partition Table) is specified in the system disk properties on the Volumes tab.
How to Install Windows on GPT Partition on Legacy BIOS Computer
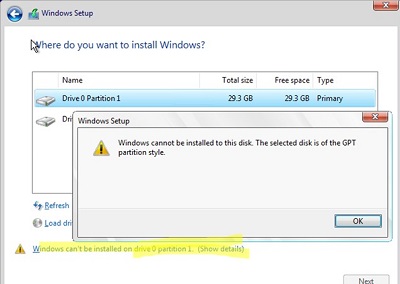
If you try to install Windows on a GPT drive on a non-UEFI computer (with BIOS firmware), the Windows Setup returns an error:
Windows cannot be installed to this disk the selected disk is of the GPT Partition Style
Diskpart
select disk 0 (if there is only one hard disk in the computer)
clean (clear disk)
convert gpt (convert the partition table to GPT)
exit
To install Windows 11/10/8.1/7 directly to the GPT drive on a BIOS-based computer, you can create a separate bootable USB flash drive with the third-party Clover bootloader. In this case, the Clover boot loader will act as a pseudo-UEFI boot manager, allowing you to boot a UEFI operating system from an MBR/CSM device. The following boot sequence will be used: grub4dos –> Clover –> UEFI .EFI boot files –> UEFI OS.
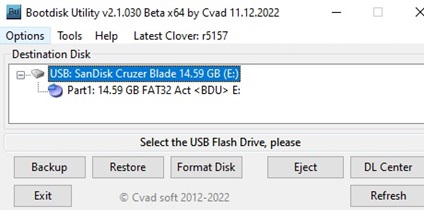
To create an external USB flash drive with the Clover bootloader, you can use the Boot Disk Utility (BDUtility.exe).
- Run the tool on any Windows computer;

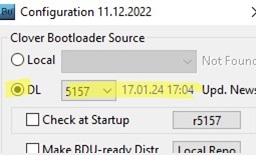
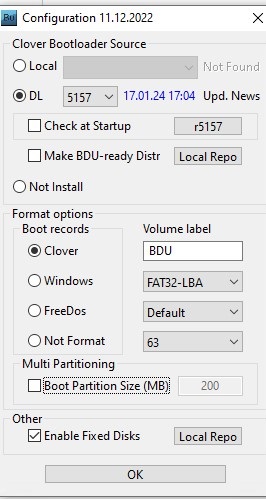
- Select Options -> Configuration. You can install the Clover bootloader from local files (Local) or download the latest version from the website (DL). In the second case, click Check Now. Select the latest release from the list of available versions of Clover;

- Set the format options: Boot record:
Clover,FAT32-LBA, first sector63(some old BIOS versions may require this parameter to be changed to4096). You can specify the size of the boot partition on the flash drive (
Boot partition size). If you create multiple partitions on a USB flash drive, older versions of Windows may only see the first partition; - Save the changes, select your USB drive, and click Format. The tool will format your USB stick, then it will write the boot0 file to the MBR, boot1f32alt to the PBR, and copy the Clover boot manager environment files;If you are installing Windows on an NVME SSD disk, you will also need to copy the NvmExpressDxe.efi driver to the following folders:
Efi\CLOVER\drivers\BIOSandEfi\CLOVER\drivers\UEFI. - Prepare another USB flash drive and write the Windows installation image to it (Creating a UEFI bootable USB flash drive with Windows 10/11 using Media Creation Tool or Rufus);
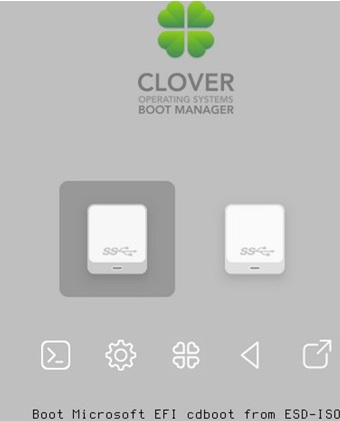
- Boot your computer from a USB flash drive containing the Clover bootloader. In the Clover interface, select to start the boot from a USB stick with a Windows installation image (
Boot Microsoft UEFI cdboot from ESD-ISO). A normal Windows installation should then begin;
- When the OS installation is complete, you can remove the installation USB flash drive with Windows. To boot locally installed Windows, select Boot Microsoft EFI Boot from EFI in the Clover Boot Manager menu.You can change Clover’s default boot device and timeouts in the
\EFI\CLOVER\config.plistfile.
Edit the options:
Boot delay:<key>Timeout</key> <integer>5</integer>
And the disk ID to boot from by default:
<key>DefaultVolume</key>
<string>LastBootedVolume</string>
Now your USB stick with Clover must always be connected to your computer to boot Windows on your BIOS computer.
61 comments
Sir after completing the process successfully can I now remove the pendrive and use it as a removable media, or do I have to insert it every time for Windows to function
You must insert your Flash Drive into computer every time at Windows boot.
stick can be removed after the operating system is booted.
Sir can you please guide me how to rollback over,its inconvenient to carry my pen drive all the time,can you please help me to how to get things back to they were before or share a link on how to,and please give me a step by step approach sir
You can use something like http://reboot.pro/topic/19516-hack-bootmgr-to-boot-windows-in-bios-to-gpt/page-2#entry184489 to get rid of the flash drive. Post in http://www.sevenforums.com/installation-setup/320700-boot-windows-7-8-gpt-bios-system-no-hybrid-mbrs-duet.html if you want anymore help.
Hey,
I wrote : http://www.sevenforums.com/installation-setup/320700-boot-windows-7-8-gpt-bios-system-no-hybrid-mbrs-duet.html , and some of this stuff sounds very familiar to me, like my own words.
*IF* you picked it up from there, I request you to leave a link back to my original article. If you found this out from somewhere else, no worries, though maybe you should attribute that too. But if you found this out on your own, I’ll be quite interested to know what other experiments you’re up to. Check out http://reboot.pro/topic/19516-hack-bootmgr-to-boot-windows-in-bios-to-gpt/ for many more adventures in this area.
But the explanation is brilliant, and very well done, by no means am I suggesting that you lifted the entire thing off anywhere : I have been searching, and this is the first newbie friendly explanation of the procedure.
Thanks 😉
Yes, articles similar in many ways, but your article I see for the first time. Sorry.
Here I published the results of wy own experiments.
Is it somehow possible to push an Windows Image onto the Drive without wiping my complete Linux gpt partitions?
Or without having to install first in bios mode and then to convert it.
Of course you can : try some of the steps in http://technet.microsoft.com/en-us/library/hh825089.aspx
Basically execute the commands given in the .bat file manually at the command prompt of Windows setup, Windows PE, or another windows installation. If you want more detailed instructions, drop a comment, and I’ll try to find a detailed tutorial.
This kinda looks interesting, but all i have is the normal Windows Iso.
Maybe i will backup and just install Windows and Linux from scratch.
Yeah, so in Linux, create 2 new partitions formatted as NTFS, one small (~100MB) and one for holding Windows itself.
Then burn and enter windows setup through normal BIOS.
After reaching the point where you have to select “Install Windows” or “repair windows”, choose the second option. Press Shift + F10 which opens a command prompt.
Then type diskpart and Enter. Find the drive letter of the 2 NTFS volumes created above, say G and H.
On your DVD (say D:) there will be D:\sources\install.wim . Use something like http://forums.mydigitallife.info/threads/28001-Installing-from-wim-files-directly-using-imagex-exe to apply the image to H drive. You can also use http://www.windowsnetworking.com/articles-tutorials/windows-7/Deploying-Windows-7-Part2.html.
Then just follow the rest of the instructions on this blog.
So now i have setup 2 ntfs partitions and am in the recovery. But how can i Dsim windows 8.1 to the disk? Or should i use imagex.exe which i can download somewhere.
And thank you for your great and fast support
I just tried to do a clean Win 10 install on an older machine (BIOS but supposedly UEFI capable) with the same USB I used to install my newer (UEFI) machine but the USB won’t boot at all. I guess this is the method I will need to use (Although planning to use a secondary hd instead of a flash drive for the boot loader). My question is, will this make the windows install a UEFI install or a legacy install on a GPT disk (Assuming there’s more to a UEFI Windows install than just the partition type?). Anything I need to do during install to make it a UEFI install (after fixing the boot loader)?
If your machine is suspected to be UEFI capable, then I recommend you test it out with a GPT drive and windows.
An installation by this method is a BIOS install, just that it’s able to boot from GPT… Functions like booting into the machine firmware configuration (“BIOS Screen”) directly from within windows require actual UEFI firmware.
Nothing else will be required after fixing the bootloader — Windows can be booted via either the BIOS entry point, or the UEFI entry point. Just the bootloader is the missing part in this BIOS-GPT configuration.
I tried to convert MBR into GPT by using the gptgen, but i got the message “unable to auto-determine the block size of the disk. Please enter the block size by hand to continue.”
I am using Seagate Barracuda 3Tb harddisk.
Now please guide me.I am stuck. I tried to search about block sizes but could not. If any solution please reply as soon as possible. Thank you and waiting for your response.
You can determine block size on the NTFS disk with help:
fsutil fsinfo ntfsinfo c:\
The Bytes Per Cluster show allocation unit (block size).
open a CMD console in administrator and the block size will be auto detected
Nice explanation…
Does this work with RAID? I.e – can i convert one of my Raid 1 drives to GPT, expand the space and let it rebuild the other drive?
Gptgen.exe will give an error from a x64 recovery disc: “The Subsystem needed to support this image type is not avalible”
So it’s only possible to use it froma a x32 recovery disc, it will refuse to get to Recovery options if x64 OS is installed, but it will get to command window pressing Shift-F10. It’s difficult to succeed without this tip, please add it to instructions, thanks!
PS: This comment window is invisible if browser window is too narrow.
Thanks for the useful info!
Why do you use the recovery disk? You can run gptgen directly from the installed Windows.
thanks for guide!
but I sill wonder…. at You wrote:
I did NOT see any step that using “another computer installed Windws” in the guide ?
It is clear that the computer will boot from the USB flash drive.
What I don’t understand is how the system knows to continue loading all the OS and then further work with the OS from the GPT disk, since in the tutorial steps there is no operation to link somehow the booting from the flash drive to the rest of the OS on the GPT disk.
The command <> copies context from actual Windows OS (disk configuration etc.). I tried to re-use USB stick created on one PC to another (both Windows 10 1809) and on the second PC I got boot error. After recreating USB on the second machine, it works perfect.
By the way BitLocker cannot be applied on such disk.
What will happen or how can MBR be converted to GPT if has more than one Windows? All windows are 32Bits. I use Grub2 to boot each one and hide system partitiojs of the others (isolating windows systems). I also have a Linux 32 bits on that disk.
MBR: Grub2
P1: 32GiB NTFS Windows Vista 32 bits (preinstalled without DVD/CD, first sector can not be moved or it will not boot unless fix with a Vista PE optical disk)
P2: 32GiB NTFS Windows 7 32 bits (UpGrade from the cloned Vista, then moved here, and boot dfixed with DVD)
P3: 32GiB NTFS Windows 10 32 bits (UpGrade from the cloned 7, then moved here, and boot fixed with DVD)
P4: Extended
L5: 4GiG FAT32 for fixed size unfragmented pagefile.sys, used by all Windows as virtual memory
L6: 4GiB Linux SWAP
L7: 32GiB Ext4 Linux distro A 32 bits root partition, /boot as folder (own bootloader is …, no need to be grub2)
L8: 32GiB Ext4 Linux distro B 32 bits root partition, /boot as folder (own bootloader is …, no need to be grub2)
L9: 32GiB Ext4 Linux distro C 32 bits root partition, /boot as folder (own bootloader is …, no need to be grub2)
… and so on a lot of Linux distros …
L98: rest GiB NTFS for shared data (videos, music, documents, etc)
L99: 2GiB Ext4 Grub2 files and manually created and manually mantained grub.cfg, just to choose witch bootloader to be loaded or power off (halt) after some seconds if no action taken (PC is prone to power on without reason, for example when i turn on lights on he bath, etc), also holds SystemRescueCD.iso as file to boot from it from Grub2 menu
Not to mention i have less than 120 partitions… HDD size is only 500GiB, do your own maths.
Grub2 version used is grub-2.02_beta3-r1 from the SystemRescueCD 4.9.0
I may think i do not need external boot media (USB / memory card) since i may can use that Grub2 to do the Windows load? Or am i wrong? Actually i am only doing a chain load to the partition (prior to that Grub2 chain load it runs commands to unhide the specific partition and to hide the other Windows partitions).
All Windows are contained in just one partition, no 100MiB extra partitions, etc… each OS is 100% inside its own NTFS / Ext4 partition, that is because i want isolating each Windows system partition, in other words not been able to alter, nor see contents of other windows when one windows is booted… From the Linux, all Windows are unhide prior to boot Linux, so Linux can see and alter all OS (Windows and Linux) systems (just in case it is needed and for ‘cloning’).
I read the Linux gdisk utility can convert MBR to GPT without loose, and also GParted, etc.; only i need how to boot again each Windows, better if possible to do with Grub2.
I also create by my own (not used pre-created images) some USB sticks that are able to boot in old BIOS only (with USB boot option), as well as on mother (U)EFI 64 bits, also in hybrid modes, so it boots well on 32 bits / 64 bits, non EFI and (U)EFI systems… the main trick is to have the stick in GPT and create a FAT32 EFI partition, and also a BIOSgrub partition of 1, 2 or 8MiB size, and of course install Grub2 for both targets, EFI and BIOS. I am able to create if on any 32 bits old PC (i386) and be sure it will also boot on (U)EFI 64 bits,… Grub2 is great for that… it can install the 64 bits boot on a 32 bots only PC.
To install Grub2 i do not use the normal scripts, that are let for the Linux distro own Grub2 bootloader… i use command line tool “grub2-install” to manually install Grub2, then i manually create the file called grub.cfg… it is a lot easier and not prone to mix things with own Linuxn/boot folder bootloader.
Yes, i chain two bootloadrs to load Linux, the main one where i select what OS to boot, then (if Linux) the one that came with that Linux (lio, grub, grub2, syslinux, etc), so i do not mix things… each Linux own bootloader must not see any other OS, so it can be with ‘defaulf’ structure, configuration, etc… no need to mix things… and i gain a simple way to upgrade each Linux, without affecting other OS… so Linux are also isolated on boot… one Linux does not have any entry to boot other Linux / Windos, etc…. i choose that on the main Grub2… cost in time is just 1 extra second on each boot (type to press cursors keys).
Hope someone can help me on how to boot Windows 32 bits from Grub2, when it is on GPT (converted from an MBR).
Also need some tip about, that Windows Vista first sector (i am afraid it is in 2048, not on first sector of next cylinder)… as i said moving the start sector (in MBR mode) requieres an optical disk i do not have… and to have it 100% legally i would need to pay for a whole Widows Vista 32 bits license (mine came pre-installd and i only have legal access to recovery DVDs, no to M$Vista PE one).
Thanks… i will investigate that other way… Having the bcd on a FAT32 at end of disk… and hybrid GPT/MBR disk (GPT protective only on pat of the disk + that FAT32 on the MBR)… inhate the idea of Hybrid GPT, i preffer the Grub2 boot mode… and since Grub2 can mount any partition FAT32, NTFS, Ext4, crypto devices, LVM, etc it may be amway to load the windows bootloader and so chain boot to the GPT partition of that windows.
P.D.: The Linux will not boot… need some fixes on menu.lst and fstab, but i think i can do them with just vi from SystemRescueCd console (or a visual editor if i strart X), etc… also i would not mind to re-install the whole Linux… but Windows re-install ismnot an option (too much work, 10 is an upgrade from 7, 7 is an upgrade from Vista, and Vista is a pre-installed, so no option to re-install it, only recovery DVDs and that empty the whole HDD).
People need to keep in mind that not all bios firmware are able to deal with a GPT drive.
I have a USB Seagate 4 Tb drive that was GPT from the factory and neither of my two
computers would boot with the drive plugged into the USB port.
The machines will freeze at the F2 Enter Setup F10 Boot menu screen and
the only thing that can be done at that point is to turn the power off and turn
it back on.
Once I converted the drive to MBR which kills about 2 Tb of drive space, both systems
will start and boot into the OS as normal with the drive connected.
I’m looking for a BIOS patch to rectify this problem.
This also works for Windows 10 x64 Home Single Language. Imma try it with a slave instead of flash drive to see if it works that way as well. TY
Thanks a lot!!!! This tutorial helped me to create GPT partition of Windows10, in order to dualboot Hackintosh and Win from the same SSD drive (no UEFI support on mobo). After following all steps, I’ve got this:
– To boot macOS I’m using SSD as bootable device, and its been set up as default boot device, so no action required before booting (Clover bootloader installed on EFI partition)
– To boot Win10 I’m using USB flash memory as bootable device (with Win bootloader) and I have to call for bios boot menu every time I want to load Win.
I’d like to know if there’s a way to have everything as described, but without having to use USB flash. I guess bootable usb can be somehow coopied to Clover, in order use Clover boot selection menu to choose between macOS and Win. What do you thing?
I did not have the original OEM ISO but was able to install Windows on my new 4TB drive by making a backup of my old 1TB MBR drive using a windows recovery CD and a backup on my external drive. Once I converted the new 4tb drive to GPT, I could not use the recovery CD to get to the recovery dos commands to make a bootable USB key. I had to put the old 1TB drive back in, then boot into the recovery CD, then make the USB boot key. Then, I swapped back in the 4TB GPT drive, and it all worked!
Thank you.
Now, what is the best way to back up the boot partition? And, should I need to restore it, how can I manage it without the original ISO.
Thanks
You can use any Windows 10 installation media to boot into WinPE environment and run commands. Boot from such a media and press Shift+F10 on the first screen to run cmd,exe
I have completed this successfully on a LSI raid0 with win7 x64. I am now attempting to work out a rock solid process wherein I can BACKUP and RESTORE via disk image the contents of these large 4TB GPT disks using disk imaging softwares. Has anyone successfully worked out a process for doing solid Backups and Restores of data on these GPT drives running on BIOS only booted systems??
[…] https://woshub.com/booting-windows-7-from-a-gpt-disk-using-bios-firmware-non-uefi/ […]
Thanks a lot. I successfully boot to windows on GPT disk with this method.
But I want to know how to use grub2 to boot windows directly from gpt disk, without the need to plug usb drive everytime.
[…] […]
Hi after doing this I’m getting
IRQL_NOT_LESS_OR_EQUAL blue screen error any solution.
could install security montly quality rollup for this machines with memory stick plugged.? how work around that.
You can install monthly Windows security updates on such a computers without any problems.
but the folder download of software distribution keep the microsoft updates saved in the usb memory? if i want create a restore point that save in the usb memory?
I have a pure gpt disk that can also boot using bootloader which is in mbr sector! , i need to be able to boot windows 8 using legacy ( BIOS ) mode and without uefi because my device used to be so laggy on any 64 bit system and uefi support booting 64 bit only , i tried using chameleon bootloader and i have found that it can scan partitions on Pure ( and not hybrid ) GPT disk without UEFI Environment but it can’t boot windows 8 32 bit because of bootmgr problems , is there any alternatives that i can use to boot windows kernel instead of windows bootloader ? and other important question : is the ability of reading GPT partition scheme from bootloader that loaded from MBR Sector because of BIOS support ? or the bootloader drivers ?
Mohamedfaky, you can try using this instructions starting from: “Moving the Windows Bootloader to the USB Flash Drive”. Sytem can boot from small USB FAT32 pendrive. My system has a pure GPT 4TB drive and UEFI is disabled. The USB device has a BOOT folder with a generated BCD pointing to Windows on 4Tb drive, in my case correct BCD is generated by: bcdboot c:\Windows /s L:
(L: is my USB drive letter). USB must have an ACTIVE primary partition and a correct MBR record which can be written with: bootsect /nt60 L: /mbr /force
Thank you, WindowsOSHub. USB boot fix worked for me after I replaced my AM3+ UEFI motherboard with an AM3+ BIOS motherboard. (I wanted to re-use my CPU and RAM for cheap).
The new motherboard could not boot the HDD with Win 10, because of GPT partition.
I downloaded the MSWin10 installation media and made a Win 10 USB boot disk, using another working PC.
I then used the Win 10 USB to boot my new motherboard.
I then transferred the win boot files to another blank USB drive.
Using this new boot USB drive, I restarted PC, and my old Windows booted OK.
Windows then reactivated on line, and all updates went smoothly.
PC will NOT boot windows without the boot USB. But that is acceptable for my desktop.
This is great Instructions for booting GPT (over 2Tb disk) from BIOS (not efi) machine using USB drive. The only downfall of this technic is that I have to redo this USB drive every time I restore image on my computer. But it works! Just boot up from Any bootable CD with access to command line and follow instructions above to create boot USB.
Hybrrnate functionality is still accessible?
I tried, but my machine restarted after the hybernation command. I think I could manage to manually turned it off (removing power before restarting occured), and after that it restored normally when powered on.
question for anybody who might know: i cloned working win7x64 from mbr 1tb evo ssd to mbr 4tb evo ssd partition on bios mobo machine. 4tb ssd already has data on other partitions beyond the 2tb limit (this is of course possible), and the drive would not boot when installed. we know windows can boot a >2tb mbr ssd with the limit, so my question is Does data beyond the 2tb point of the drive cause a boot failure? or should i be looking elsewhere in the cloning process for my boot problem? btw i’m in the process of applying the gpt technique to enable the boot but haven’t gotten it working yet, so question is for troubleshooting knowledge.
JERKSTORE, I guess your 4Tb must be GPT (to be able to use all space). And your w7 is probably MBR. So you should build a pendrive to boot from it and which will continue booting from w7 in 4Tb drive as instructed here.
Thanks so much for this. I have followed the above and all works perfect. Question for you, Is there a reason why we cannot do the above instructions on an fat32 partition of the hard drive instead of a thumb drive?
You can use an internal HD/SSD, but it has to be a MBR one, not a GBT. Then this methode works well.
what about a mbr partition (MAKING IT ACTIVE) on a gpt HD
You can’t have a MBR partition on a GPT drive, a drive is either GPT or MBR, not both.
Of course you can. GPT drives leave the first LBA (LBA0) empty. UEFI “BIOS” ignores LBA0. The MBR partition is written to LBA0 and non-UEFI “BIOS” boots from LBA0. I have been doing this for years to use 4GB+ system drives on older, pre-UEFI, hardware.
While MBR supports installing the OS on an already partitioned Drive, why GPT does not allow the user to instal an already partitioned, blank Drive? Suppose, if I have a GPT partitioned SSD of 1 TB capacity and I am partitioning the SSD into 3 partitions, the first being for the Operating System (Windows 10 64 bit) and two other partitions for Data Storage. Suppose if I need to re-install Windows 10 for any reason, then it won’t allow me to install the OS unless and until I remove all the other partitions on the SSD, in the event of which I have the chance of losing my valuable Data stored in the other partitions. Then what is the point in partitioning the Drive? This problem is not faced in MBR. One can instal the Operating System without affecting/removing the other partitions in an MBR partitioned Disk. This is the main drawback of GPT partition. GPT partition does not allow the user to instal Windows 10 64 bit on an already existing Disk partition. The user must remove all partitions and Windows 10 is taking up the task of partitioning the Drive while installing the OS, in which case, the Data contained in the other partitions are lost. Please clarify if this problem is a creation of Microsoft WINDOWS 64 Bit Operating System OR if it is a problem of the GPT system of partitioning? If there is any solution for this? i.e, one must be able to install or re-install the Windows 10 64 bit OS on an already existing partition on a large sized SSD with GPT Partitioning System which contains other partitions with Data. The BIOS supports only EFI which supports GPT only. How to instal the OS without losing the Data on other partitions or how to instal Windows without affecting and/or removing the other paritions on the Disk?
IF LEGACY MODE OR CSM IS UNAVAILABLE YOUR OUT OF LUCK. Otherwise…..
I have succeeded in this as follows: 1. Use a disk manager to create to “re-create” the MBR for the GPT disk. YES, a GPT disk does have an MBR! Write the MBR to the GPT disk. 2. Remove the Windows partition. 3. Chose Legacy or set CSM mode in BIOS, 4. Reinstall windows from USB/ Optical to the unallocated space. What you get is Legacy Windows install on a GPT drive. The other partitions are unafected and show up on Disk Manager.
just for closure, i eventually found a program easybcd to fix the booting of my windows7 that got corrupted. then i found a ssd mass storage controller device update for my specific old-ass toshiba satellite that allowed windows7 to boot from the giant 4tb ssd and use all the space properly in mbr format from bios. i did indeed use a boot drive to get it going in win7 with gpt format for awhile, but that was just because it wouldn’t boot from bios in mbr even after win7booting was corrected but before the ssd controller was updated (which was skipped by the device driver auto update program i used to hopefully eliminate this problem) without wiping the last 2tb of the drive. once the storage controller driver was updated properly for the chipset, then the 4tb of the ssd was fully recognized, and suddenly win7mbr was perfectly bootable from bios without the need for a boot drive. so to summarize my solution: correct bootfiles, update mass storage controller device driver according to chipset to recognize a full 4tb ssd (by searching from manufacturer/model website), boot from bios on 4tb mbr ssd in win7 at lightning speed with full 4tb capacity as long as win7 is only on the first 2tb and the last 2tb is separate partition you know people
MBR can’t have partitions after 2Tb point. Maybe a third party program let you access the rest of the HD in a non standard way. Probably risky to use that scheme for important data.
Hi, thanks for your article. I’m in the same position of setting up a DL360p Gen8 server with MS Hyper-V 2019 on a RAID1 array with two 8tb drives, and was thinking of having two logical drives: 150Gb for the OS and the remainder for everything else.
One thing I couldn’t understand if this was the same situation or not: is it possible, without the USB bootloader drive, to have windows on e.g. a 150gb logical drive and have Windows access the remainder 7Gb logical drive?
I’ve made a simple trial with little success (OS part was fine, but the second logical drive was only visible for the first 2Tb).
Thanks
You must use the GPT partitioning scheme for drives larger than 2 Gb. You cannot access more than 2 Gb on a drive with MBR partition table.
Or use a larger (up to 16TB) drive with 4Kbyte sectors. No risk at all as “limit” is = Sector Count * Sector Size. Bigger sectores > Bigger Limit.
For me it will not work.
After i make all Steps and now starts from USB Stick i become a Winload Error with 0x00000e Stop Code.
After we boot to windows can we convert from GPT To MBR back and next time boot the computer through HDD instead of USB Flash Drive for system that do not support UEFI