When managing a large fleet of servers and workstations, it is useful to have basic information about the computer displayed on the system desktop. For example, it can include the computer’s hostname, domain info, IP and MAC addresses, Windows version and build, CPU type, RAM, free disk space, technical support contacts, etc. Microsoft’s BgInfo tool allows to query system information and display it directly on a user’s desktop as a background. BgInfo overlays text information over the user’s desktop wallpaper and replaces the current wallpaper image.
Create a Bginfo Text Template to Display on the Desktop
First, create a template file that Bginfo will use to show information on a Windows desktop.
- Download the Bginfo (https://docs.microsoft.com/en-us/sysinternals/downloads/bginfo) and run the
bginfo.exe; - Configure the information to be displayed on the user’s desktop in the Bginfo window;
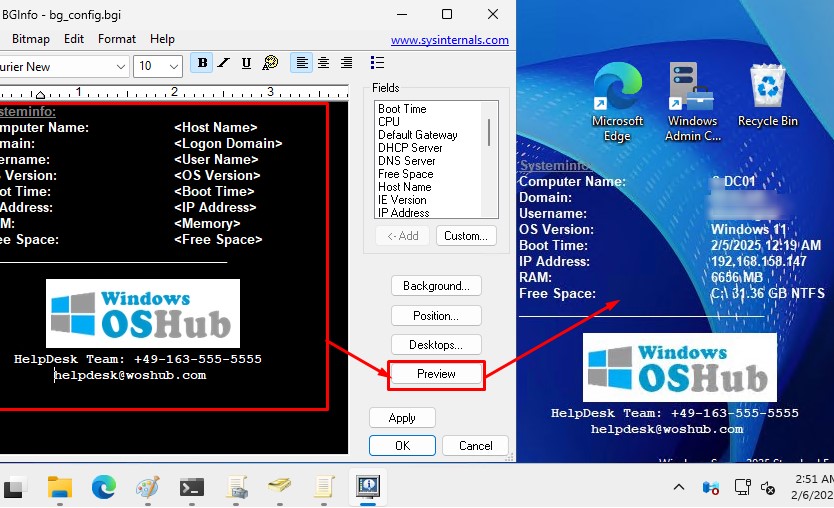
- The Bginfo configuration window is a simple text editor where you can add, delete, or edit any of the displayed values, change the font color or size, the position of the info block on the screen, add your logo, etc.
- The list of available system values that Bginfo can get from the operating system is available in the Fileds list on the right. Dynamic variables whose values must be obtained from the system are set in angle brackets. For example,
<Host name> - I created a simple template with basic information about the computer, and added the company logo and technical support contacts:
Systeminfo:
 Computer Name:         <Host Name>
 Domain:          <Logon Domain>
 Username:       <User Name>
 OS Version:     <OS Version>
 Boot Time:      <Boot Time>
 IP Address:     <IP Address>
 RAM:  <Memory>
 Free Space:     <Free Space>
 __________________________________
 LOGO IMG
 HelpDesk Team: +49-163-555-5555
helpdesk@woshub.com - Click on the Preview button to see how the computer and user information from Bginfo will look on the desktop.

- Save your configuration in the bg_config.bgi file.
Applying Bginfo Wallpaper to Domain computers via GPO
You can use domain Group Policy (GPO) to apply the Bginfo configuration file to all computers in an Active Directory domain.
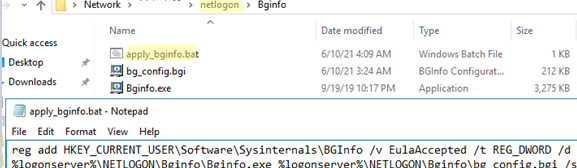
Create a Bginfo folder in the NETLOGON directory on the domain controller (C:\WINDOWS\SYSVOL\sysvol\woshub.loc\SCRIPTS ) and copy the bg_config.bgi and Bginfo.exe files into it.
Create the batch script file apply_bginfo.bat in the same folder. This file applies the BgInfo settings to a computer:
reg add HKEY_CURRENT_USER\Software\Sysinternals\BGInfo /v EulaAccepted /t REG_DWORD /d 1 /f
 %logonserver%\NETLOGON\Bginfo\Bginfo.exe %logonserver%\NETLOGON\Bginfo\bg_config.bgi /silent /TIMER:00 /nolicprompt
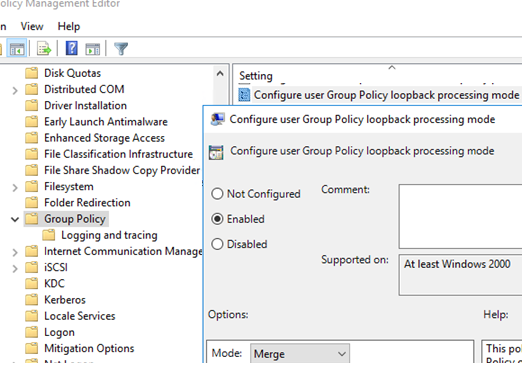
- Open the Domain GPO editor (
gpmc.msc), create a new Group Policy named bgInfoGPO and link it to the computer’s OU
- Edit the GPO
- Go to User Configuration -> Policies -> Windows Settings -> Scripts (Logon/Logoff) -> Logon -> Scripts -> Add and specify the UNC path to your script (for example,
\\woshub.loc\NETLOGON\Bginfo\apply_bginfo.bat); - Enable the GPO loopback processing mode to apply the GPO to users (if you have assigned it to the OU containing computer objects): Computer Configuration –> Administrative Templates -> System -> Group Policy -> Configure user Group Policy loopback processing mode = Enabled (Merge);
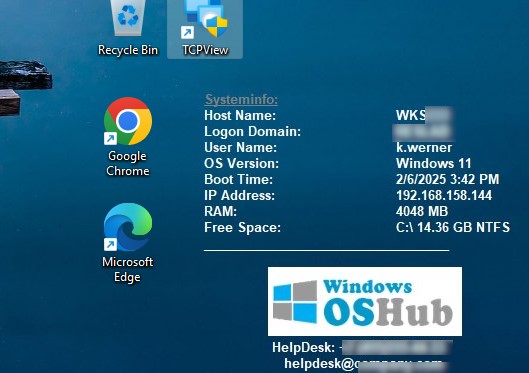
- To update Group Policy settings on the client, log off and log on to the computer. Check that the system information you have configured is displayed on the desktop.


BgInfo copies the current desktop background to BGInfo.bmp to the user’s %Temp% directory and puts your text on top of it. If you set the desktop wallpaper using the domain GPO, note that the BgInfo policy must be applied after our wallpaper policy. Change the order of the GPO links if necessary.
Bginfo: Get System Info Using VBS or PowerShell Script
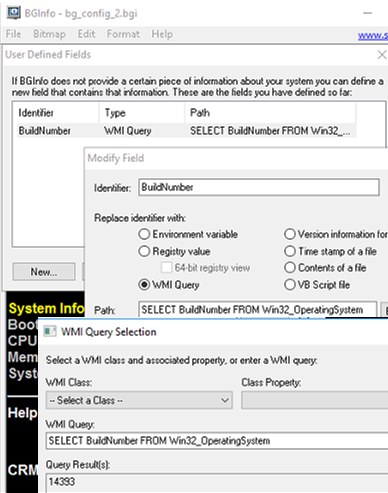
Bginfo comes with a set of predefined variables whose values can be displayed on the desktop. If you want to display other information about the system or environment, you can get any data from the computer using a WMI query, get from the registry, or from a VBS or PowerShell script.
To add custom values to BgInfo, click Custom -> New.
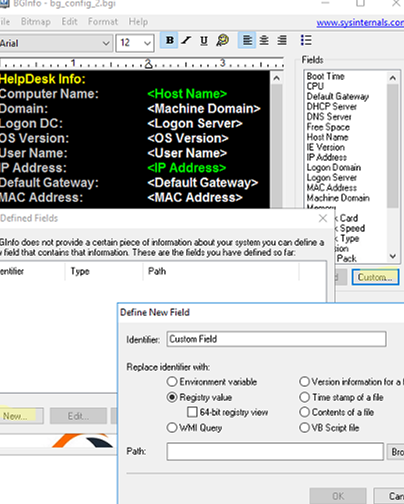
The tool allows to display:
- An environment variable value
- A registry parameter value
- WMI query result
- A file version
- A file contents
- Run a VBS script file
For example, the following WMI query shows the Windows build on a desktop:
SELECT BuildNumber FROM Win32_OperatingSystem
Use the following VBS script to display computer model information on the desktop:
winmgt = "winmgmts:{impersonationLevel=impersonate}!//"
 Set oWMI_Qeury_Result = GetObject(winmgt).InstancesOf("Win32_ComputerSystem")
 For Each oItem In oWMI_Qeury_Result
 Set oComputer = oItem
 Next
 If IsNull(oComputer.Model) Then
 sComputerModel = "*no-name* model"
 Else
 If LCase(oComputer.Model) = "system product name" Then
 sComputerModel = "Custom-built PC"
 Else
 sComputerModel = oComputer.Model
 End If
 End If
 sComputer = Trim(sComputerModel)
 Echo sComputer
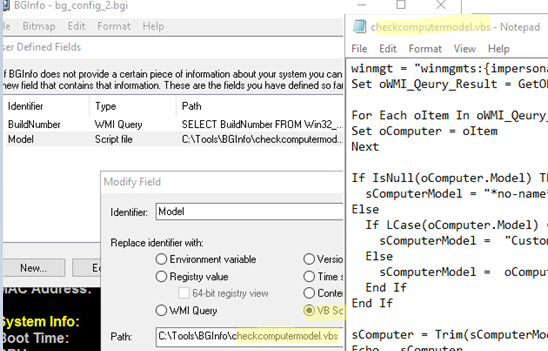
Note that the VBS script must use Echo to return the value you want to see in BgInfo.
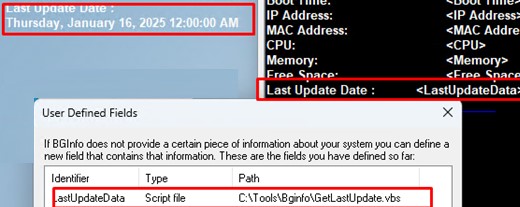
Bginfo doesn’t allow running PowerShell commands or scripts to get information directly. So, if you want to output the information from PowerShell to Bginfo, create a simple wrapper in the VBScript code. For example, the following VBS file runs a PowerShell command that gets the date the last security update was installed in Windows.
On Error Resume Next
 Set objShell = CreateObject("Wscript.Shell")
 Status = objShell.Exec("powershell.exe -Command (Get-HotFix | Sort-Object InstalledOn -Descending | Select-Object -First 1).InstalledOn").StdOut.ReadAll()
 echo Status
Show System Information on the Windows Lock Screen
You can show the current desktop wallpaper with systeminfo on the Windows Lock Screen.
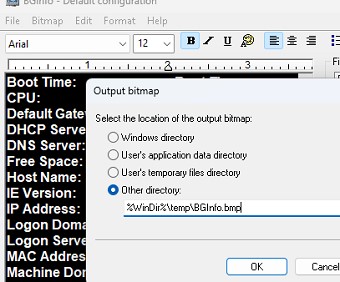
Lock screen settings are configured through the HKLM system registry key. To apply the new lock screen wallpaper to non-admin users, change the image path in the BGinfo settings (Bitmap -> Location) from the user’s %Temp% directory to %WinDir%\Temp\BGInfo.bmp.
Then, run the following startup script apply_bginfo_lockscreen.bat via the GPO section Computer Configuration -> Policies -> Windows Settings -> Scripts -> Startup.
set ImagePath=%WinDir%\Temp\BGInfo.bmp "HKEY_LOCAL_MACHINE\SOFTWARE\Policies\Microsoft\Windows\Personalization" /V "LockScreenImage" /T REG_SZ /D "%ImagePath%" /F REG ADD "HKEY_LOCAL_MACHINE\SOFTWARE\Microsoft\Windows\CurrentVersion\PersonalizationCSP" /V "LockScreenImageStatus" /T REG_DWORD /D "00000001" /F REG ADD "HKEY_LOCAL_MACHINE\SOFTWARE\Microsoft\Windows\CurrentVersion\PersonalizationCSP" /V "LockScreenImagePath" /T REG_SZ /D "%ImagePath%" /F REG ADD "HKEY_LOCAL_MACHINE\SOFTWARE\Microsoft\Windows\CurrentVersion\PersonalizationCSP" /V "LockScreenImageUrl" /T REG_SZ /D "%ImagePath%" /F
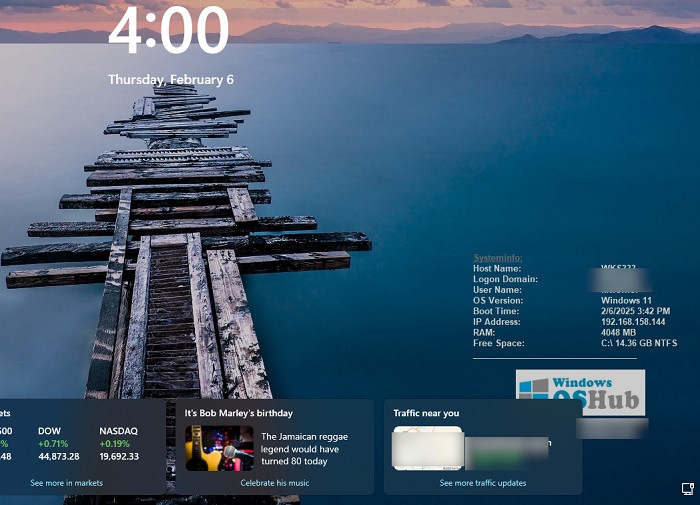
The computer’s login/lock screen will now also show all the necessary system information.