Windows Server 2022 introduces native support for the HTTP/3 protocol which makes the loading of IIS website pages faster and improves security. The most important feature of HTTP/3 is that it is based on QUIC (Quick UDP Internet Connections) transport protocol working over UDP. Users with a slow and unstable Internet connection get the highest profit from HTTP/3. Let’s look at how to enable HTTP/3 support for an Internet Information Service (IIS 10.0.20348+) website running on Windows Server 2022.
To enable HTTP/3 support in IIS, you need to configure some options in Windows:
- Enable TLS 1.3 on Windows Server (required for using QUIC and HTTP/3);
- Add TLS_CHACHA20_POLY1305_SHA256 cipher suite for TLS connections;
- Add an HTTP/3 response code to the HTTP header of your IIS website.
Edit some registry options to enable TLS 1.3 support on Windows Server (in this example, we enable TLS 1.3 client and server support).
reg add "HKEY_LOCAL_MACHINE\SYSTEM\CurrentControlSet\Control\SecurityProviders\SCHANNEL\Protocols\TLS 1.3\Client" /v DisabledByDefault /t REG_DWORD /d 0 /f
 reg add "HKEY_LOCAL_MACHINE\SYSTEM\CurrentControlSet\Control\SecurityProviders\SCHANNEL\Protocols\TLS 1.3\Client" /v Enabled /t REG_DWORD /d 1 /f
 reg add "HKEY_LOCAL_MACHINE\SYSTEM\CurrentControlSet\Control\SecurityProviders\SCHANNEL\Protocols\TLS 1.3\Server" /v DisabledByDefault /t REG_DWORD /d 0 /f
 reg add "HKEY_LOCAL_MACHINE\SYSTEM\CurrentControlSet\Control\SecurityProviders\SCHANNEL\Protocols\TLS 1.3\Server" /v Enabled /t REG_DWORD /d 1 /f

Enable HTTP/3 support for IIS:
reg add "HKEY_LOCAL_MACHINE\SYSTEM\CurrentControlSet\services\HTTP\Parameters" /v EnableHttp3 /t REG_DWORD /d 1 /f
 reg add "HKEY_LOCAL_MACHINE\SYSTEM\CurrentControlSet\services\HTTP\Parameters" /v EnableAltSvc /t REG_DWORD /d 1 /f
Then enable a special TLS cipher using the PowerShell command:
Enable-TlsCipherSuite -Name TLS_CHACHA20_POLY1305_SHA256 -Position 0
Make sure that the cipher suite support has been enabled:
(Get-TlsCipherSuite).Name | Select-String CHACHA

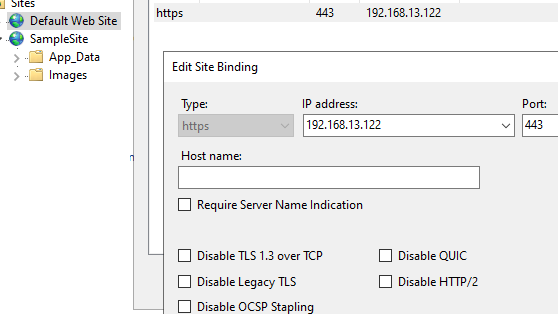
Then add HTTP/3 to the response header of your website. Create a simple site in IIS (you may use a default website for the test), bind an SSL certificate to the website (you may use a self-signed Windows certificate, but your client must trust it), and bind the website to port 443 (from the Edit Bindings menu).
Note that some additional options (Disable QUIC, Disable TLS 1.3 over TCP, Disable Legacy TLS) have appeared in the website binding form in IIS.
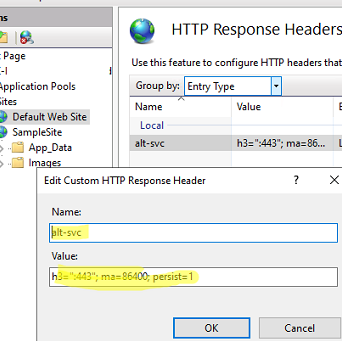
Then open the HTTP Response Headers section in the IIS website settings and add the following option to the list of HTTP responses:
- Name:
alt-svc - Value:
h3=":443"; ma=86400; persist=1
You can add this HTTP Header option using PowerShell:
Import-Module WebAdministration
 $siteName ="Default Web Site"
 $headerName="alt-svc"
 $headerValue='h3=":443"; ma=86400; persist=1'
 Add-WebConfigurationProperty -Filter "system.webServer/httpProtocol/customHeaders" -PSPath IIS:\Sites\$siteName -Name . -AtElement @{name=$headerName}-Value @{name=$headerName;value=$headerValue}
Make sure that QUIC (Port 443/UDP) traffic is allowed in Microsoft Defender Firewall:
Get-NetFirewallRule | ?{ $_.DisplayName -eq "World Wide Web Services (QUIC Traffic-In)" }|select name,enabled, status

If the rule is inactive, enable the Windows Defender Firewall rule using PowerShell:
Get-NetFirewallRule IIS-WebServerRole-QUIC-In-UDP|enable-netfirewallrule
Restart Windows Server. After the restart, make sure that the IIS website responds over HTTP/3 (all modern browsers support the HTTP/3 protocol by default).
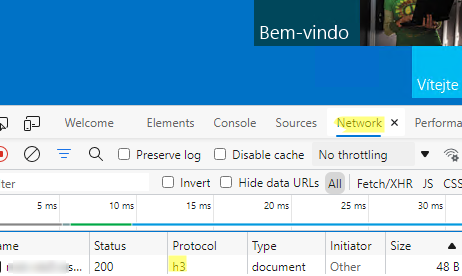
- Open a webpage of your IIS site in a browser (I used built-in Microsoft Edge), enable the Inspect mode, and go to the Network tab;
- Add the Protocol column and refresh the page (
F5); - Make sure that H3 is specified in the Protocol column. It means that HTTP/3 is used to connect to the website.

2 comments
What’s the benefits of http3?
EnableAltSvc registry key doesnt seem to work, running windows server 2022… the fact MS hides all this behind registry keys is ridiculous. one of the selling points of server 2022 was its support for these protocols yet MS has disabled them by default?!