Modern versions of Windows and Windows Server allow you to increase the size of any disk volume (partition) at the expense of unused (unallocated) disk space without shutting down the computer and without losing data. In this article, we’re going to explain how to extend a disk partition in Windows using the Disk Management GUI, the diskpart tool, or PowerShell commands.
Windows will allow you to expand a basic volume if:
- Free unallocated space available on the same physical (virtual disk);
- The partition is formatted with the NTFS or ReFS file system;
- There is free (unpartitioned) space to the right of the partition you want to extend;
- You cannot create a partition larger than 2 TB on disks with an MBR partition table. For large disks (over 2 GB), use a GPT partition table (you can convert MBR to GPT in Windows without data loss)
How to Extend a Volume Using the Disk Management Snap-in
The easiest way to extend a partition in Windows is to use the Disk Management MMC:
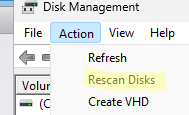
- Open the Disk Management console (
diskmgmt.msc) as an administrator. Update volume information using the option Action -> Rescan disk (if you have recently increased the size of your virtual machine’s hard disk in the hypervisor and can’t see the newly added space);
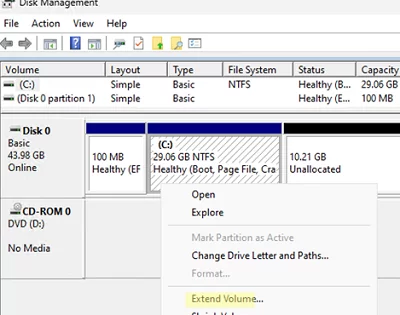
- Right-click on the disk volume you want to extend. In my case, it’s a logical partition with a
C:\drive letter assigned to it; - Select Extend Volume;
- Maximum available space in MB indicates how much more you can extend the current partition. Type the amount of MB to be added to the partition using unallocated space in the Select the amount of space in MB box. In this example, I’m going to add all the free space to my system volume;
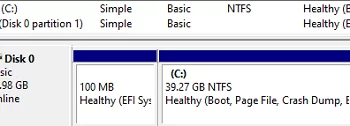
- Click Next -> Finish and check that your C drive has been extended.

The screenshot below shows that there is a Windows Recovery Environment volume between your C drive and the unallocated area. Note that the Extend Volume option for the disk is greyed out.
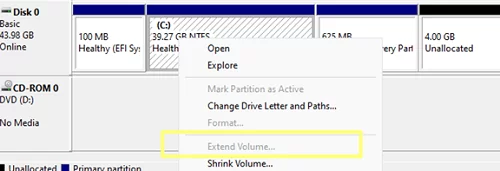
This means that you will not be able to expand your C: drive until you remove the Recovery partition or move it to the end of the drive. See how to do this in the following guide: Cannot Extend Volume to Unallocated Space in Windows.
Extending a Volume in Windows from the Command Line
If you need to increase the disk volume size from the command prompt, you can use the console diskpart tool or PowerShell cmdlets to manage disks and partitions from the built-in Storage module. Further in the article, we will show how to increase disk size on a host running Windows Server Core or Microsoft Hyper-V Server (non-GUI).
Run the command:
Diskpart
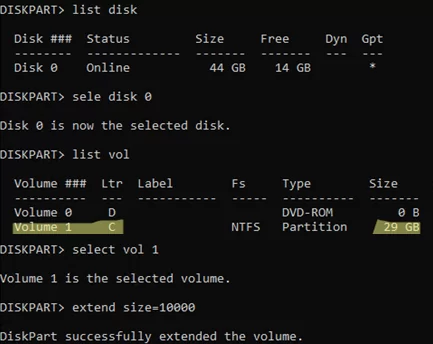
Here’s how to view the list of available disks:
DISKPART -> list disk
Select a disk:
DISKPART -> select disk 0
List volumes:
DISKPART -> list vol
Select the one you want to extend:
DISKPART -> select volume 3
The following diskpart options are used to expand a disk volume:
EXTEND [SIZE=] [DISK=] [NOERR]
For example, you can add 10 GB to a current volume:
DISKPART -> extend size=10000
Or add all available free space:
DISKPART -> extend
Don’t forget to check that the volume has been increased:
DISKPART -> list vol
Close the diskpart session:
DISKPART -> exit
You can also extend the volume using PowerShell.
Start by updating the information about your disks:
"rescan" | diskpart
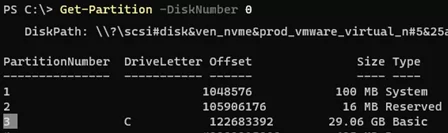
Display information about the current size of the partitions on disc 0:
Get-Partition -DiskNumber 0
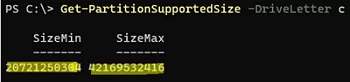
The command below will give you the minimum size of your logical drive (SizeMin, which is the actual size of the data on the partition) and the maximum size of the partition it can be extended to (SizeMax):
Get-PartitionSupportedSize -DriveLetter C
To increase the specific volume (assigned drive letter), specify its new size:
Resize-Partition -DriveLetter C -Size 42169532416
If you want to extend it using all the free space available, use the following commands:
size = (Get-PartitionSupportedSize -DiskNumber 0 -PartitionNumber 3)
 Resize-Partition -DiskNumber 0 -PartitionNumber 3 -Size $size.SizeMax

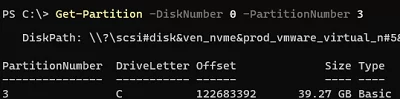
Finally, check that your partition has actually been extended:
Get-Partition -DiskNumber 0 -PartitionNumber 3
1 comment
it is very good way of tech
Thanks