This post will cover how to manage disks, partitions, and volumes using the PowerShell command line. All disk and partition management tasks that are typically performed using the Disk Management GUI (diskmgmt.msc) or the DiskPart.exe command-line tool can also be executed from PowerShell. We’ll explain how to retrieve information about connected physical disks, initialize a disk, create a partition table, create a new partition, format it, and assign a drive letter.
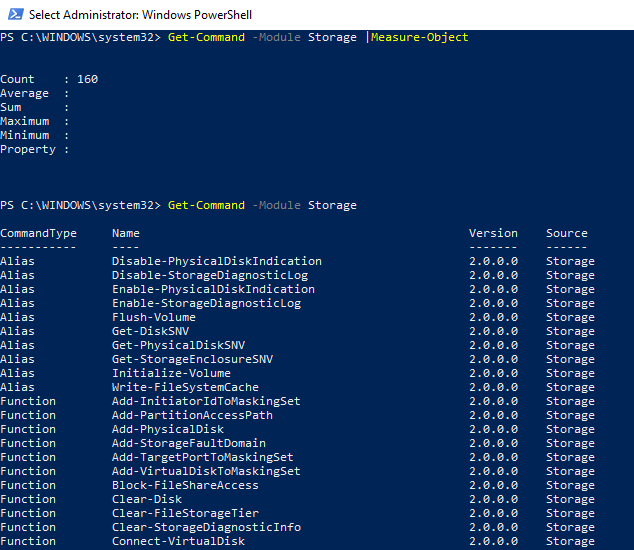
The built-in Storage module (available starting with PowerShell 3.0 and newer) contains over 170 cmdlets for managing disks and partitions.
Get-Command -Module Storage
PowerShell: List Local Disks and Partitions
First, let’s list the available local disks on a computer at the logical level.
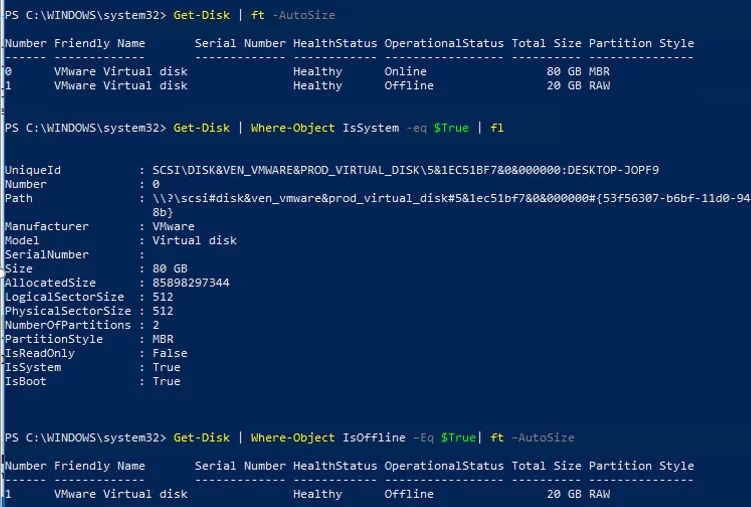
Get-Disk | ft -AutoSize
To select only the system drive on which Windows is installed, run the following command:
Get-Disk | Where-Object IsSystem -eq $True | fl
This command displays all attributes of the system disk. These attributes can be used to select disks based on different criteria.
UniqueId : SCSI\DISK&VEN_VMWARE&PROD_VIRTUAL_DISK\5&1EC51BF7&0&000000:DESKTOP-JOPF9
Number : 0
Path : \\?\scsi#disk&ven_vmware&prod_virtual_disk#5&1ec42ba7&0&000000#{21f23456-a6bf-12d0-94f2-001efb8b}
Manufacturer : VMware
Model : Virtual disk
SerialNumber :
Size : 98 GB
AllocatedSize : 98432321434
LogicalSectorSize : 512
PhysicalSectorSize : 512
NumberOfPartitions : 2
PartitionStyle : MBR
IsReadOnly : False
IsSystem : True
IsBoot : True
Print the disk name, serial number, model, and firmware version:
Get-Disk | Select-Object -Property FriendlyName, SerialNumber,Model,FirmwareVersion
Filter only by disks with an Offline status.
Get-Disk | Where-Object IsOffline –Eq $True| ft –AutoSize
Use the Get-PhysicalDisk cmdlet to view the characteristics and status of local physical disks on a computer.

With PowerShell, you can detect whether a drive is an SSD or HDD, or if it is a USB flash drive (Unspecified media type).
DeviceId Model                      MediaType   BusType         Size

——— ——                      ———   ——-         —-

0        TOSHIBA MK3775VSXP         HDD         SATA    500156374016

1        Samsung SSD 840 PRO Series SSD         SATA    128060514304

2        Transcend                 UnSpecified USB     128169757184
For example, to display all connected USB drives:
Get-Disk | Where-Object -Property BusType -eq USB
The disk health can be checked from PowerShell by looking at the HealthStatus attribute, as well as the SMART values of the disk.
Get-PhysicalDisk | Get-StorageReliabilityCounter | Select-Object DeviceId, Temperature, PowerOnHours, LoadUnloadCycleCount, ReadErrorsTotal, WriteErrorsTotal | Format-Table -AutoSize

If you need to put the disk into read-only mode (this only applies to the current computer):
Set-Disk 2 -IsReadOnly 1
Disable read-only mode:
Set-Disk 2 -IsReadOnly 0
List the partitions on all the disks in a computer.
Get-Partition
Or get partitions on the specified disks only:
Get-Partition –DiskNumber 1,2
List all logical volumes on a Windows computer:
Get-Volume

Disk Initialization in PowerShell
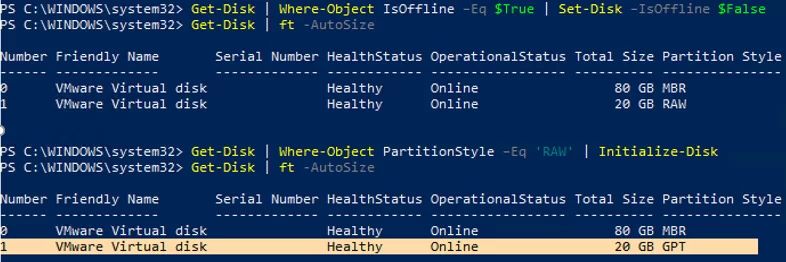
In the previous example, one of the computer’s disks was Offline and had a RAW partition table (in the Partition Style column). This is a new, clean disk that has just been connected to the computer. Let’s try to initialize it, create a GPT or MBR partition table, and create a new partition on it.
In order for the new disk to be available to the operating system, it must first be brought Online.
Get-Disk | Where-Object IsOffline –Eq $True | Set-Disk –IsOffline $False
Now you can initialize this disk (its index is 1):
Initialize-Disk -Number 1
The disk is formatted with a GPT (GUID) partition table by default. If you want to change the partition table type to MBR, run the following command:
Set-Disk 2 -PartitionStyle MBR
To avoid specifying the disk number, you can initialize all connected disks with the RAW partition table:
Get-Disk | Where-Object PartitionStyle –Eq 'RAW' | Initialize-Disk
How to Create Partitions on a Disk Using PowerShell
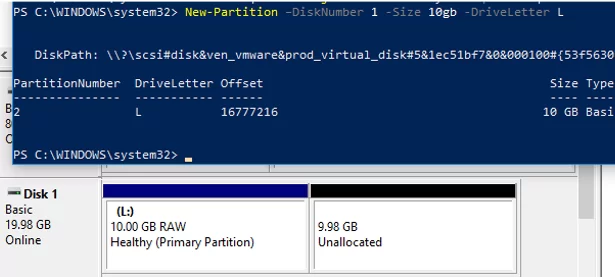
The New-Partition cmdlet is used to create a new partition on a disk. Let’s create a 10 GB partition and assign the letter L: to it:
New-Partition –DiskNumber 1 -Size 10gb -DriveLetter L
If you want the partition to occupy all available disk space, use the UseMaximumSize attribute. To automatically assign a drive letter, use the AssignDriveLetter option (sometimes Windows doesn’t assign a drive letter automatically).
New-Partition –DiskNumber 1 -AssignDriveLetter –UseMaximumSize
To change the drive letter assigned to a partition, use the command:
Set-Partition –DriveLetter L -NewDriveLetter U
If there is any unused space, an existing partition on the disk can be extended using it. First, check the maximum available partition size (SizeMax). Then, increase the partition size to its maximum using unallocated space.
$MaxSize = (Get-PartitionSupportedSize -DriveLetter L).SizeMax
 Resize-Partition -DriveLetter L -Size $MaxSize

This command is used to make a specific partition active.
Set-Partition -DriveLetter U -IsActive $true
Display information about the used and free space on the logical volumes.
Get-CimInstance -Class Win32_LogicalDisk |
 Select-Object -Property DeviceID, VolumeName, @{Label='FreeSpace (Gb)'; expression={($_.FreeSpace/1GB).ToString('F2')}},
 @{Label='Total (Gb)'; expression={($_.Size/1GB).ToString('F2')}},
 @{label='FreePercent'; expression={[Math]::Round(($_.freespace / $_.size) * 100, 2)}}|ft

If you need to set a specific partition to ReadOnly mode:
Set-Partition -DiskNumber 2 -PartitionNumber 2 -IsReadOnly 1
Format-Volume
Let’s format a new partition in the NTFS file system and assign it the DBData volume label:
Format-Volume -DriveLetter L -FileSystem NTFS -NewFileSystemLabel DBData -Confirm:$false

Removing Partitions from a Disk with PowerShell
To remove all partitions on disks 1 and 2 without confirmation, run this command:
Get-Partition –DiskNumber 1,2 | Remove-Partition -Confirm:$false

To delete all partitions on Disk1 and completely erase data, use:
Clear-Disk -Number 1 -RemoveData -Confirm:$false
If there are OEM partitions on a disk (OEM recovery partition, EFI partition, System Reserved), use the RemoveOEM parameter to delete them:
Clear-Disk -Number 1 -RemoveData –RemoveOEM
Use the following PowerShell command to initialize any new RAW disks connected to the computer and create an NTFS partition with the maximum available size. It is convenient to use when connecting a new, empty disk (whether physical or virtual).
Get-Disk |Where-Object PartitionStyle -eq 'RAW' |Initialize-Disk -PartitionStyle MBR -PassThru |New-Partition -AssignDriveLetter -UseMaximumSize |Format-Volume -FileSystem NTFS -Confirm:$false
7 comments
thank you, this was very helpful
Thanks so much, your post help me so much,
i did the follow script for shrink and create a new partition with free space:
Exmaples: Disk = 0, Driveletter=K
New-Partition -DiskNumber 0 -UseMaximumSize -DriveLetter k
maybe this can help other people. 🙂
It would’ve been more helpful to include commands that show how to automatically select the correct eg unformatted disk. Instead, the article shows that we have to figure out which disk which defeats the purpose of automating the tasks.
I have a script I use to backup data using robocopy. Because it stores critical/sensitive data, I prefer to hide the partition rather than allowing Windows to mount it automatically, and only use the script to unhide the partition, backup the date with robocopy, and hide the partition again. I use the HDD/SSD serial number in order to mount the drive and run the script.
You can get the serial number with:
Get-Disk | Select-Object Number,SerialNumber
Here’s part of the code I use that work both old and recent Powershell versions. The storage device serial number is represented as ’53R1ALNUMB3R’. The drive has two partitions, one small FAT16 and the “hidden” NTFS (partition 3). I run this with elevated privileges:
# To maintain compatibility with old Powershell versions
if ( $PSVersionTable.PSVersion.Major -le 4 )
{ Get-Disk | Where-Object SerialNumber -EQ 53R1ALNUMB3R | Get-Partition | Where-Object PartitionNumber -EQ 3 | Set-Partition -IsHidden $false }
else
# For Powershell v5 or later
{ Get-Disk -SerialNumber 53R1ALNUMB3R | Set-Partition -PartitionNumber 3 -IsHidden $false }
I recall there being some commands that can allow one to reset and recreate some sort of system log in the SRP that can grow to fill up the entire SRP free space and then interfere with system operations such as Windows Backup and Update. I used them a couple years ago when Backup broke as a result. I remember you go into disk management, add a drive letter to the SRP, and then do these commands. One of the commands let you see the existence and size of this mystery log. Once done, remove the drive letter, things work again. Anyone recall what the commands are?
Hi
Is there a powershell script that can be run automatically to resize the disk space?
Thx
What does automatic resizing mean?
Suppose you have unallocated space on your hard drive.You will only be able to use it to increase the size of the partition to the left of it.
$driveLetter = "C"Get-Partition -DriveLetter $driveLetter
$MaxSize = (Get-PartitionSupportedSize -DriveLetter $driveLetter).sizeMax
$MaxSizeGB = [math]::Round($MaxSize/1024/1024/1024,2)
Write-Output " the maximum size is $MaxSizeGB GB"
if ((get-partition -driveletter $driveLetter).size -eq $MaxSize) {
Write-Output "The drive $driveLetter is already at its maximum drive size"
exit
}
Resize-Partition -DriveLetter $driveLetter -Size $MaxSize