System Restore Points is an easy tool to restore to the previous Windows OS state if you experience unexpected system file or registry problems after installing bad drivers, updates, or apps. You can use a restore point to revert the state of the registry, system files, drivers, and installed software to the date the restore point was created. Although system restore points are based on volume shadow copies, users’ profile files are not overwritten when restoring from a checkpoint. We’ll look at how system administrators can use restore points in Windows 10 and 11 in this guide.
How to Enable System Protection on Windows
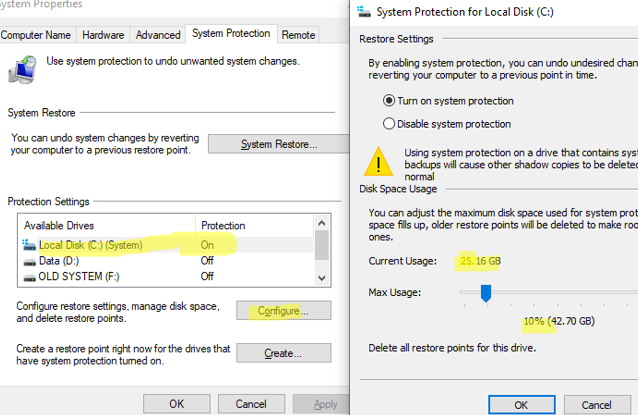
The restore points feature in Windows 10 and 11 is based on the System Protection service, which is disabled by default. You can check if the system protection with restore points is enabled for a specific drive in Windows:
- Run the command
systempropertiesprotection - The System Protection tab of the classic System Properties applet will open;
- In this case, protection is enabled for the system drive (C:) and disabled for all others;
- Select the drive and click the Configure button;
- Here you can enable or disable drive protection, change the maximum disk size available for storing restore points, and delete all restore points.

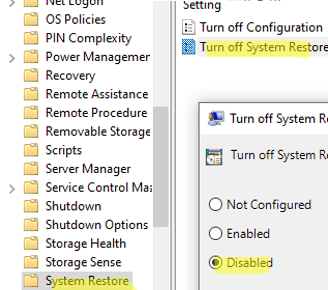
You can enable system protection using GPO. Configure the following Group Policy options:
- Go to Computer Configuration -> Policies -> Administrative Templates -> System -> System Restore and change Turn off System Restore = Disabled
- Navigate to Computer Configuration -> Policies -> Administrative Templates -> Windows Components -> Windows Defender -> Scan and set Create system restore point = Enabled
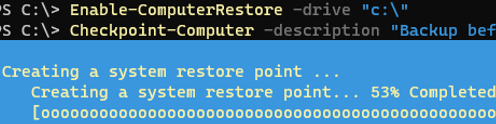
You can use PowerShell to enable system protection for a specific drive:
Enable-ComputerRestore -drive "c:\"
Create, List, and Delete a System Restore Point on Windows
By default, Windows automatically creates restore points when installing or uninstalling updates, drivers, or applications.
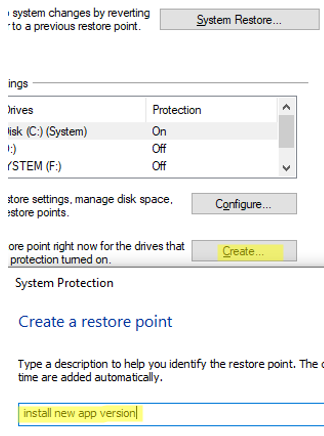
To create a restore point immediately, click the Create button, and enter a description for the point.
Also, you can manually create a restore point from a PowerShell prompt:
Checkpoint-Computer -description "Checkpoint before update video driver" -RestorePointType "APPLICATION_INSTALL"
By default, a restore point of type APPLICATION_INSTALL is created. You can use the following values for the RestorePointType parameter:
- MODIFY_SETTINGS
- DEVICE_DRIVER_INSTALL
- APPLICATION_INSTALL
- APPLICATION_UNINSTALL
- CANCELLED_OPERATION
List available restore points:
Get-ComputerRestorePoint|ft -AutoSize

By default, System Protection allows you to create only one restore point every 24 hours. If you try to create a new one, you will get an error:
WARNING: A new system restore point cannot be created because one has already been created within the past 1440 minutes.
To create restore points more frequently, you must modify the SystemRestorePointCreationFrequency DWORD registry parameter under the HKLM\SOFTWARE\Microsoft\Windows NT\CurrentVersion\SystemRestore reg key. The default parameter value is 1440 (24 hours). Change the value to 0 to disable the limit on how often restore points are created.
wbAdmin start backup -backupTarget:U: -include:C: -allCritical -quiet
Windows restore points are based on shadow copies (checkpoints) of the volumes made by the VSS service. When you create a restore point, VSS tells all applications to go into a consistent state and temporarily suspend their activity. It then creates a snapshot of the consistency state of the entire volume.
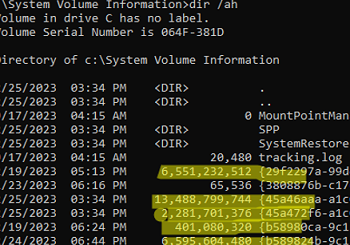
Restore point image files are stored in the hidden System Volume Information folder located at the root of each drive. The screenshot shows shadow copy files for each of the restore points created. They can reach tens and hundreds of gigabytes in size, as you can see.
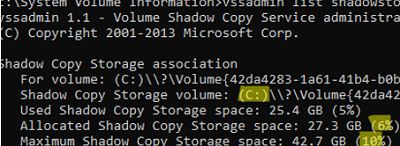
List the drives (volumes) for which shadow copies have been created:
vssadmin list shadowstorage
In this example, there are checkpoints on drive C: that take up 6% of the space (summary can occupy up to 10% of the drive capacity).
You can change the maximum size available for shadow copies using the commands:
vssadmin resize shadowstorage /on=c: /for=c: /maxsize=50GB
Or:
vssadmin resize shadowstorage /on=c: /for=c: /maxsize=15%
Lists available shadow copies for the specified volume:
vssadmin list shadows /for=c:

You can delete a specific checkpoint by its Shadow Copy ID:
vssadmin delete shadows /Shadow={xxxxxxxx-xxxx-xxxx-xxxx-xxxxxxxxxxxx}
Use the following command to delete the oldest shadow copy:
vssadmin delete shadows /for=C: /oldest
Delete all restore points:
vssadmin delete shadows /all
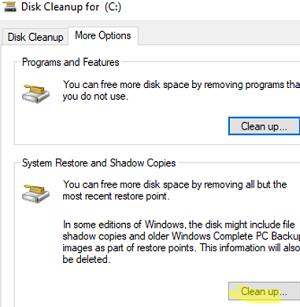
To delete old restore points, you can also use the built-in Disk Cleanup tool (cleanmgr.exe). Go to the More Options tab and click Clean up in the System Restore and Shadow Copies section.
Recovering Windows or Individual Files from the System Restore Point
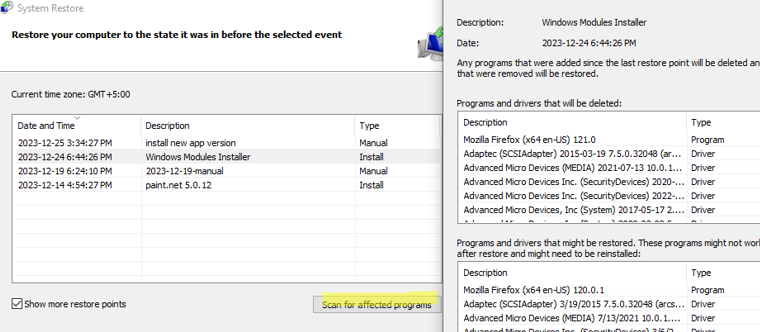
To restore the operating system state from a previously created restore point, you can use the rstrui.exe tool.
- Run the tool;
- Select the previous restore point to which you want to roll back Windows
- Compare the list of applications, services, and drivers in the online Windows image with the list at the restore point (click Scan for affected programs);
- Click Next -> Finish;
- Windows will rollback the system state to the previous shadow copy (reboot required).
You can use PowerShell to restore Windows from a restore point. Get restore point IDs:
Get-ComputerRestorePoint
Restoring Windows from a specified restore point:
Restore-Computer -RestorePoint 21

Check to see if the restore was successful:
Get-ComputerRestorePoint -LastStatus
As mentioned above, rolling back to a previous restore point will not overwrite the user’s files. But they are still available in a shadow copy (because a checkpoint of the entire volume is taken). This means you can manually restore any file from a volume shadow copy.
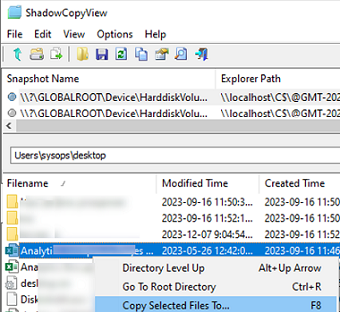
To view files in a shadow copy, you can use the free ShadowCopyView tool (https://www.nirsoft.net/utils/shadow_copy_view.html). Browse the required shadow copy (sort by creation date), find the previous version of the file (folder), and restore it to a specific location on the disc (Copy Selected files to …).
To work around this, you can configure File History or use a Task Scheduler job to make shadow copies using the command:
wmic shadowcopy call create Volume='C:\'
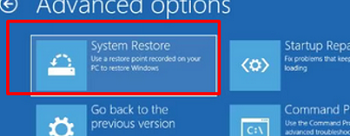
You will be able to restore the state of Windows in offline mode. Boot your computer into the Windows RE recovery environment and select System Restore from the menu. You will be prompted to select one of the previously created restore points.
After restoring a domain member computer from a previously created restore point, you will usually also need to repair the trust relationship with the domain:
Test-ComputerSecureChannel –Repair