Quite often, you have to expand virtual machine disks when the system drive runs out of free space. For example, you increased the disk size in the VMware or Hyper-V virtual machine settings, and now you need to extend the volume inside the guest operating system (Windows).
Extend Volume Option is Grayed Out in Windows Disk Management Console
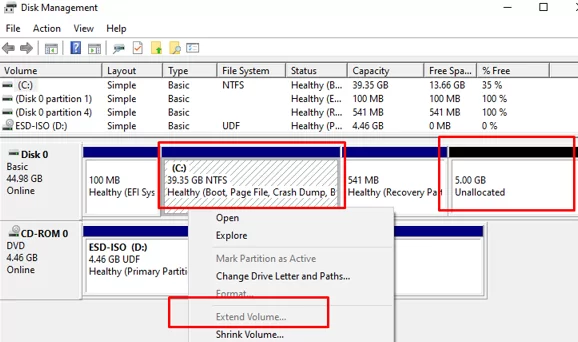
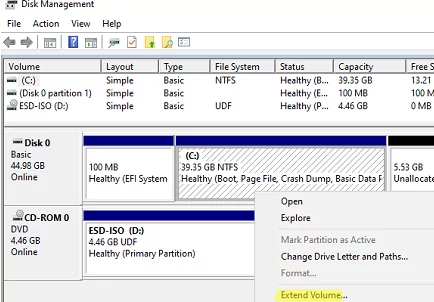
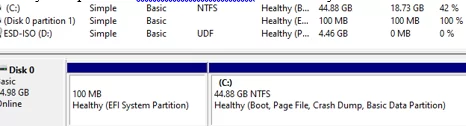
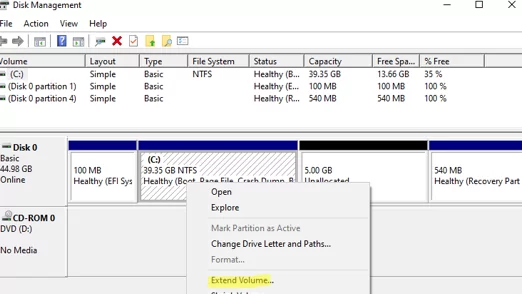
Open Disk Management console (diskmgmt.msc) and right-click on the partition you want to expand (in my example, it’s a logical volume with the drive letter C:\ assigned). As you can see, the Extend Volume option is grayed out. The fact is that you can extend a volume in Windows only if there is an Unallocated space to the right of it.
In my case, the recovery partition is between volume C: and unallocated space. You cannot expand the C: partition because it has a recovery (Windows RE) partition to its right. That’s why the “Extend Volume” option is inactive (grayed out).
You won’t be able to extend a disk volume in Windows (Windows Server) if:
- To the right of the partition you want to expand is another partition;
- The partition is formatted with a file system that does not support the extending (FAT32, exFAT). Only NTFS/ReFS volumes can be extended;
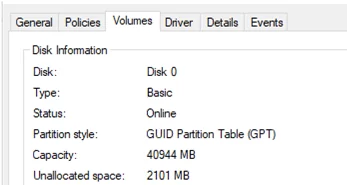
- You cannot create partitions larger than 2 TB on disks with an MBR partition table. Use the GPT partition table for large drives (greater than 2 TB). You can convert MBR to GPT without data loss using the built-in Mbr2gpt.exe tool. You can check the current partition table type on the Volumes tab of the disk in Device Manager. In this example, my Windows 10 VM is installed in EFI mode with GPT partitions on a disk.

In this article, we will look at how to properly increase a partition (system drive C:) in Windows if the Extend Volume option is not available (greyed out) in the Disk Management console. You need to move or delete the recovery partition if it prevents (blocks) your volume from extending.
Cannot Extend Volume Due to Windows Recovery Partition
In the simplest case, you can just move the recovery environment files from the WinRE partition to the system drive C: and completely delete the 541MB recovery partition.
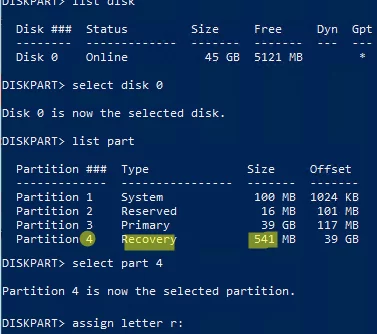
First, assign a drive letter to the recovery partition. Open a command prompt as an administrator and run:
diskpart
List available local disks:
list disk
Choose your disk:
select disk 0
Display a list of partitions.
list part
Select the recovery partition (in your case it may be a different partition number):
select partition 4
Assign it a drive letter R:
assign letter r:
 exit
Disable the Windows Recovery Environment (WinRE):
reagentc /disable

Now you have to remove the recovery partition with a size of 541 (in our example, this is Partition 4).
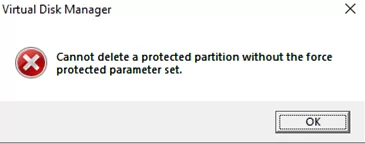
If you try to delete the Windows recovery partition from the Disk Management GUI by clicking Delete Volume (sometimes the disk properties are not available at all), the following error will appear:
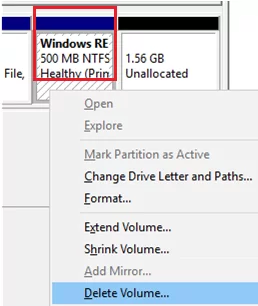
Virtual Disk Manager
Cannot delete a protected partition without the force protected parameter set.
You can delete such a protected partition only using the diskpart tool. Open the elevated command prompt and run the diskpart command. Select the partition you want to delete (note the results of your commands, since the numbers of disks and partitions may differ).
DISKPART> rescan
DISKPART> list disk
DISKPART> select disk 0
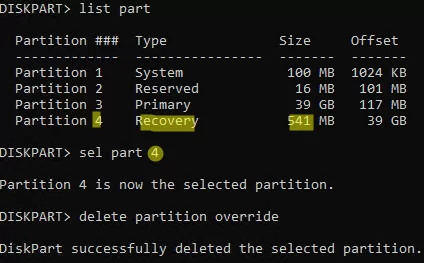
DISKPART> list part
DISKPART> select part 4
DISKPART> delete partition override
DiskPart successfully deleted the selected partition.
DISKPART> Rescan
Please wait while DiskPart scans your configuration...
DiskPart has finished scanning your configuration.
DISKPART> exit
Enable WinRE and update the ReAgent.xml configuration file with the command:
reagentc /enable

Run the following command to verify that the recovery environment WIM file has been recreated on drive C:
bcdedit /enum all | find "osdevice"
ramdisk=[C:]\Recovery\WindowsRE\Winre.wim,{e668f79e-60da-11ed-b27a-ea3359f08732}
Check your current WinRE configuration:
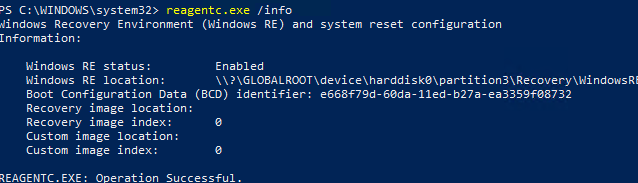
reagentc.exe /info
Windows Recovery Environment (Windows RE) and system reset configuration
Information:
Windows RE status: Enabled
Windows RE location: \\?\GLOBALROOT\device\harddisk0\partition3\Recovery\WindowsRE
Boot Configuration Data (BCD) identifier: e668f79d-60da-11ed-b27a-ea3359f08732
Recovery image location:
Recovery image index: 0
Custom image location:
Custom image index: 0
REAGENTC.EXE: Operation Successful.
winre.wim recovery environment file is now located on the system partition where Windows is installed.Now you can extend your system partition (drive C:):
- Open the
diskmgmt.mscconsole; - Right-click on the partition you want to increase and select Extend Volume;
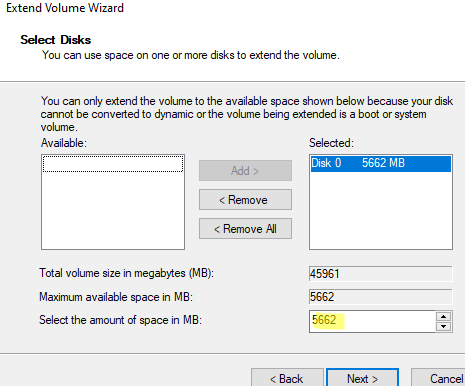
- Specify the amount of space in MB you want to increase your partition. In my case, I will extend the C: drive by 5 GB. Click Next -> Finish;
- The system partition has been extended successfully.
Windows detects the recovery partition by the special labels: GUID — de94bba4-06d1-4d40-a16a-bfd50179d6ac and the GPT attribute 0x8000000000000001.
Move Windows Recovery Partition to the End of Disk with GParted LiveCD
If you are afraid of removing existing partitions on disks, you can move the partition that prevents it from expanding to the end of the disk using a third-party tool. You can use the free GParted (GNOME Partition Editor) boot image to manage partitions offline. This is a Live CD based on Linux Debian with a graphical frontend for the parted tool (a console-based utility for managing disk partitions in Linux). Download the ISO image gparted-live-1.4.0-6-amd64.iso here https://gparted.org/download.php (about 490 MB).
Boot your virtual machine from the GParted live ISO image (if you want to expand the partition on a physical computer, you can burn the ISO image to a USB flash drive using the Rufus utility).
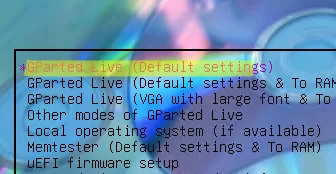
Select consecutively:
- Don’t touch keymap
- Default English language (33)
- Mode 0 – Continue to start X to use GParted automatically
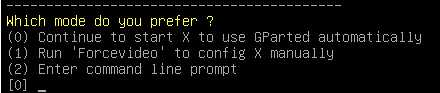
The graphical partition editor GParted will start automatically.
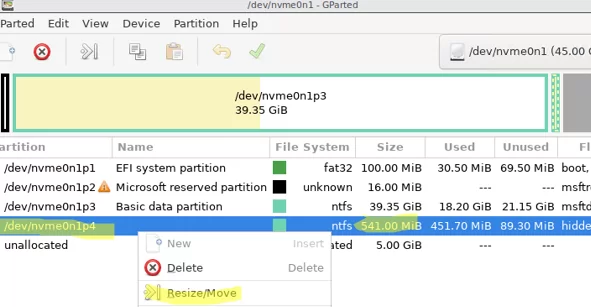
Find the partition you want to move to the right. Note that GParted uses the Linux partition naming. The easiest way to find your Windows recovery partition is by its size. In our case, this is the /dev/vvme0n1p4 partition with a size of 541 MB. Right-click on a partition and select Resize/Move.
Specify a value of 0 in the Free space following (MiB) field to move the partition to the end of the disk.
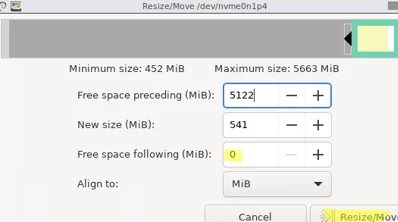
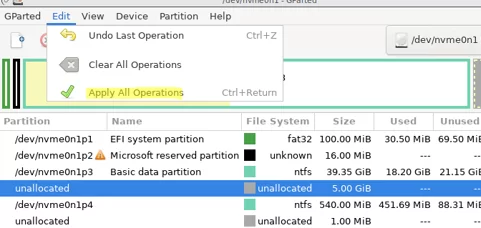
Click the Resize/Move button. To start moving partitions, click Edit -> Apply all operations in the top menu. In my case, a small 500 MB partition was moved in a few seconds.
Reboot the VM and start Windows. Open the Disk Management console. As you can see, the recovery partition has been moved to the end of the disk. The unallocated area is now to the right of the volume with the drive letter C:\.
The Extend Volume option is now available and you can extend the system partition on your drive. The Windows recovery environment will not be affected.
13 comments
Thanks! Just what I was looking for, worked perfectly first time.
Thanks! it worked Great!
I just needed to recreate my .wim file, so had some help from “https://community.spiceworks.com/how_to/163540-convert-esd-to-wim”.
But really big big thanks!!!
This line gives error on my computer:
robocopy e:\boot c:\boot /s
since the system could not find the \boot\ file in the recovery partition
The Partition style is not GPT in my computer, so I followed instructions in part “How to Delete the Recovery Partition and Move the BCD on BIOS-based PC”
When I made the RE partition unhidden and assigned it a name, I could see directories and files as follows:
F:
– Recovery
– WindowsRE
boot.sdi
ReAgent.xml
Winre.wim
Could you please advise how to move BCD and relevant files to C: drive properly.
[…] If it was an 'original' drive it may well have the original image in the recovery partition with specific drivers and software provided by the manufacturer, or it could just be the Win RE partition. It horses for courses I'm afraid, it seems a little less common these days, but sometimes it can do more harm than good – especially when an elderly relative or less IT literate family member chooses 'restore my computer' or something from a troubleshooting menu and wipes all their data and photos… If he has the original drive and has mastered the cloning process (depending on the software he used), he may be able to do the clone again and choose which partitions to clone on to the new drive? This has some good info: Extend Volume Blocked by a Recovery Partition on Windows 10 | Windows OS Hub […]
Thanks this CLI commands helped to remove the recovery partition.
Hello, this worked for my w2022 server.
Thanks
What should be the assignment of the drive letter R: be good for? It is used nowhere and the partition assigned to that drive letter is deleted anyway.
Thank you so much!
[…] Fix: Can’t Extend Volume in Windows | Windows OS Hub (woshub.com) […]
The gparted section worked for me.
Thanks.
Thanks.
Followed the first instructions carefully. In the beginning, you said:
“In the simplest case, you can just move the recovery environment files from the WinRE partition to the system drive C: and completely delete the 541MB recovery partition.”
But nowhere in the instructions do you ever “move” anything, as far as I can tell.
When I got to the last two commands, I get:
reagentc /enable
REAGENTC.EXE: The Windows RE image was not found.
bcdedit /enum all | find “osdevice”
osdevice partition=C:
So, now I have no WinRE? I guess that means I need a DVD or USB key to fix things if I ever need to recover, correct?
Thanks – exactly what I needed – worked first time. ;>=