PostgreSQL is a free object-relational database management system able to compete with proprietary databases, like Microsoft SQL Server or Oracle. PostgreSQL supports user data, functions, operations, domains, and indexes. In this article, we’ll walk through the installation and brief overview of PostgreSQL database management. We will install PostgreSQL on a Windows 10 computer, create a new database, add tables, and grant user access permissions. Also, we will show how to manage PostgreSQL using SQL shell and the visual PgAdmin tool. I hope this article will be a good starting point to learn PostgreSQL and use it in development or test projects.
How to Install PostgreSQL on Windows 10
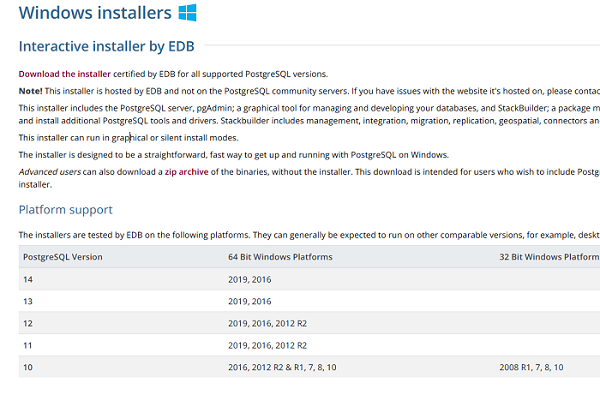
To install PostgreSQL, go to https://www.postgresql.org and download the latest version of the distribution for Windows. Today it is PostgreSQL 14 (it supports 64-bit Windows versions only). Then run the installer.
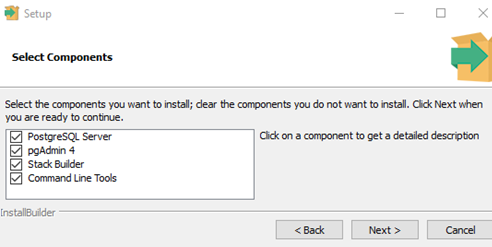
Check the following options during the installation:
- PostgreSQL Server – a database server;
- PgAdmin 4 – visual SQL editor;
- Stack Builder – additional developer tools (you may need them later);
- Command Line Tools.
Set a password for postgres user (it is created by default and has superuser privileges).

By default, the PostgreSQL database instance listens on port TCP 5432. You must add it to the exceptions list in your firewall.
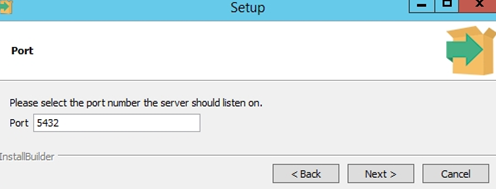
Click Next, Next, and the installation of PostgreSQL is over.
Enable Remote Access to PostgreSQL Database
To allow network access to your PostgreSQL instance from remote computers, you need to create firewall rules. You can create a rule using a command line or PowerShell.
Run the command prompt as administrator. Enter the command below:
netsh advfirewall firewall add rule name="PostgreSQL" dir=in action=allow protocol=TCP localport=5432
- where rule name is a rule name
- localport is the allowed port number
Or, you can create a firewall rule allowing access to your PostgreSQL instance on port 5432 using PowerShell:
New-NetFirewallRule -Name 'POSTGRESQL-In-TCP' -DisplayName 'PostgreSQL (TCP-In)' -Direction Inbound -Enabled True -Protocol TCP -LocalPort 5432
After the command is applied, a new inbound rule for PostgreSQL port will appear in the Microsoft Defender Firewall.
Change the value in port = 5432. Then restart your postgresql-x64-14 server service. You can restart the service using PowerShell:
Restart-Service -Name postgresql-x64-14
You can configure PostgreSQL options in postgresql.conf using tuners.
Managing PostgreSQL Database from the Command Prompt
Let’s see how to manage PostgreSQL using the command prompt tools. The main PostgreSQL management tools are located in bin folder, so we will run all commands from this directory.
Run the command prompt and change to the bin directory:
CD "C:\Program Files\PostgreSQL\14\bin"
Basic PostgreSQL commands:
- Check the PostrgreSQL version:
psql –V - Use the createdb command to create a new database:
createdb -U postgres testdb(where postgres is a super-user, testdb is a new database name). Enter the super-user password; - To view a list of active databases:
Psql -U postgres –l(password) - Create a new user:
createuser –U postgres myuser1(where myuser1 is a new user name); - Grant superuser privileges to the new user (don’t do this in a production deployment). Run the interactive PostgreSQL management shell:
psql –U postgres. Grant the privileges:ALTER ROLE operator SUPERUSER CREATEROLE CREATEDB;Now your user can create roles and databases; - To display a list of users and roles in PostgreSQL, run the command:
\du
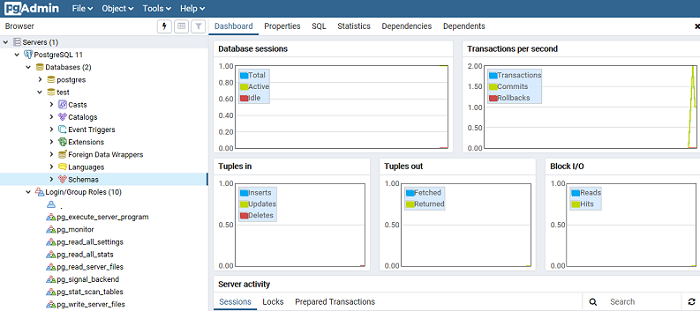
PgAdmin: Graphical PostgreSQL Editor
PgAdmin makes it easier to manage a PostgreSQL database in an intuitive visual mode.
To run the editor, click PgAdmin 4 in the Start menu and enter postgres (super-user) password.
Expand a list of active databases in the Servers pane.
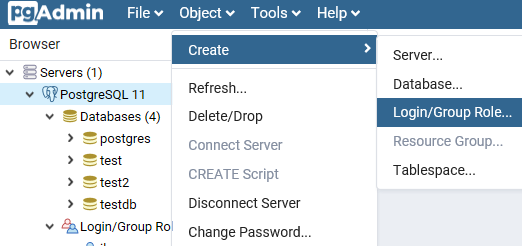
You can quickly create a new user or group and grant them some privileges. To do it, open Object -> Create -> Create Login/Group.
To create a new database, just select Database in Object -> Create. Enter the database name and the owner.
By default, all PostgreSQL databases are stored in base directory located in C:\Program Files\PostgreSQL\14\data\base.
Each database has a sub-directory inside PGDATA/base named by the database OID in pg_database. By default, the database files are stored in the sub-directory. Each table and index are stored in a separate file.
To backup and restore the database, it is better to use the Backup option in the Tools menu. To backup PostgreSQL automatically, use the pg_dump.exe command prompt tool.
Using PostgreSQL Query Tool
To create SQL queries in the graphical editor, pgAdmin has the built Query Tool. For example, you want to create a new table in a database using Query Tool.
- Select a database and open Query Tool in the Tools menu.
- Create an employee table:
CREATE TABLE employee
 (
 Id SERIAL PRIMARY KEY,
 FirstName CHARACTER VARYING(30),
 LastName CHARACTER VARYING(30),
 Email CHARACTER VARYING(30),
 Age INTEGER
 );
Idis the number of employees the SERIAL key is assigned to. This field contains a numerical value (1, 2, 3, etc.) that is increased by one with each new line. The next fields contain an employee’s first name and last name, their email address, and have a CHARACTER VARYING(30) type (30 characters max). TheAgefield contains an employee’s age and has an INTEGER type since it stores numbers. - After you have written the SQL query code in the Query Tool, press F5, and a new table (employee) will be created in the database;
- To fill in the fields in the table, select the employee table in Schemas -> Tables. Click View/Edit Data in the Object menu. Here you can fill in the data in the table;
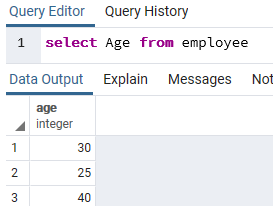
- Then run a simple select SQL query using the Query Tool:
select Age from employee;


1 comment
You can use Cybertec PostgreSQL Configurator, PostgreSQL Configuration Tool, or PGTune online tool to fine tune you rPostgreSQL configuration
For example, the following postgresql.conf settings are recommended for a VPS SSD server with 4xGB RAM and 4xvCPU:
# Total Memory (RAM): 4 GB
# CPUs num: 4
# Connections num: 100
# Data Storage: ssd
max_connections = 100
shared_buffers = 1GB
effective_cache_size = 3GB
maintenance_work_mem = 256MB
checkpoint_completion_target = 0.7
wal_buffers = 16MB
default_statistics_target = 100
random_page_cost = 1.1
effective_io_concurrency = 200
work_mem = 5242kB
min_wal_size = 1GB
max_wal_size = 4GB
max_worker_processes = 4
max_parallel_workers_per_gather = 2
max_parallel_workers = 4
max_parallel_maintenance_workers = 2