When you perform a clean installation of Windows 11 (or the latest Windows 10 builds), the Setup wizard prompts you to sign in with your online Microsoft Account (MSA). If your computer is on a network isolated (disconnected) from the Internet, you don’t have a Microsoft account, or you don’t want to use one, you simply won’t be able to sign in to your device during the Windows 11 setup process.
In Windows 11 21H2, a Microsoft account was only required for the Home edition. This edition’s system requirements clearly state that an internet connection and a Microsoft account are necessary. However, starting with Windows 11 22H2, the option to create a local account is also missing by default in the Pro edition. In this article, we will show you several ways to install Windows 11 25H2 with a local account (without a Microsoft account).
If you have an internet connection when installing Windows 11 25H2 but would prefer not to use a Microsoft account, there are specific steps you can follow to create a local account instead.
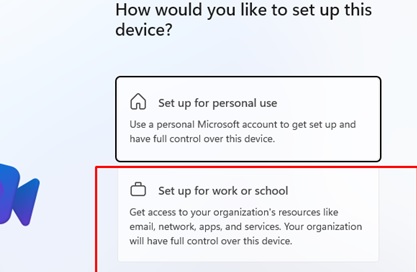
- Select the option to join the computer to the domain. (Set up for work or school).

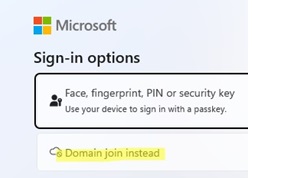
- On the Microsoft account sign-in screen, click Sign-in options to view the available options.

- Select Domain-join instead

- You will then be prompted to create a new local account and set a password for it. An actual connection to the Active Directory domain is not required for this.


However, this method of bypassing the Microsoft account requirement only applies to Windows 11 Pro and Enterprise editions (not Home).
test@test.com with password test. If a Microsoft account (MSA) does not exist, Windows Installer will prompt you to create a local user account. However, starting with Windows 11 version 24H2, this method no longer works. 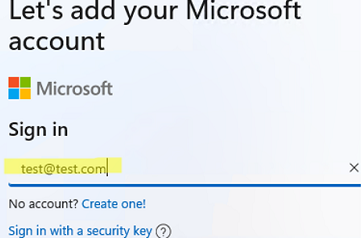
In Windows 11 25H2, another option has appeared that allows you to continue the installation with a local account:
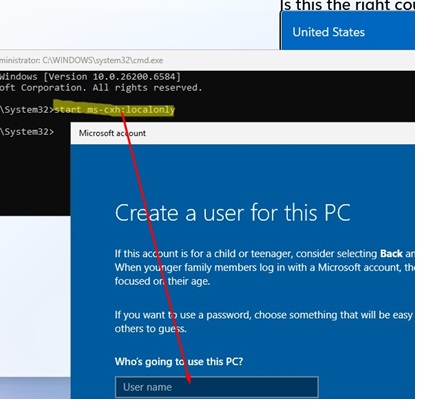
- To open the command prompt on the Windows Out-of-Box Experience (OOBE) screen, press
Shift+F10(orFn+Shift+F10on some laptops). - Run the command:
start ms-cxh:localonly - You will be redirected to the local account creation screen. Specify the new username and password, and you will be logged into Windows 11 with a local account.

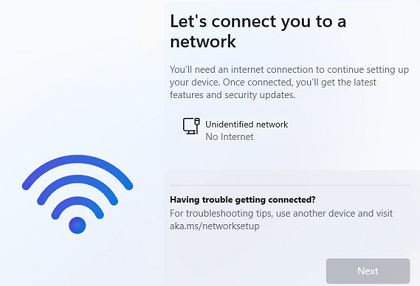
If your computer is connected to an isolated network (without an Internet connection), there is an alternate option to install Windows 11 with a local account:
- If your computer isn’t connected to the Internet, the Windows Out Of Box Experience (OOBE) wizard won’t allow you to complete the installation of Windows 11 25H2 without a network connection. This step only contains a button to load network adapter drivers. There is no option to skip the network check and continue installation with a local account
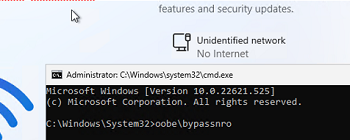
- You can bypass this screen. Press
Shift+F10to open the command prompt. - Run the
oobe\bypassnrocommand and your computer will restart automatically. (This command bypasses the OOBE requirement to check network availability, Bypass Network Requirement Oobe).
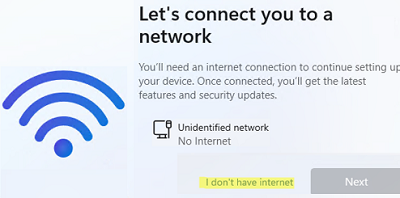
This command actually creates the BypassNRO registry parameters and then restarts the computer. This registry entry can be created manually:reg add HKLM\SOFTWARE\Microsoft\Windows\CurrentVersion\OOBE /v BypassNRO /t REG_DWORD /d 1 /f - Now OOBE skips the network connection check, and the I don’t have Internet button will appear. Click it, click Continue with limited setup, and you will be able to create a local Windows user.
During the OOBE phase, advanced users can manually create a local Windows user.
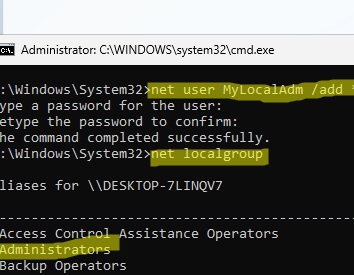
- To do this, create a new local Windows user account using the command prompt (press
Shift+F10):net user MyLocalAdm /add * - Set a user password
- List local groups:
net localgroup - Find the name of the built-in Administrators group (the name of the built-in Administrators group may vary in localized versions of Windows 11)
- The next step is to add your user to the Administrators group:
net localgroup administrators MyLocalAdm /add
- Run:
oobe\msoobe.exe - The computer will reboot.
- The Windows 11 login screen will appear with a list of users. It will display the name of the local user that you created and defaultuser0. Click on your user account and enter the password
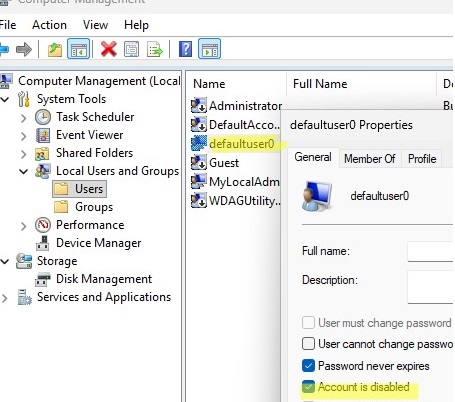
 After signing in to Windows, disable the defaultuser0 account to hide it from the login screen.

You can also create an autounattend.xml answer file and copy it to the root directory of your Windows 11 installation USB stick.
<?xml version="1.0" encoding="utf-8"?>
<unattend xmlns="urn:schemas-microsoft-com:unattend">
<settings pass="oobeSystem">
<component name="Microsoft-Windows-Shell-Setup" processorArchitecture="amd64" publicKeyToken="31bf3856ad364e35" language="neutral" versionScope="nonSxS" xmlns:wcm="http://schemas.microsoft.com/WMIConfig/2002/State" xmlns:xsi="http://www.w3.org/2001/XMLSchema-instance">
<OOBE>
<HideOnlineAccountScreens>true</HideOnlineAccountScreens>
<HideWirelessSetupInOOBE>true</HideWirelessSetupInOOBE>
</OOBE>
</component>
</settings>
</unattend>
The installer will apply this answer file and prompt you to create a local Windows user. Enabling the HideOnlineAccountScreens and HideWirelessSetupInOOBE options causes the steps for specifying a Microsoft account and checking for network availability during the Out-Of-Box Experience (OOBE) to be skipped.
reg add HKLM\SOFTWARE\Microsoft\Windows\CurrentVersion\OOBE /v HideOnlineAccountScreens /t REG_DWORD /d 1 /f && reg add HKLM\SOFTWARE\Microsoft\Windows\CurrentVersion\OOBE /v HideWirelessSetupInOOBE /t REG_DWORD /d 1 /f && shutdown /r /t 0 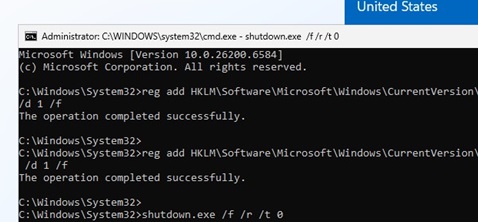
If you use the Rufus tool to create a Windows 11 installation USB stick, you can enable the following options when writing the installation image:
- Remove requirements for an online Microsoft account
- Create a local account with username
This also allows you to skip the Microsoft Account prompt in Windows Setup and install Windows 11 using a local account.
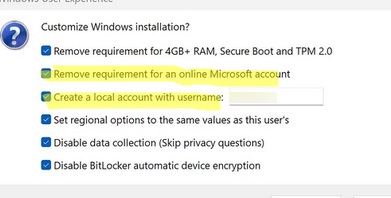
Remove requirement for 4Gb+ RAM, Secure Boot and TPM 2.0).Updated on 10 September 2025. I found information suggesting that Microsoft has blocked all methods of creating local accounts on the Out-of-Box Experience (OOBE) screen (including the commands start ms-cxh:localonly and oobe\bypassnro ) in the latest Windows 11 Insider Preview Build (26120.6772, released on 6 October 2025). These and other known methods of bypassing Microsoft account registration no longer work in the latest Windows 11 builds. This change is likely to be rolled out to the Windows 11 GA channel soon.
1 comment
Please move your update warning at the end of the article to the very beginning of the article because it says the article may no longer work in the future.
“Updated on 10 September 2025. I found information suggesting that Microsoft has blocked all methods of creating local accounts on the Out-of-Box Experience (OOBE) screen (including the commands start ms-cxh:localonly and oobe\bypassnro ) in the latest Windows 11 Insider Preview Build (26120.6772, released on 6 October 2025). These and other known methods of bypassing Microsoft account registration no longer work in the latest Windows 11 builds. This change is likely to be rolled out to the Windows 11 GA channel soon.”