If you are using a remote computer to run one or two apps in an RDP session, you will probably find it more convenient to run these programs in the RemoteApp mode. RemoteApp technology is one of the features of the Remote Desktop Services role on Windows Server, which allows you to run apps installed on a remote RDS (RDP) server as if they were running locally on the client. This means that the entire desktop of the remote Windows host is not delivered to the client’s monitor; only the published application’s window is displayed.
While RemoteApps is officially supported only on Windows Server with the RDS role, you can still configure and run any installed program as a RemoteApp on desktop versions of Windows, such as 10 or 11. This post explains how to create, manage, and run RemoteApps on a Windows 11 device (requires Pro or Enterprise edition).
The first step is to configure a remote computer (RDP server) to run the RemoteApp workload:
- Enable the Remote Desktop protocol on Windows
- Install the application you want to use
- Add a user who will be allowed to use the app to the local
Remote Desktop Usersgroup or to the local policy Alow log on through Remote Desktop Services - Allow any local program to run as a RemoteApp. Open the Local Group Policy Editor (
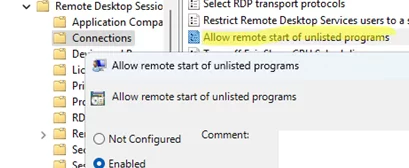
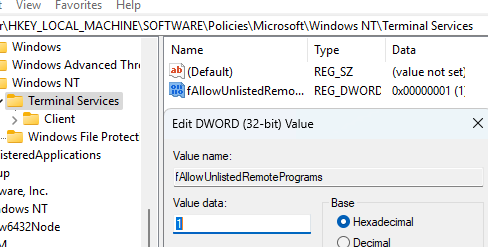
gpedit.msc), go to Computer Configuration -> Administrative Templates -> Windows Components -> Remote Desktop Services -> Remote Desktop Session Host -> Connections. Enable the policy Allow remote start of unlisted programsOr, create a registry parameter fAllowUnlistedRemotePrograms with a value of 1:
reg add "HKEY_LOCAL_MACHINE\SOFTWARE\Policies\Microsoft\Windows NT\Terminal Services" /v fAllowUnlistedRemotePrograms /t REG_DWORD /d 1
- Restart the remote computer.
HKLM\SOFTWARE\Microsoft\Windows NT\CurrentVersion\Terminal Server\TSAppAllowList\Applications for each application.Sample REG file for publishing Acrobat Reader as a RemoteApp on RDS in a workgroup environment:
Windows Registry Editor Version 5.00
[HKEY_LOCAL_MACHINE\SOFTWARE\Microsoft\Windows NT\CurrentVersion\Terminal Server\TSAppAllowList\Applications\MyAdobeReaderApp]
"CommandLineSetting"=dword:00000000
"RequiredCommandLine"=""
"Name"="Adobe Reader"
"Path"="C:\\Program Files\\Adobe\\Acrobat DC\\Acrobat\\Acrobat.exe"
"ShortPath"="C:\\PROGRA~1\\Adobe\\Acrobat DC\\Acrobat\\Acrobat.exe"
"IconPath"="C:\\PROGRA~1\\Adobe\\Acrobat DC\\Acrobat\\Acrobat.exe"
"IconIndex"=dword:00000000
"ShowInTSWA"=dword:00000001
"SecurityDescriptor"="
RDP client setup.
Now configure a shortcut for the RDP connection on the client device (where you want to show the RemoteApp window).
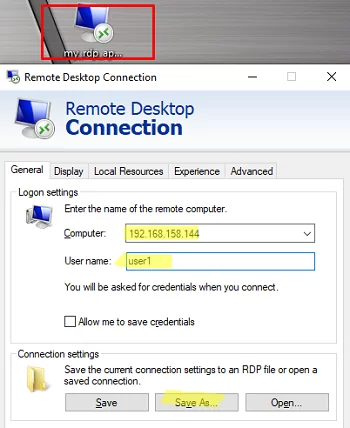
- Open the default Remote Desktop Connection client (
mstsc.exe). Enter the DNS name/IP of the Remote Desktop computer and the username to sign in. - (Optional) Configure the required remote connection settings on the remaining tabs of the RDP Client (local device redirections: drives, remote desktop clipboard, printers, etc.)
- Save the configured remote connection settings to a file with the
*.RDPextension (Save As) - Open this *.RDP file in any text editor. Add the following directives to the end of the file:
remoteapplicationmode:i:1
RemoteApplicationName:s:REMOTEAPP TITLE SHOULD BE DISPLAYED IN THE TASKBAR
RemoteApplicationProgram:s:"PATH TO THE APP EXECUTABLE ON THE RDP HOST"
DisableRemoteAppCheck:i:1
Prompt for Credentials on Client:i:0
Alternate Shell:s:rdpinit.exe
- If you need to run the program with additional command line arguments, add the directive:
RemoteApplicationCmdLine:s:COMMAND LINE PARAMETERS
Make sure that the options set are not configured in the existing RDP connection parameters. This may cause conflict. - Save the RDP connection file.
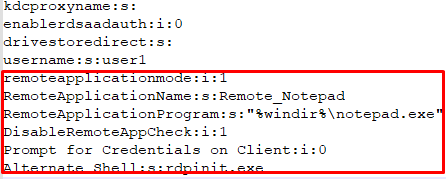
For example, to run notepad.exe as a RemoteApp, add the following lines to the RDP file:
remoteapplicationmode:i:1
RemoteApplicationName:s:Remote_Notepad
RemoteApplicationProgram:s:"%windir%\notepad.exe"
DisableRemoteAppCheck:i:1
Prompt for Credentials on Client:i:0
Alternate Shell:s:rdpinit.exe
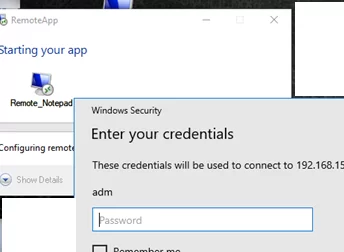
A password prompt should appear (you can save the RDP credentials). Confirm you trust the RDP certificate and RemoteApp windows will appear on your desktop.
start shell:AppsFolder\Microsoft.WindowsCalculator_8wekyb3d8bbwe!App
In this example, the APPX name was copied from the PackageFamilyName value and I manually added !App at the end.
Get-AppxPackage | Select-Object Name, PackageFamilyName | Where-Object { $_.Name -like "*calc*" }
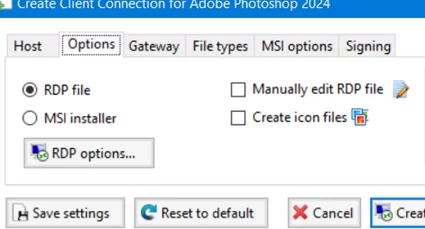
If you find that you often need to create shortcuts to launch RemoteApp, you can use the free RemoteApp Tool (https://github.com/kimmknight/remoteapptool) to easily generate RDP or MSI installer files for your clients. The tool also allows settings file associations, changing the icon and other parameters of RemoteApp items, and configuring RDP host settings (including RDP session timeouts).
This method of publishing RemoteApp on desktop devices running Windows 10/ 11 doesn’t require the deployment of a separate RDS licensing server and the purchase of terminal licenses (RDS CALs). However, only one simultaneous RemoteApp session will be available with such a computer. You can use RDP Wrapper to bypass the restriction on the number of concurrent RDP connections in Windows 10 and 11.

6 comments
As always, I found something new to learn. Thank you Windows OSHub!
Really useful website, thank you!
Hi , the remote apps could be for example adobe premiere and be able to use the GPU of the remote computer where i have installed the apps?
Of course, the RemoteApp will have access to all of the remote host’s local resources (including the GPU).
Any way i can remotely run a program with admin rights using standard user account .. using rdp arg
Running an app published as a RemoteApp in elevated mode isn’t a good idea, in my opinion. A full RDP session might be a better choice.
Otherwise, you will have to disable secure desktop prompts for UAC in the local GPO settings, which is not safe.
In my opinion, it is better to configure the app to bypass the UAC prompt, as described here.
https://woshub.com/run-program-without-admin-password-and-bypass-uac-prompt/