You can use the clipboard in an RDP session to copy and paste text or files between a local computer and a remote host (this can be either an RDP-enabled Windows workstation or an RDS farm on Windows Server). Sometimes it happens that the clipboard in a terminal session (or RemoteApp) stops working, and you cannot transfer (copy/paste) your data between your computer and the RDP server (host).
There are several possible causes and troubleshooting steps:
- Verify that clipboard redirection is enabled in the RDP client settings
- Check whether Group Policy or RDP server security settings allow clipboard and file redirection
- In many cases, simply restarting the failed
rdpclip.exeprocess in the current user session resolves the issue.
Restart the Rdpclip.exe Process (RDP Clipboard Monitor)
With the default settings, Windows allows users to use the clipboard to copy and paste text and files between the local host and the RDP session.
If the clipboard suddenly stops working in the RDP session, and the Paste option in the context menu becomes inactive, the easiest fix is to gracefully end the current RDP session (logoff) and reconnect. This will probably fix the remote clipboard issue. However, this is inconvenient because you will need to restart all the applications in the RDP session. Fortunately, you can restore correct clipboard operation in an RDP session without logging the user off.
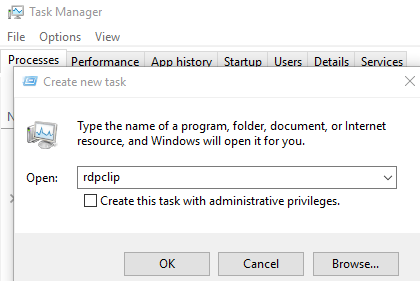
The rdpclip.exe process is responsible for operating the clipboard between your computer and the Remote Desktop host. When a remote user connects to Remote Desktop, a separate rdpclip.exe process is started for each session. You can use the Task Manager to kill the rdpclip.exe (RDP Clipboard Monitor) process and then start it again manually (Task Manager -> File -> Start new task -> rdpclip.exe -> Enter).
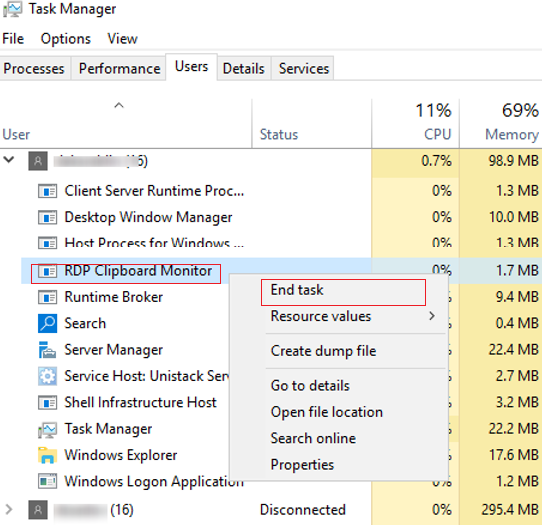
It usually helps to quickly restore the remote clipboard operation. Check that copy/paste (Ctrl+C / Ctrl+V) now works in the RDP session.
Users can restart the hung rdpclip.exe process themselves using a simple script. The following CMD script and equivalent PowerShell command restart the rdpclip.exe process in the current user’s session without affecting the clipboard processes of other users on the RDP server.
BAT script:
taskkill /F /FI "USERNAME eq %username%" /IM rdpclip.exe && start rdpclip.exe
PowerShell script:
Get-Process rdpclip -EA 0 | ? SessionId -eq (Get-Process -Id $PID).SessionId | Stop-Process -Force; Start-Process rdpclip
To make it more convenient for users, save this script as a BAT or PS1 file to the shared Desktop folder of the Public profile (%PUBLIC%\Desktop), or copy it to users’ desktops via GPO. If you use a PS1 script file, you can sign the PowerShell script or configure the PowerShell Execution Policy to allow running scripts.
Enable Clipboard in Remote Desktop Client on Windows
Check that your RDP client settings allow you to use the clipboard in the terminal session.
If you’re using the built-in Windows RDP client (Remote Desktop Connection mstsc.exe ) to connect to a remote terminal host, make sure its settings allow copy and paste via the RDP clipboard.
Go to the Local Resources tab, and make sure that the Clipboard option is enabled in the “Local device and resources: Choose the devices and resources that you want to use in your remote session” section.
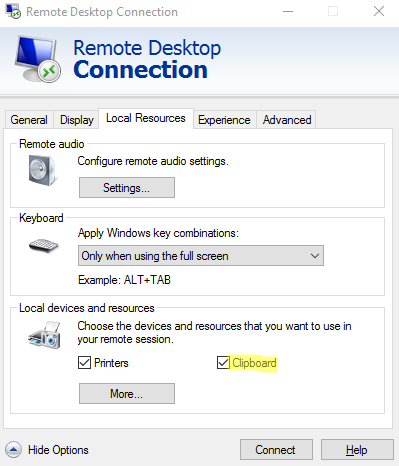
If you want to allow files to be copied via the RDP clipboard, click the More button and check the Drives option. This enables local drive redirection within the RDP session, allowing file transfers through the clipboard between the local and remote systems

If you are using a pre-configured RDP file to connect to a remote computer (for example, to connect to a published RemoteApp on RDS), ensure that the following options are configured in it:
redirectclipboard:i:1
redirectdrives:i:1
drivestoredirect:s:*
- redirectclipboard – allow/deny using the local clipboard in a remote session
- Drivestoredirect and redirectdrives – enable redirection of specific or all local drives to the Remote Desktop session (required if you want to copy/paste files via RDP).
To disable clipboard and local drive redirection on the RDP client for all users connecting to remote desktops, create the following registry value and set it to 1:
reg add "HKEY_LOCAL_MACHINE\Software\Microsoft\Terminal Server" /v DisableClipboardRedirection /t REG_DWORD /d 1 /f
 reg add "HKEY_LOCAL_MACHINE\Software\Microsoft\Terminal Server" /v DisableDriveRedirection / t REG_DWORD /d 1 /f
How to Enable or Disable Copy/Paste via RDP Clipboard on Windows
Using Group Policy or registry settings, an administrator can enable or disable the RDP clipboard for copy-and-paste operations on an RDS/RDP server.
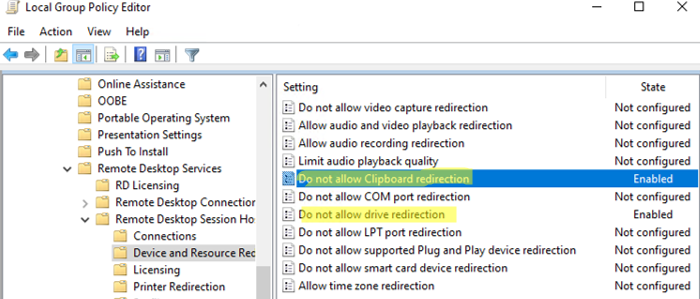
- Open the Local Group Policy Editor:
gpedit.msc - Go to Computer Configuration -> Administrative Templates -> Windows Components -> Remote Desktop Services -> Remote Desktop Session Host -> Device and Resource Redirection;
- To prevent copying data to/from a remote server via the clipboard in an RDP session, set the following policies to Enabled:
Do not allow Clipboard redirection – disable the clipboard redirection, which is used to copy text or files via the RDP clipboard.
Do not allow drive redirection – disable drive mapping redirection to prevent users from accessing their local drives in an RDP session. This feature is required for copying files between a local computer and an RDP host via the clipboard.
 Similar policy settings can be found in the user GPO section. This means that you can disable the use of the clipboard and the redirected drives for specific RDP users. On a standalone (workgroup) computer, multiple local GPOs (MLGPO) can be used to disable the RDP clipboard for non-admin users.
 - To enable the RDP clipboard, set the settings to Disabled (by default, Windows allows the RDP clipboard to be used to copy data between a local computer and a Remote Desktop host).
- Update the Group Policy settings using the command
gpupdate /force. In order for the new settings to be applied to users, they must either end their RDP sessions (usingLogoffinstead ofDisconnect) or wait for their sessions to be automatically disconnected according to the RDS timeouts.
Enabling these policy options will create the following DWORD parameters in the HKEY_LOCAL_MACHINE\SOFTWARE\Policies\Microsoft\Windows NT\Terminal Services registry key:
fDisableCdm=1(Disable local disks redirection on the RDP host)fDisableClip=1(Restrict RDP clipboard redirection to prevent data transfer between the server and the client)
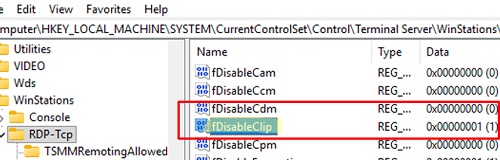
You can also prevent the use of the clipboard on the RDP server side directly through the registry by creating the following parameters.
reg add "HKEY_LOCAL_MACHINE\SYSTEM\CurrentControlSet\Control\Terminal Server\WinStations\RDP-Tcp" /v fDisableClip /t REG_DWORD /d 1 /f
 reg add "HKEY_LOCAL_MACHINE\SYSTEM\CurrentControlSet\Control\Terminal Server\WinStations\RDP-Tcp" /v fDisableCdm /t REG_DWORD /d 1 /f
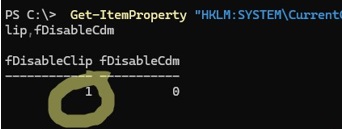
Therefore, check the status of the following four registry options to see if clipboard transfers are allowed on the RDS server. If the value is 1 for any of these options, this indicates that the RDP clipboard is disabled. Check the value of the registry items using PowerShell:
Get-ItemProperty -Path "HKLM:SYSTEM\CurrentControlSet\Control\Terminal Server\WinStations\RDP-Tcp" | Select fDisableClip,fDisableCdm
 Get-ItemProperty -Path "HKLM:SOFTWARE\Policies\Microsoft\Windows NT\Terminal Services" | Select fDisableClip,fDisableCdm
Conversely, if you want to allow the use of the RDP clipboard, these registry settings should either be absent (by default) or set to 0.
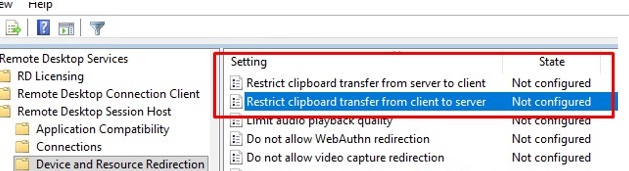
With Windows Server 2022 and Windows 11 22H2, administrators can use new Group Policy options to enforce stricter controls over clipboard redirection in RDP sessions. These GPO settings are also located under Administrative Templates -> Windows Components -> Remote Desktop Services -> Remote Desktop Session Host -> Device and Resource Redirection.
- Restrict clipboard transfer from client to server – allows you to enable or disable the copying of data from the client to the server via the clipboard.
- Restrict clipboard transfer from server to client – set the restriction of clipboard transfers from the server to the client.
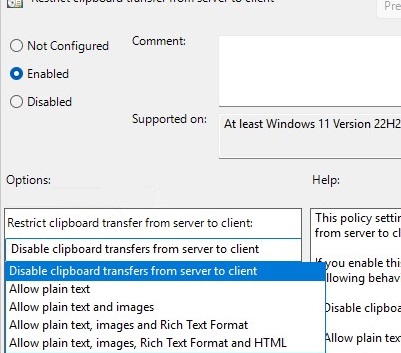
PolicyDefinitions directory.There are several options available for each of these GPO settings (the corresponding registry parameter values are specified in parentheses). These options enable you to specify which types of objects can be copied to and from the RDP server via the clipboard:
- Disable clipboard transfers from client to server (
0) - Allow plain text (
1) - Allow plain text and images (
2) - Allow plain text, images and Rich Text Format (
3) - Allow plain text, images, Rich Text Format and HTML (
4)
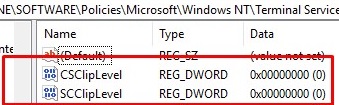
Check the values of the parameters specified by these policies in the registry:
Get-ItemProperty "HKLM:\SOFTWARE\Policies\Microsoft\Windows NT\Terminal Services" | Select CSClipLevel, SCClipLevel
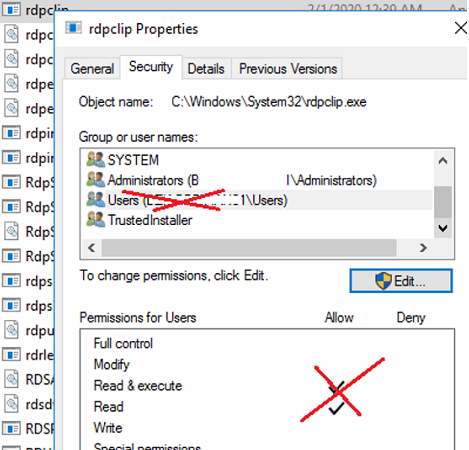
If you want to prevent non-admin users from copying to or from an RDP session, you can change the NTFS permissions on the executable file C:\windows\system32\rdpclip.exe. To do this, remove the Read/Execute permissions for the built-in Users group in the file’s security properties (you will have to change the file owner from TrustedInstaller to another one first).
Configure Clipboard Redirection Options in Remote Desktop Services (RDS)
If you are using Windows Server hosts with the Remote Desktop Services (RDS) role, you can enable or disable the clipboard and local drives redirection in the RDS collection settings.
Open the Server Manager -> Remote Desktop Services -> Collections -> Tasks -> Edit Properties -> Client Settings. Uncheck the Clipboard and Drives options in the Enable redirecting for the following section.

The Drives option allows you to copy files using the clipboard (local drives will be redirected to an RDS session).
To change the RDS collection settings, you can use PowerShell:
Set-RDSessionCollectionConfiguration -CollectionName munRDSApp1 -ClientDeviceRedirectionOptions "Clipboard,Drive"
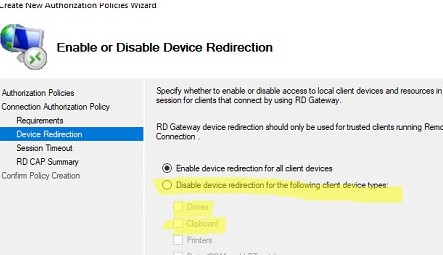
If you are using the Remote Desktop Gateway (RDGateway) to connect to the RDS host, note that you can enable or disable the clipboard usage in the CAP (Connection Authorization Policy) settings. By default, the Enable device redirection for all client devices option is enabled in the Device Redirection section. Here, you can disable the RDP clipboard and/or local drive redirection.
xcopy \\tsclient\c\iso\myapp.iso c:\rdsfolder\
This article explains the main ways to troubleshoot a non-working clipboard in an RDP session. The potential root causes range from a hung rdpclip.exe process to Remote Desktop host security policies that prevent clipboard redirection for text and file transfers.
10 comments
Hello,
just a question (you never know), is it possible to copy text from a web page (.php) in a browser (edge, ff) then, in a “RDP” remote desktop session (and RDP in citrix too) to paste the text into PowerShell, without DOM or invisible characters?
Cordially.
hola, no me aparece en el administrador ese proceso?? que puedo hacer?
hola, pero es rdpclip no esta en ejecución, y¿y no permite copiar, pero he verificado en otro servidor que si deja copiar y pegar, y tampoco tiene ese servicio pero si deja copiar y pegar
Using the Task Manager, you can kill the rdpclip.exe (RDP Clipboard Monitor) process and run it manually (Task Manager -> File -> Start new task -> rdpclip -> Enter).
It’s working, thanks.
Working beautifully on Win 2019
Great, I had everything set up correctly except for this entry:
HKEY_LOCAL_MACHINE\SOFTWARE\Policies\Microsoft\Windows NT\Terminal Services registry branch:
fDisableCdm =1
(It came out to 1 and changing it to 0 has let me copy and paste)
Thank you
Just a heads-up. I found that the $ENV.USERNAME Variable doesn’t always work in RDS. Therefore, you may need to use [ENVIRONMENT]::USERNAME in it’s place.
Restarting RDPclip did the trick for me.
I’m so happy to find this solution, I’ve been looking for this for weeks. Thank you very much!!!
Ok This edit fix My Problem (2022 New RDP server) Succes. Thanx
he Server Manager -> Remote Desktop Services -> Collections -> Tasks -> Edit Properties -> Client Settings. Uncheck Clipboard and Drives options in the Enable redirecting for the following section.
Sorry Edit: Add Local Drive selection save.