Windows OS Hub
  • Windows
    • Windows 11
    • Windows Server 2022
    • Windows 10
    • Windows Server 2019
    • Windows Server 2016
  • Microsoft
    • Active Directory (AD DS)
    • Group Policies (GPOs)
    • Exchange Server
    • Azure and Microsoft 365
    • Microsoft Office
  • Virtualization
    • VMware
    • Hyper-V
  • PowerShell
  • Linux
  • Home
  • About

Windows OS Hub

  • Windows
    • Windows 11
    • Windows Server 2022
    • Windows 10
    • Windows Server 2019
    • Windows Server 2016
  • Microsoft
    • Active Directory (AD DS)
    • Group Policies (GPOs)
    • Exchange Server
    • Azure and Microsoft 365
    • Microsoft Office
  • Virtualization
    • VMware
    • Hyper-V
  • PowerShell
  • Linux

 Windows OS Hub / Windows 11 / Change Network Connection (Adapter) Priorities in Windows

August 5, 2024 Windows 10Windows 11Windows Server 2019

Change Network Connection (Adapter) Priorities in Windows

Sometimes, you may need to manually configure network connection priorities to route traffic correctly on a Windows computer with multiple network adapters (Ethernet, Wi-Fi, VPN).

Windows automatically assigns priorities for network adapters based on connection (link) speed. The higher the connection speed, the higher the priority of such a network adapter (the lower the interface metric value). Windows typically uses the following priorities for different network interface types:

  1. Ethernet
  2. Wi‑Fi
  3. Mobile connections

If your computer is connected to a 100Mbps Ethernet port and a high-speed Wi-Fi router, you may find that the wireless network connection is prioritized.

See the Automatic metrics feature for IPv4 routes for a complete list of interface types, link speed criteria, and associated metrics in Windows.

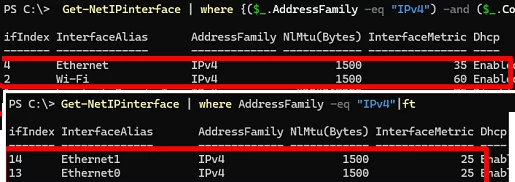
List available IPv4 network adapters and their priorities in Windows:

Get-NetIPinterface | where AddressFamily -eq "IPv4"

The InterfaceMetric value determines the priority of a network interface. The lower the InterfaceMetric, the higher the network connection priority.

Below are the results of the command from two different computers. The first screenshot shows that the Ethernet connection has a higher priority than the wireless Wi-Fi adapter. The second screenshot is taken from a computer with two Ethernet ports with the same priority.

view network adapter priorities and metrics in windows

The InterfaceMetric value indicates the priority of the IP route through this network adapter in the Windows routing table.

route print

print routing table and network interface metrics

The metric value in the ‘route print‘ command is the sum of the InterfaceMetric value from the Get-NetIPinterface command and the RouteMetric value from the Get-NetRoute command.

According to this routing table, network traffic will be sent by default through the first network interface with the lower metric.

Using PowerShell, you can check which network adapter will be used to access the Internet according to the current routing table:

Get-NetRoute -DestinationPrefix 0.0.0.0/0

Get-NetRoute - find IP routing table info

Two network routes with the same interface metric exist in this case. This means you cannot know which adapter is used for Internet access.

To manually change network interface metrics and assign priorities, use the Set-NetIPInterface cmdlet. To lower the priority of one of the interfaces, specify its name (InterfaceAlias) or interface index (ifIndex) and the new metric value:

Set-NetIPInterface -ifIndex 14 -InterfaceMetric 26

or

Set-NetIPInterface -InterfaceAlias Ethernet1 -InterfaceMetric 26

Set-NetIPInterface - configure interfacemetric priority

Learn more about configuring network settings in Windows using PowerShell.

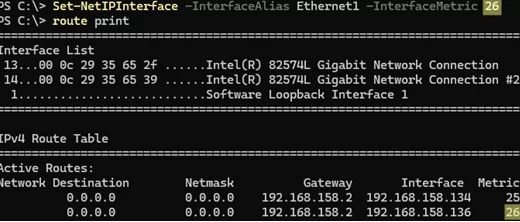
Make sure that the metric value for this adapter in the routing table has changed.

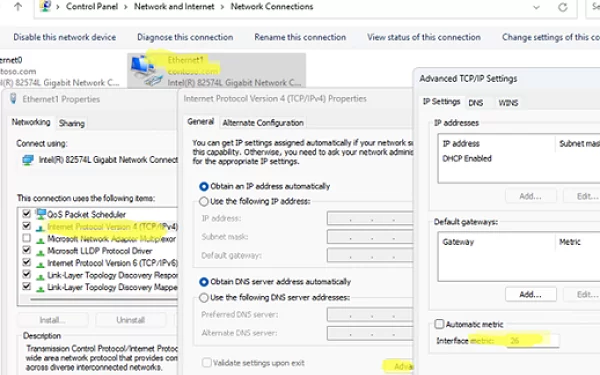
You can also change the priority (metric) of a network interface in the network adapter properties using the Network Connections applet (ncpa.cpl) in the Control Panel.

Open the properties of the IPv4 protocol in the adapter settings -> Advanced -> change the value in the Interface metric field and apply the changes.

By default, the Automatic metric option is enabled here, which indicates that the network adapter priority is set automatically according to the link speed.

Change interface metric from control panel

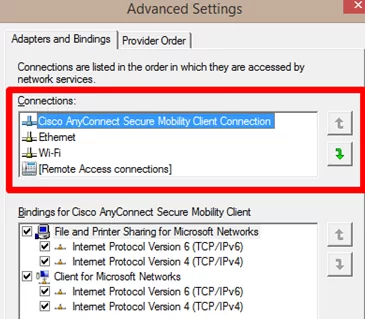
Before Windows 10 and Windows Server 2016, network adapter priorities can be configured using the Adapters and Bindings dialog. However, this Control Panel item has been removed in later versions of Windows.

Adapters and Bindings dialog in previous Windows versions

How to automatically disconnect Wi-Fi when an Ethernet cable is plugged in.
0 comment
6
Facebook Twitter Google + Pinterest
previous post
How to Migrate (Import) VMs from VMware ESXi to Proxmox
next post
Mount Physical and Network Drives in WSL2 (Windows Subsystem for Linux)

Related Reading

WMIC Command Not Found on Windows

May 20, 2025

Configuring Windows Protected Print Mode (WPP)

May 19, 2025

Unable to Map Drive: An extended error has...

May 13, 2025

Map a Network Drive over SSH (SSHFS) in...

May 13, 2025

How to Cancel Windows Update Pending Restart Loop

May 6, 2025

Leave a Comment Cancel Reply

join us telegram channel https://t.me/woshub
Join WindowsHub Telegram channel to get the latest updates!

Categories

  • Active Directory
  • Group Policies
  • Exchange Server
  • Microsoft 365
  • Azure
  • Windows 11
  • Windows 10
  • Windows Server 2022
  • Windows Server 2019
  • Windows Server 2016
  • PowerShell
  • VMware
  • Hyper-V
  • Linux
  • MS Office

Recent Posts

  • Map a Network Drive over SSH (SSHFS) in Windows

    May 13, 2025
  • Configure NTP Time Source for Active Directory Domain

    May 6, 2025
  • Cannot Install Network Adapter Drivers on Windows Server

    April 29, 2025
  • Change BIOS from Legacy to UEFI without Reinstalling Windows

    April 21, 2025
  • How to Prefer IPv4 over IPv6 in Windows Networks

    April 9, 2025
  • Load Drivers from WinPE or Recovery CMD

    March 26, 2025
  • How to Block Common (Weak) Passwords in Active Directory

    March 25, 2025
  • Fix: The referenced assembly could not be found error (0x80073701) on Windows

    March 17, 2025
  • Exclude a Specific User or Computer from Group Policy

    March 12, 2025
  • AD Domain Join: Computer Account Re-use Blocked

    March 11, 2025

Follow us

  • Facebook
  • Twitter
  • Telegram
Popular Posts
  • How to Allow Multiple RDP Sessions on Windows 10 and 11
  • How to Run Program without Admin Privileges and Bypass UAC Prompt
  • Fix: BSOD Error 0x0000007B (INACCESSABLE_BOOT_DEVICE) on Windows
  • Fixing ‘The Network Path Was Not Found’ 0x80070035 Error Code on Windows
  • How to Delete Old User Profiles in Windows
  • How to Install Remote Server Administration Tools (RSAT) on Windows
  • How to Backup and Copy Local Group Policy Settings to Another Computer
Footer Logo

@2014 - 2024 - Windows OS Hub. All about operating systems for sysadmins


Back To Top