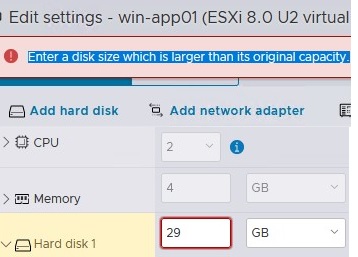
In this article, we will look at how to reduce the size of a virtual machine’s hard disk (VMDK) in VMware ESXi. From the vSphere Client GUI, you cannot reduce the size of a virtual disk (only the option to increase the VM disk size is available). An error occurs when you try to specify a smaller VM disk size: Enter a disk size which is larger than its original capacity.
Before you can reduce the size of the virtual disk on the VMWare ESXi datastore:
- Delete all virtual machine snapshots;
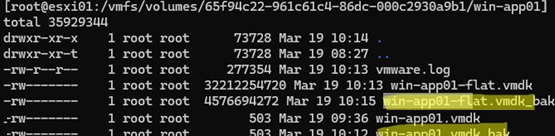
- Backup the virtual machine, or at least make a copy of the *.vmdk and the *-flat.vmdk files of the virtual hard disk you want to shrink. In the ESXi console, run the following commands:
cp vmname.vmdk backup_vmname.vmdk
 cp vmname-flat.vmdk backup_vmname-flat.vmdk

Reducing the virtual disk file in VMware is a two-step process:
- Shrink the partition size within the guest OS;
- Reduce the size of a VMware virtual machine’s VMDK file on VMFS (NFS) datastore.
How to Shrink Disk Partition in the Guest OS
First of all, reduce the size of the disk partition in the guest operating system
If the VM has a Windows guest OS installed:
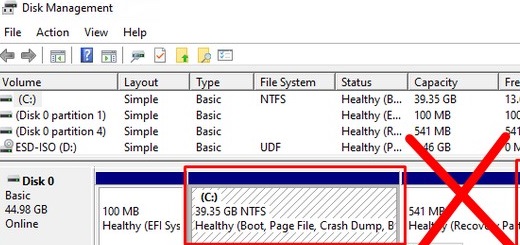
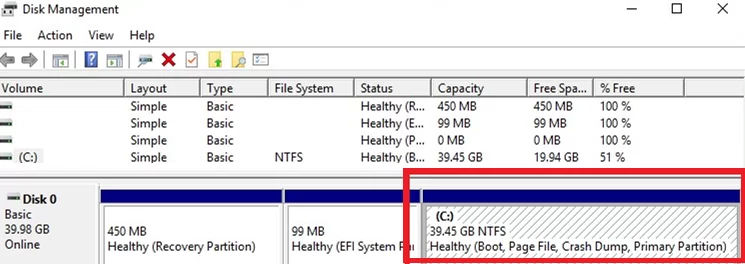
- Open the Disk Management console (
diskmgmt.msc); - In this case, the WinRE
Recovery Partitionis to the right of the partition we want to shrink. To shrink the partition in Windows, there should be no other partitions to the right of the partition you are trying to shrink. You need to either move the winre.wim recovery image from a separate partition to the system one, or move the recovery partition to the beginning of the partition table (both options are described in detail in the post: Cannot extend volume blocked by a recovery partition);
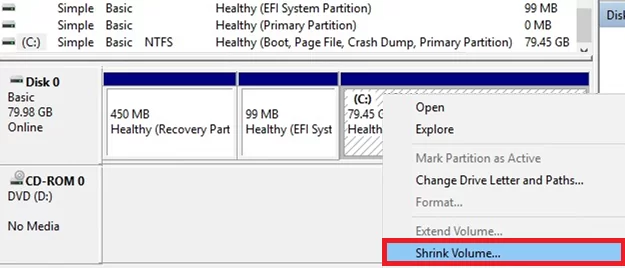
- You can now reduce the size of the main partition. In modern versions of Windows, you can reduce the size of the partition without rebooting; in older versions, you have to use the
sdeletetool. Click on the partition and select Shrink Volume;
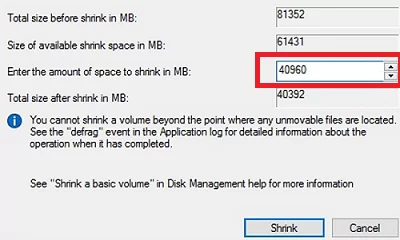
- Suppose you need to reduce VM disk size by 40GB. In the Enter the amount of space to shrink in MB box, type 40960 MB (
40 GB x 1024) and click Shrink;
- When the shrink task is complete, 40GB of unallocated space will appear to the right of your main partition.

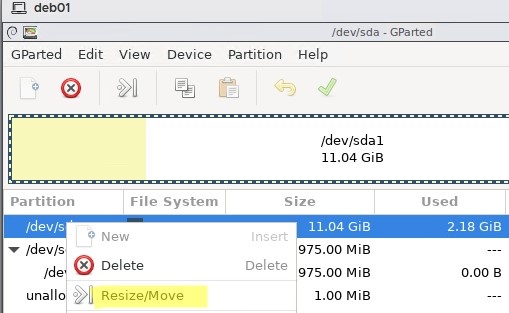
For the Linux VMs, you can boot the virtual machine from a GParted LiveCD (GNOME Partition Editor) if you need to reduce the size of the root partition. Shrink partitions using the GParted GUI’s Resize/Move menu. Move partitions if necessary. To apply changes, select Edit -> Apply all operations. The tool will resize partitions and reduce the file system using Rezise2fs.
Boot the Linux guest VM and check that everything is working correctly.
Reduce the Size of a VMware Virtual Machine Disk (VMDK)
You can now reduce the size of the VMDK file on the VMware VMFS file system.
- Shut down the VM;
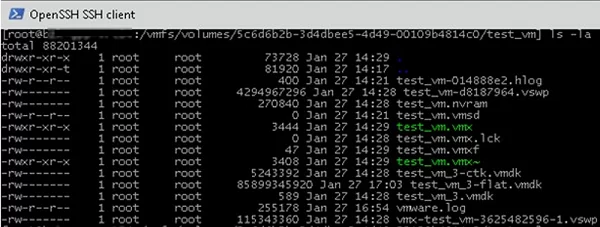
- Use SSH to connect to the ESXi host on which the virtual machine is registered;
- Navigate to the directory where the VM vmdk file is located (you can find the path to the VMDK file in the virtual disk properties in the vSphere client):
cd /vmfs/volumes/datastore/test-VM
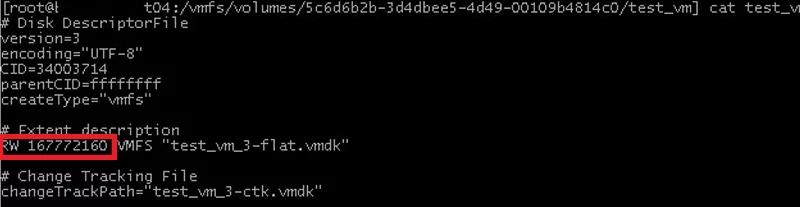
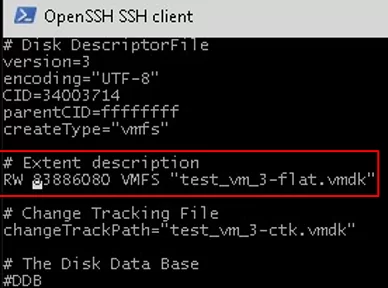
- List the virtual disk configuration file (*.vmdk) using the cat command:
# cat test_vm_3.vmdk
The size of the vmdk disk is set in the #Extent description section (after the RW symbols). In this case, it is 167772160 (80 GB *1024*1024*1024 / 512); - I want to reduce my VMDK disk by 40 GB. This means that I have to specify 83886080 in the Extent description section. This value is calculated as follows:
167772160(current disk size) –83886080(40 GB*1024*1024*1024 / 512); - Edit the virtual disk configuration file using vi:
# vi test_vm_3.vmdk - Use the down arrow key to scroll to the line containing the disk size and press
i(to edit it). Specify the new size of the virtual disk. Press ESC to exit the edit mode and then type:wq-> Enter to save the changes; - The remaining step is to migrate the VM to another datastore using Storage VMotion. The virtual machine properties will show the new virtual disc size after the virtual machine files are moved.
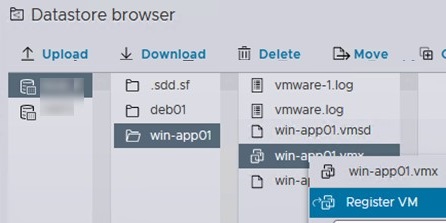
Then go to the Storage section, find the VMFS/NFS datastore where the VM is located -> click Datastore Browser, find the VM directory, click on the VMX file, and select Register.
Or you can clone the VMDK file using this command:
vmkfstools -i test_vm_3.vmdk test_vm_3_newsize.vmdk
Then delete the original VMDK file and clone the disk again, to revert to its original name:
rm test_vm_3.vmdk
 rm test_vm_3-flat.vmdk
 vmkfstools -i test_vm_3_newsize.vmdk test_vm_3.vmdk
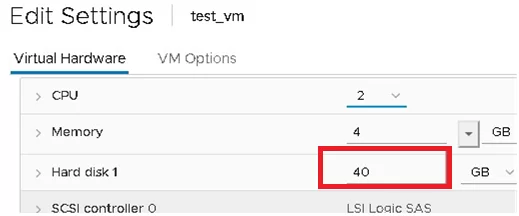
Make sure that the new size of the virtual disk is now displayed in the VM properties.
Then start the VM, logon to the guest OS, and check that the unallocated space has disappeared, and the disk size has been reduced.
Shrink a VMDK Disk Using VMware vCenter Converter Standalone
You can reduce the size of virtual machine hard disks using the VMware vCenter Converter Standalone. This free GUI tool allows you to clone a source VM and set the size of the new disk to be smaller than the original (there must be free space on the guest file system).
Cons:
- V2V conversion is quite slow;
- There must be enough free space on the datastore to save a new VM;
- A new MAC address is assigned to the new VM.
Pros:
- Simple graphical interface;
- An exact copy of a VM is created;
- The source VM won’t be corrupted by incorrect disk resizing actions.
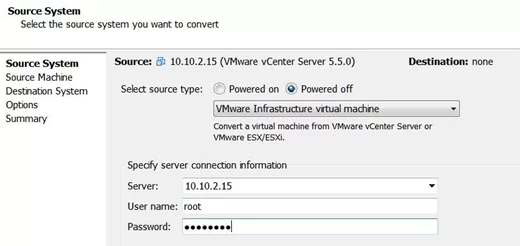
Run VMware Converter and specify the ESXi host or vCenter address.
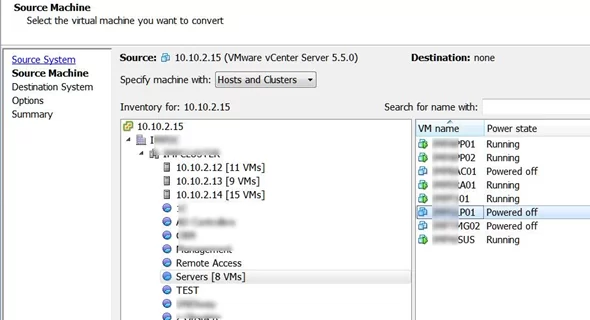
Select the source VM.
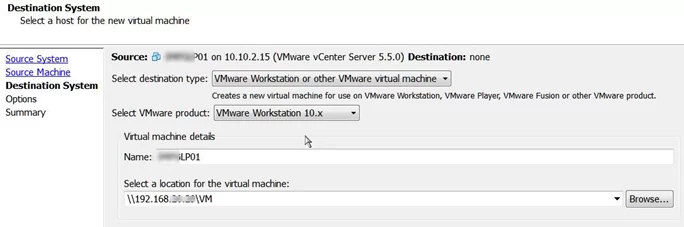
Set the virtual hardware settings for your new (destination) VM.
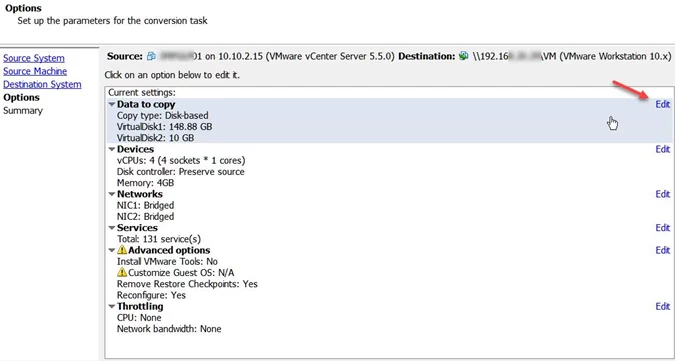
Go to the disk edit mode (Data to copy -> Edit).
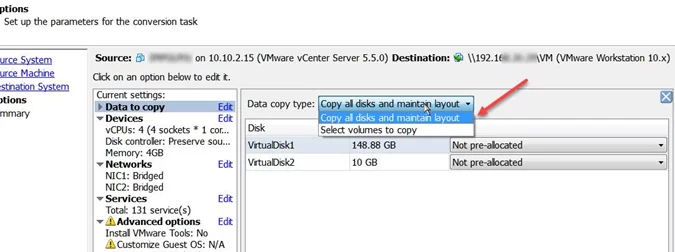
Select the copy mode: Select volumes to copy.
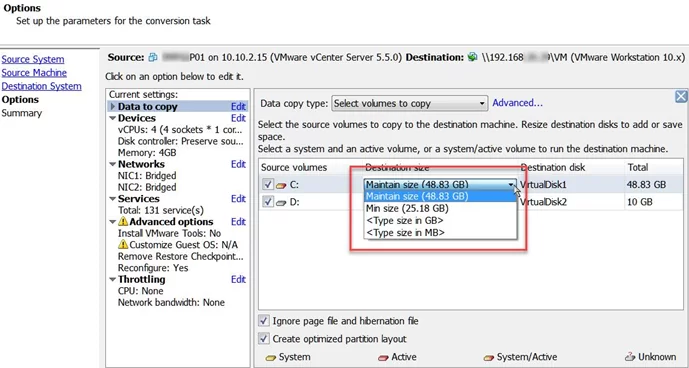
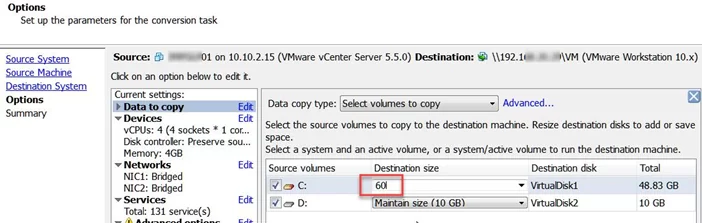
Specify the new virtual disk size for your new VM. In my example, 48 GB on the virtual disk is occupied by the guest OS, and the total disk size is 150 GB. We will reduce the size of the virtual disk to 60 GB.
Run the VM conversion process. When finished, turn off the source VM and power on the new one. Check that the virtual disk size has been reduced. The original VM can then be removed.
21 comments
Thanks for article. Note that ssh won’t connect to the ESXi host by default for security purposes.
https://kb.vmware.com/s/article/1019852
For some reason i do not get that second option on my VMware vCenter Converter Standalone. Dont know if that is a license thing or something else. Do i perform same procedure for a linux vm ?
Thank you! better service than some premier support I won’t mention
Thank you for this helpful article. I’ve used it a few times now. Some comments:
– It seems like the “Pros” and “Cons” above are transposed
– If you use vVols in your environment, you may wish to move the VM to regular storage first as resulting VM may not tolerate snapshots
– I usually shrink the drive in Windows more than needed, then come back at the end and expand it just to be safe
Successfully shrunk my HDD, thanks!
But there is still unallocated space.
How can I delete it?
I’ve tried reconnecting the HDD in the VM settings.
I converted the VM with the remaining unallocated space into a template.
The unallocated area disappeared from the deployed VM.
I think I’ll deal with this for now.
Sorry for the inconvenience.
– use translation tool
Perhaps you just needed to refresh the data in the disk management console.
This worked amazingly well. It’s just too bad it only works on offline VMs. If there was a way to do this online, that would be wizard!
After having shrinked one of the disk of a VM (edit vmdk file) I’m unable to Storage vMotion the VM. Get the following error: “Failed waiting for data. Error 195887107. Not found.” Any idea?
Have you checked the following VMware kb? You should disable the multi-writer attribute on your vmdk drives (the Sharing option).
Storage vMotion fails with Error 195887107 (66850)
https://kb.vmware.com/s/article/66850
Thank you for these instructions.
Reducing the VMDK worked well for guests running Windows.
With Ubuntu guests and LVM I had to manually correct and repair the GPT table before the machine would boot correctly
Thanks, I was able to clone physical Dell W10LTSC to Dell ESXi standalone host with to small datastore. Used sysprep, Clonezilla. New VM in ESXi overprovison size(to enable restore with Clonezilla). In VM, cmd.exe diskpart and “select volume x” and “delete volume x override”(recovery etc partitions), shrink c:, ssh to ESXi, resize in vmdk conf file. Unregister/register VM in ESXi to have it show the right size. 😀
This worked great for me – almost. The drives on the VM are the correct size, and the disks on the VM configuration are the right size, but the Datastore files are still reporting the original size for the VMDKs. How do fix this?
If it is a thin provisioned disk you may have to run this command on the ESXi host on that VMDK file. vmkfstools -K disk_name.vmdk
I had to do this to get my thin provisioned VMDK file back down in size after deleting a bunch of files. Check this KB for the steps I took. https://kb.vmware.com/s/article/2136514
This unfortunately does not work for NFS datastores and without sufficient space on a vmfs datastore to migrate the vm to you’re stuck with creating a new drive, copying the data and deleting the old or using v2v.
this seems to work well for MBR based disks. for GPT based ones, i had to shrink the main partition at least 2MB more than the projected total size of the disk (i even shrunk it 128MB more.. to be on the safe side). after manipulating the VMDK file and migrating the VM, i booted a GParted live distro and used gdisk’s (r)ecovery option to rebuild the backup GPT. in detail: i used the d option [use main GPT header (rebuilding backup)] and then (w)rote the GPT to the disk. hope this keeps someone from growing grey hair 😉
If you only want to compress the thin vmdk disk file without resizing the partition in the guest VM (you should fill the unused space with zeroed blocks in the case of a Linux VM.: # dd bs=1M count=8192 if=/dev/zero of=zero)
vmkfstools -K [disk]
If you have machine on Vcenter you dont need to unregister you just have to move to a diferent host and it will force the sync
Resizing my powered-off Exchange thin-provisioned VMDK data volumes did not work. The drives were right-sized in vCenter, but inaccessible in the OS. (Had migrated datastore after resizing). V2V 6.6 no longer supports disk option editing.
How to do this when the disk needs to be reduced by 1.5 Tb. In that case, according to this formula, the second number turns out to be greater than the first?
Just convert TB to GB and follow this guide.