For testing purposes or as a simple stub at the service deployment stage, I regularly need to run a simple web server on Windows. To avoid a full-featured IIS installation, you can run a simple HTTP web server directly from your PowerShell console. You can run such a web server on any TCP port using the built-in System.Net.HttpListener .NET class.
Open your PowerShell console and create an HTTP listener:
$httpListener = New-Object System.Net.HttpListener
Then specify the port to listen. In this example, I want to run an HTTP web server on Port 9090.
$httpListener.Prefixes.Add("http://localhost:9090/")
- Make sure that this port is not being used by other processes. You can find out which process is listening on a TCP or UDP on Windows.
- In order to listen in all network interfaces, use the
http://+:9090/address.
Start the listener:
$httpListener.Start()
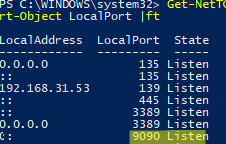
If you run this code, a separate process waiting for connection on port 9090 appears in Windows. Check it using the command:
nestat –na 9090
or display a list of open ports using PowerShell:
Get-NetTCPConnection -State Listen | Select-Object -Property LocalAddress, LocalPort, State | Sort-Object LocalPort |ft
New-NetFirewallRule -DisplayName "AllowTestWebServer" -Direction Inbound -Protocol TCP –LocalPort 9090 -Action Allow
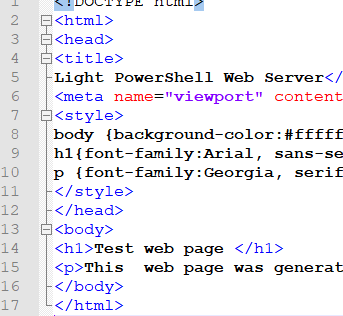
Now create a text file on your hard drive with the HTML you want your webserver to display. For example:
<!DOCTYPE html>
<html>
<head>
<title>
Lightweight PowerShell Web Server</title>
<meta name="viewport" content="width=device-width, initial-scale=1">
<style>
body {background-color:#ffffff;background-repeat:no-repeat;background-position:top left;background-attachment:fixed;}
h1{font-family:Arial, sans-serif;color:#000000;background-color:#ffffff;}
p {font-family:Georgia, serif;font-size:14px;font-style:normal;font-weight:normal;color:#000000;background-color:#ffffff;}
</style>
</head>
<body>
<h1>Test web page </h1>
<p>This web page was generated by PowerShell using the System.Net.HttpListener class</p>
</body>
</html>
I saved this HTML code to C:\PS\testwebpage.html with UTM-8 encoding.
Then run the following commands to read your HTML file and send a response to a user’s browser.
$context = $httpListener.GetContext()
 $context.Response.StatusCode = 200
 $context.Response.ContentType = 'text/HTML'
 $WebContent = Get-Content  -Path "C:\PS\testwebpage.html" -Encoding UTF8
 $EncodingWebContent = [Text.Encoding]::UTF8.GetBytes($WebContent)
 $context.Response.OutputStream.Write($EncodingWebContent , 0, $EncodingWebContent.Length)
 $context.Response.Close()
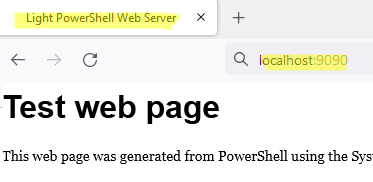
Open the URL address of your HTTP server in a browser (http://localhost:9090) or use PowerShell to get the content of a web page. The script returns an HTML code only once, after which your listener will be stopped automatically (only one user request is processed).
Free the TCP port:
$httpListener.Close()
If you want the HTTP server to keep returning your page, you need to add PowerShell code to the loop. The following example starts an HTTP server in a loop that ends when any key is pressed in the PowerShell console.
write-host "Press any key to stop the HTTP listener after next request"
 while (!([console]::KeyAvailable)) {
 $context = $httpListener.GetContext()
 $context.Response.StatusCode = 200
 $context.Response.ContentType = 'text/HTML'
 $WebContent = Get-Content -Path "C:\PS\testwebpage.html" -Encoding UTF8
 $EncodingWebContent = [Text.Encoding]::UTF8.GetBytes($WebContent)
 $context.Response.OutputStream.Write($EncodingWebContent , 0, $EncodingWebContent.Length)
 $context.Response.Close()
 Write-Output "" # Newline
 }
 $httpListener.Close()
A PowerShell HTTP server remains alive until you close the PowerShell console or end the session by using the .Close method.
You can run such a lightweight web server on any Windows host without Internet Information Services or other third-party software installation. No administrator privileges are required. You may use this HTTPListener as a simple REST server or to get information from a remote computer via HTTP.


