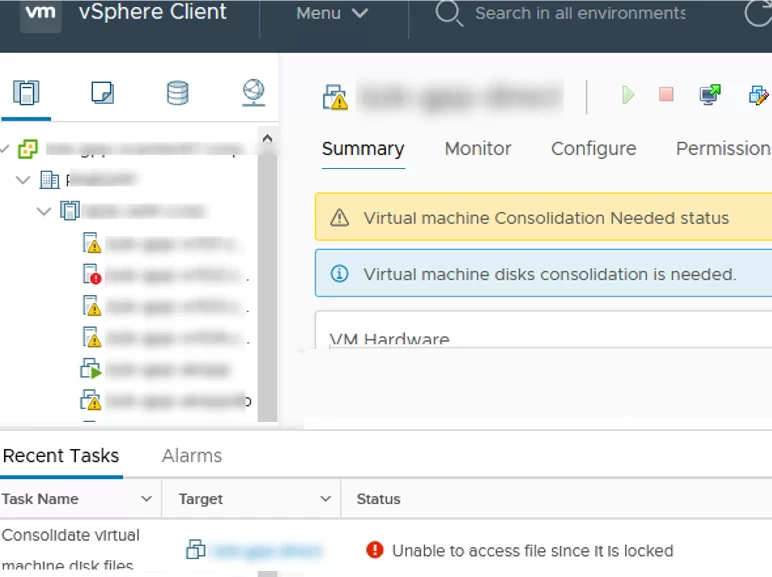
Very often when deleting snapshots or consolidating disks of virtual machines running on VMWare ESXi hosts, I see the “Unable to access a file since it is locked” error. This frequent issue is related to errors in a VM backup software (I came across the issue in Veeam, HPE/Micro Focus Data Protector, Veritas.) If the snapshot of the virtual disk is locked, you won’t be able to consolidate disks (when you see the error ‘Virtual machine disks consolidation is needed’), move a disk to another datastore using Storage vMotion, back up a VM or delete the current snapshot. Sometimes you cannot even turn on a locked virtual machine.
An error of access to a locked virtual disk file or a snapshot in VMWare may look like this:
Unable to access file since it is locked.
An error occurred while consolidating disks: One or more disks are busy.
Also, you may see this error:
An error occurred while consolidating disks: msg.snapshot.error-DISKLOCKED.
The most often the “Unable to access file since it is locked” error appears when:
- Some files of a powered on virtual machine contain tags indicating that they are locked by other ESXi hosts;
- When virtual disks are added to the backup appliance and the backup session fails.
To find the source of a lock and release it, you have to identify the locked files first.
- Using an SSH client, connect to the ESXi host prompt the problem VM is registered on;
- Go to the directory with the virtual machine files:
cd /vmfs/volumes/VMFS_DATASTORE_NAME/LOCKED_VM - Look for consolidation and file locking errors in vmware.log:
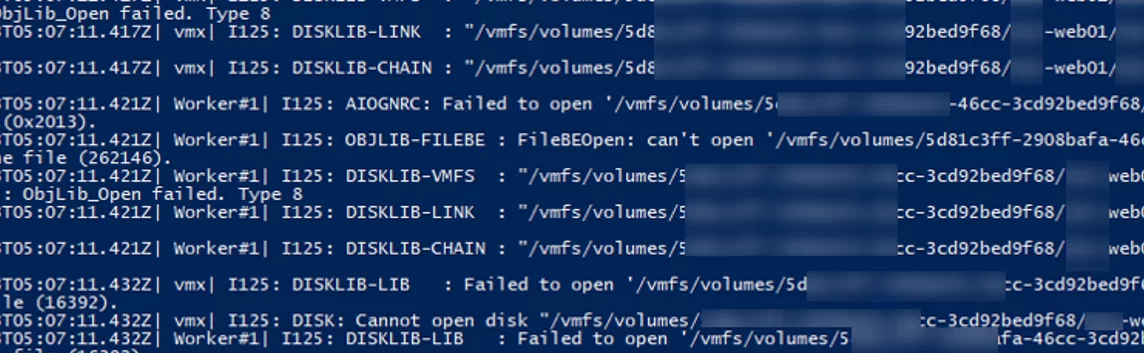
cat vmware.log | grep lock - The log will contain errors like that:
VigorSnapshotManagerConsolidateCallback: snapshotErr = Failed to lock the file (5:4008)
2020-09-09T05:07:11.432Z| vmx| I125: DISK: Cannot open disk "/vmfs/volumes/5121c3ff-2303a3a-33bb-12345678221/mun-web01/mun-web01_1-000002.vmdk": Failed to lock the file (16392).
2020-09-09T05:07:11.432Z| Worker#1| I125: DISKLIB-LIB : Failed to open '/vmfs/volumes/5121c3ff-2303a3a-33bb-12345678221/mun-web01/mun-web01-000002.vmdk' with flags 0xa Failed to lock the file (16392).
2020-09-09T05:07:11.432Z| Worker#1| I125: DISK: Cannot open disk "/vmfs/volumes/5121c3ff-2303a3a-33bb-12345678221/mun-web01/mun-web01-000002.vmdk": Failed to lock the file (16392).
2020-09-09T05:07:11.432Z| vmx| I125: [msg.fileio.lock] Failed to lock the file

- In this example, you can see that the file mun-web01_1-000002.vmdk is locked;
- Using the following command, you can display the current snapshot chain starting with the specified one to a flat disk:
vmkfstools -qv10 mun-web01_1-000002.vmdk - Then get the information about the snapshot and its owner (RO owner):
vmkfstools -D mun-web01-000001-delta.vmdk
Lock [type 10c000021 offset 242835456 v 856, hb offset 3153920
gen 3, mode 1, owner 5cbac61a-4b6e32b7-0480-d06726ae7900 mtime 5199410
num 0 gblnum 0 gblgen 0 gblbrk 0]
RO Owner[0] HB Offset 3153920 5cbac61a-4b6e32b7-0480-d06726ae7900
Addr <4, 532, 83>, gen 859, links 1, type reg, flags 0, uid 0, gid 0, mode 600

The RO Owner line shows the MAC address of the ESXi host network adapter that has locked the snapshot file (the MAC address is highlighted on the screenshot). Also, note the Mode value:
- mode 1 – a read/write lock (for example, of a powered on VM);
- mode 2 – usually means that the virtual disk is locked by the backup application.
To find an ESXi server if a MAC address is known, you can use the following VMware PowerCLI commands (convert the MAC address you got earlier to the format with colons):
Import-Module VMware.VimAutomation.Core -ErrorAction SilentlyContinue
 connect-viserver mun-vcenter
 Get-VMHost | Get-VMHostNetworkAdapter | Where-Object {$_.Mac -like "d0:67:26:ae:79:00"} | Format-List -Property *

The ESXi hostname will be shown in the VMHost field.
Also, you can display the ARP table directly from the ESXi host and get IP and MAC addresses of all other ESXi servers in the VMkernel network:
esxcli network ip neighbor list

To unlock a VM file, just restart the ESXi host you have found (migrate all VMs from it using VMotion in advance). If you cannot restart the host, restart the Management Agent (hostd) in the Maintenance Mode from the host’s SSH console:
services.sh restart
Then try to consolidate disks or delete a VM snapshot again.
To fix the problem, open the settings of the VM, Veeam proxy is installed on. Remove the disk of the VM that has locked files from the VM hardware.
Make sure that you have checked “Remove from virtual machine” instead of “Remove from virtual machine and delete files from disk” otherwise you can accidentally remove your vmdk disk.