The Active Directory Users and Computers (ADUC) snap-in is one of the most commonly used graphical consoles for managing Active Directory domain objects, such as users, computers, groups, organizational units (OU) and permissions. The Active Directory MMC snap-in (dsa.msc) can be installed on both Windows Server hosts and Windows 11/10 workstations.
The ADUC console is part of the Remote Server Administration Tools (RSAT), used to remotely manage Windows Server roles and features, and is installed by default only on Active Directory domain controllers. This article explains how to install and use the Active Directory Users & Computers (ADUC) management snap-in from any Windows workstation.
- How to Install Active Directory Users & Computers on Windows 11 and 10
- Install Active Directory (ADUC) Console via PowerShell
- Installing Active Directory Users & Computers Snap-in on Windows Server
- Working with the Active Directory Users and Computers (ADUC) Console
- Using the ADUC Console from a Non-domain Computer
How to Install Active Directory Users & Computers on Windows 11 and 10
The Active Directory console is available for Windows 11 and 10 workstations as part of the Remote Server Administration Tools (RSAT). This component is not installed by default in Windows and can be added as a Feature on Demand (FoD) via the Settings -> System -> Optional Features -> View Features. Check the RSAT: Active Directory Domain Services and Lightweight Directory Services Tool in the list and click Add.
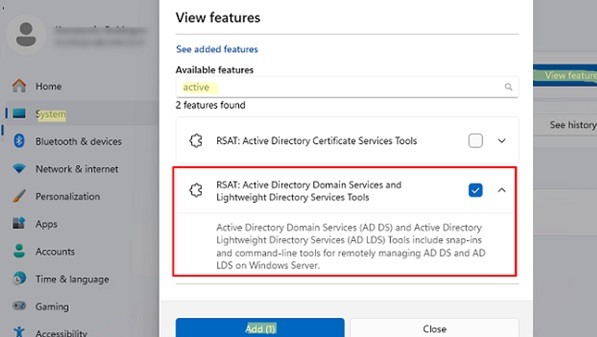
Windows will connect to Microsoft servers to download and install the Active Directory Remote Server Administration Tools (including Active Directory graphical consoles, command prompt tools, and Active Directory PowerShell module).
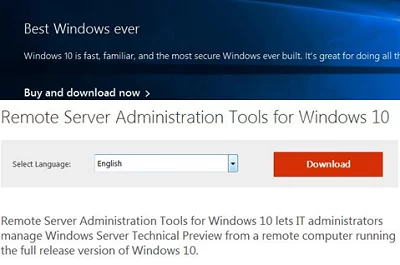
Before the release of Windows 10 version 1809, the RSAT components were not included in the system image as ‘Features on Demand’. Instead, they required the installation of a separate MSU update (KB269364). Below are the links to download RSAT for previous Windows versions:
- RSAT for Windows 10 1803/1709 — https://www.microsoft.com/en-us/download/details.aspx?id=45520
- RSAT for Windows 8.1 — https://www.microsoft.com/en-us/download/details.aspx?id=39296
Download the RSAT version that matches your operating system’s bitness. Double-click the MSU file to start installation:
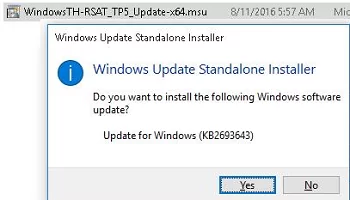
Or install the MSU file from the command prompt in quiet mode:
wusa.exe C:\Install\WindowsTH-RSAT_TP5_Update-x64.msu /quiet /norestart
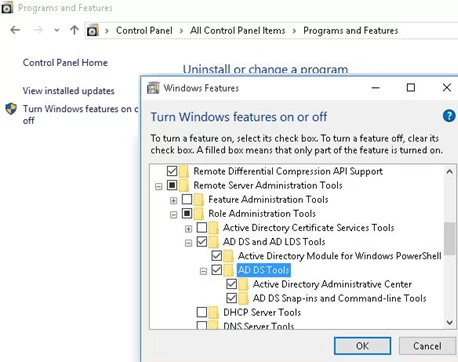
Once the RSAT installation is complete, restart your computer. Next, activate the AD management tools in RSAT:
- Open the Turn Windows features on or off dialog by running the
optionalfeatures.execommand - Expand Remote Server Administration Tools-> Role Administration Tools -> AD DS and AD LDS Tools in the features tree
- Check AD DS Tools and click OK.

Install Active Directory (ADUC) Console via PowerShell
In my opinion, it is much easier and faster to install a set of AD management tools on Windows 11 using PowerShell. Check whether the AD tools are installed on a computer.
Get-WindowsCapability -Online -Name Rsat.ActiveDirectory*
If the component is missing (NotPresent), add it using the following command:
Get-WindowsCapability -Online -Name Rsat.ActiveDirectory*|Add-WindowsCapability -Online

In Windows 11, the RSAT.ActiveDirectory optional feature is downloaded from Microsoft servers over the internet. If your computer is on an isolated network or direct internet access is blocked, installing RSAT features will fail with error 0x800f0954.

In this case, download an offline ISO image containing the Windows Feature on Demand components for your version of Windows from the Microsoft website.
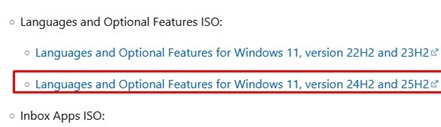
Mount the downloaded FoD ISO image on the workstation and run the offline installation of the AD management tools from it.
Add-WindowsCapability -Online -Name Rsat.ActiveDirectory.DS-LDS.Tools~~~~0.0.1.0 -LimitAccess -Source D:\LanguagesAndOptionalFeatures\

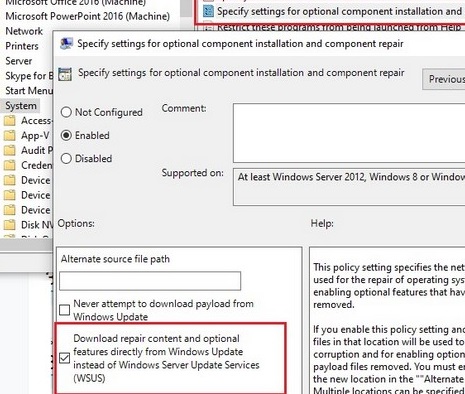
If you are installing Active Directory consoles on computers that receive updates from a corporate WSUS server, you must apply the ‘Specify settings for optional component installation and component repair‘ GPO to them with the Download repair content and optional features directly from Windows Updates instead of Windows Server Updates Services (WSUS) option enabled. In this case, instead of trying to retrieve Features on Demand components from the intranet WSUS server, the Windows computer will contact Microsoft’s servers directly via the internet.
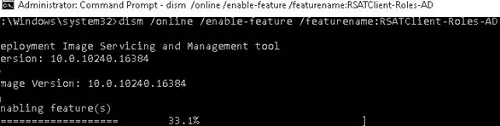
Before Windows 10 build 1809, it was possible to install the ADUC snap-in using DISM from the command prompt as well:
dism /online /enable-feature /featurename:RSATClient-Roles-AD
 dism /online /enable-feature /featurename:RSATClient-Roles-AD-DS
 dism /online /enable-feature /featurename:RSATClient-Roles-AD-DS-SnapIns
Installing Active Directory Users & Computers Snap-in on Windows Server
The ADUC console and other Active Directory administration tools are installed automatically on a Windows Server host when the ADDS role is installed, and the host is promoted to a domain controller. However, it is possible to add AD management tools to any domain-member Windows Server host.
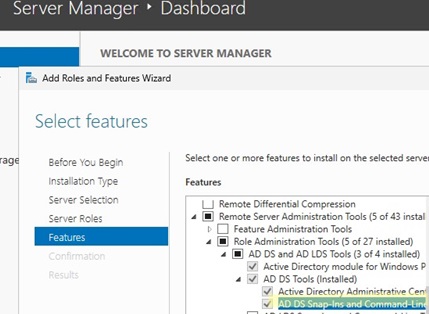
- Via Server Manager: Add Roles and Features -> Features -> Remote Server Administration Tools -> AD DS and AD LDS Tools -> AD DS Tools -> AD DS snap-Ins and Command-line tools

- Or install the ADDS management tools using PowerShell:
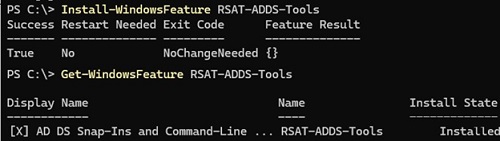
Install-WindowsFeature RSAT-ADDS-Tools
Check that this Windows Server feature is installed:
Get-WindowsFeature RSAT-ADDS-Tools
Working with the Active Directory Users and Computers (ADUC) Console
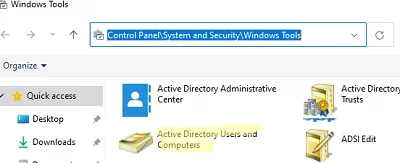
After installing the RSAT tools on a computer, you will find a link to launch the Active Directory Users & Computers MMC console in the following section of the Control Panel:
- On Windows 11: Windows Tools (Control Panel\System and Security\Windows Tools):
- On Windows 10: Windows Administrative Tools
To quickly navigate to this section of the Control Panel, run the command: control /name Microsoft.AdministrativeTools
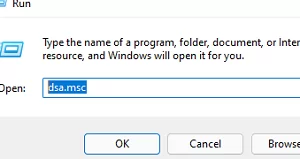
To launch the ADUC console, either click the shortcut in the Control Panel or run the following command via Win+R:
dsa.msc
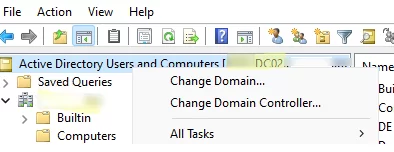
If your computer is joined to an Active Directory domain, the ADUC will connect to a domain controller based on the current Logon server ($env:LOGONSERVER). The name of the DC that the MMC console is currently connected to is shown at the top.
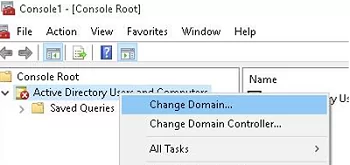
To connect to another AD domain controller or another domain, click the console root and select the Change Domain or Change Domain Controller from the context menu.
The Active Directory console shows a tree-like Organizational Unit (OU) structure of your domain (and a separate section containing AD Saved Queries).
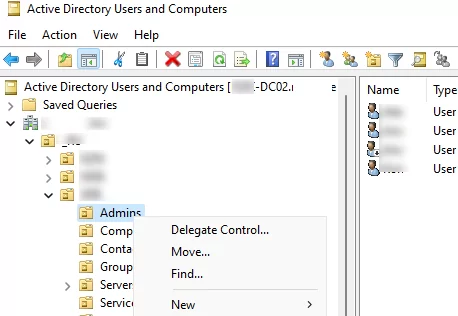
The ADUC snap-in allows administrators to perform the following actions in Active Directory:
- Create Organizational Units (OUs) according to the physical or logical structure of the company
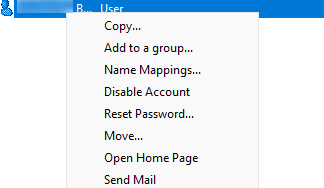
- Create, rename, move, edit or delete users, computers, groups, and contacts
- Reset user passwords in Active Directory or disable/unlock accounts
- Search for objects in AD
- Delegate permissions to create/edit/delete objects in Active Directory to other users or groups
- Move the FSMO roles between the domain controllers and raise the domain functional level
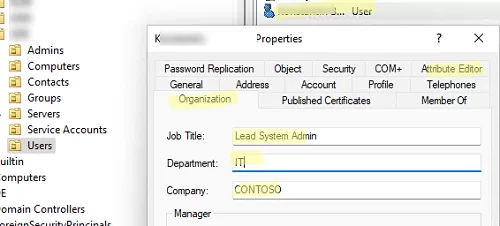
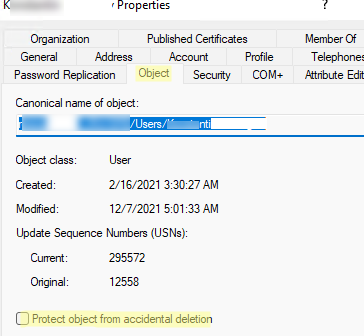
- View or edit the properties of domain objects. For example, open the user properties and edit their attributes. Some user properties can be found on the relevant tabs. The complete list of user attributes is available on the Attribute Editor tab (object properties cannot be edited when connected to a read-only domain controller, RODC)
Using the View -> Add/Remove columns menu, you can add object attributes you want to see in the ADUC console. For example, you can also add a separate tab containing a photo of the AD user.
To show system containers and object properties in the Active Directory snap-in (they are hidden by default), enable the option View -> Advanced Features.
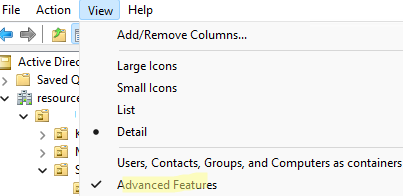
Additional system tabs will then be displayed for all objects. For example, you can get a canonical object name, view an account creation date, or check the Protect object from accidental deletion option in the Object tab.
Using the ADUC Console from a Non-domain Computer
To connect to a domain controller via the ADUC console from a non-domain-joined workstation (workgroup member), use this method:
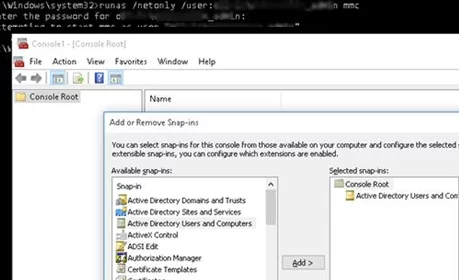
- Open the command prompt and run the mmc console as a different user:
runas /netonly /user:woshub\jsmith mmc - In the empty MMC console, select File -> Add/Remove Snap-In
- Move the Active Directory Users and Computers snap-in to the right panel and click Add
- To connect to a domain, click the console root and select Change domain. Type the domain name.
runas /user:woshub\username "c:\windows\system32\mmc.exe %SystemRoot%\system32\dsa.msc /domain:woshub.com"The ADUC console will then connect to the domain controller and display the container (OU) structure of the specified Active Directory domain.
ADAC) console. Although the two consoles have similar functionality, the ADAC (dsac.exe) supports a number of advanced features.- Managing the AD Recycle Bin and restoring deleted objects.
- Configure Fine-Grained Password Policy (FGPP) in AD
- ADAC is built on PowerShell. This means that the PowerShell commands are being executed in the background. It provides advanced features such as global search, instant password resets, and PowerShell command history.
- Managing a multi-domain environment from a single console.
- Bulk Active Directory operations.