Let’s look at several ways to access data stored on the datastore with the VMFS file system of the ESXi host (these are configuration files, data files, and snapshots of virtual machines) from Linux, Windows, and VMware hypervisor. Actually, this article is based on a real case of our client when a single VMware ESXi host has suddenly crushed.
If your ESXi host crashes, but the local disks (or LUNs) are still functional, you can copy the virtual machine files and run the VMs on another host (on VMware Workstation or even on Hyper-V). Common operating systems (Windows and Linux) by default won’t see data on a partition with a VMFS file system, because they don’t have a VMFS driver
Let’s consider three scenarios of accessing data on the VMFS datastore.
How to Mount VMFS File System on Linux (Ubuntu)?
Let’s look at how to mount a partition with the VMFS file system on a computer running Ubuntu 20.04 LTS installed. Install the vmfstools package depending on the version of the VMFS file system:
- vmfs-tools – supports VMFS 3 (ESXi 3.x, 4x) andVMFS 5 (ESXi 5.x)
- vmfs6-tools – VMFS 6 (used by default in modern versions of ESXi since vSphere 6.5)
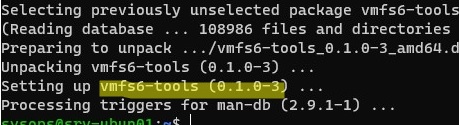
In our example, the disk was connected to an ESXi 7.1 host, so you need to install vmfs6-tools to access data on a VMFS6 file system:
# apt-get -y install vmfs6-tools
Create a mount directory:
# mkdir /mnt/vmfs
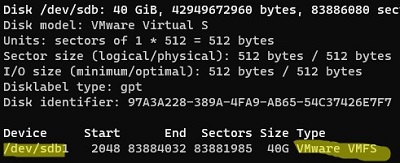
Get the disk name and partition type:
# fdisk -l
In our example, you can see that the /dev/sdb drive has an sdb1 partition with the VMware VMFS file system.
# parted -l
To mount this VMFS partition on Linux, run the command:
# sudo vmfs6-fuse /dev/sdb1 /mnt/vmfs
The command returned that the specified partition contained a VMFS6 file system and mounted it to the target directory.
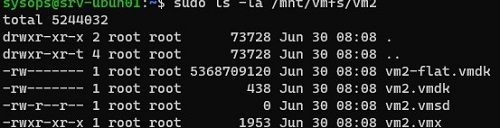
Virtual machine files on a VMFS disk are available for you in read-only mode and you can copy them or quickly run them with VMware Player/Workstation.
An error may occur while mounting a partition:
VMFS Unsupported version 5
Unable to openfilesystem
In this case, you need to install vmfs-tools which supports VMFS3 and VMFS5:
# apt-get install vmfs-tools
It remains to mount the disk partition with VMFS 5 datastore:
#vmfs-fuse /dev/sdb1 /mnt/vmfs
Mounting VMFS Partition on a New VMware ESXi host
Above, we looked at how to mount VMFS partition using third-party VMFS drivers. However, the most universal way to access data on a VMFS data store of a failed server is to connect its disks to a new ESXi server (you can install ESXi on a new host in less than an hour). I think this is the easiest way to mount a VMFS volume from a physical hard drive or LUN on a storage array device (connected via Fiber Channel or iSCSI).
Follow the steps below to mount an existing VMFS datastore on a new ESXi host without formatting it:
- Connect to the new ESXi server (ESXi 6.7 in this example) using the vSphere Web Client;
- Connect the disk to the new host and perform Storage rescan (if your VMFS is located on an iSCSI LUN, you connect it according to the guide);
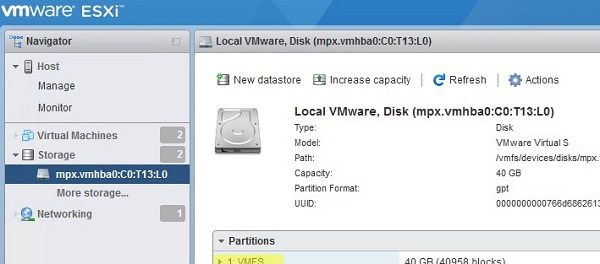
- Go to the Devices tab, and find your LUN in the list. Make sure ESXi sees the VMFS partition there;
 If the VMFS datastore has been removed from the storage device, check the post “How to recover an accidentally deleted VMFS datastore?”
 - Connect to the console of the ESXi host via SSH and run the command:
vmkfstools -V
- This command should find available VMFS partitions on disks and mount them;
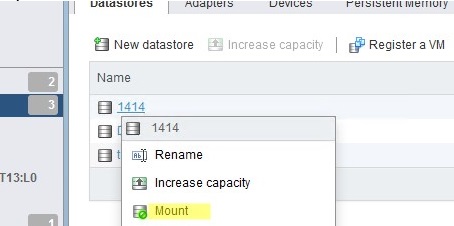
- Open vSphere Client and make sure your VMFS storage is now available. Click on it and select Mount;

- Open the Datastore Browser. Now you can access all files on VMFS datastore. You can find the necessary vmx files, register them on the current ESXi host, and immediately run critical virtual machines.
Accessing VMFS Datastore from Windows
In order to mount the VMFS partition and access virtual machine files from Windows, you’ll need a special Java driver – Open Source VMFS Driver. This driver requires Java version 6 or later and allows to mount VMFS volumes in a read-only mode.
You can download Open Source VMFS Driver here: https://code.google.com/archive/p/vmfs/. This project has not been updated since 2010 and the latest version of the driver that is available on the site is VMFS Driver r95, which supports only VMFS 3 (< VMware ESXi 5.x).
- Download Open Source VMFS Driver (fvmfs_r95_dist.zip) and extract it to any directory (e.g., C:\vmfs);
- You can check the operation of the java-application fvmfs.jar as follows:
cd \vmfs
java -jar fvmfs.jar - Next, you need to determine the number of the disk containing the VMFS datastore connected to your Windows computer. You can find the disk number in the Disk Management Console or using diskpart (in our example, the connected disk has the index 1 – Disk1. For fvmfs driver, this disk has the following name \\.\PhysicalDrive1);
- Try to get information about this disk:
java -jar fvmfs.jar \\.\PhysicalDrive1 info

- Share this disk with WebDAV:
java -jar fvmfs.jar \\.\PhysicalDrive1 webdav - Make sure that the WebClient service is started. If the service is disabled, run it;

- Mount the shared disk:
net use * http://localhost:50080/vmfs - A new disk containing read-only VMFS datastore will appear in Windows;

- Do not close the command prompt window while working with files on the VMFS datastore.


14 comments
Hi.
I cant mount the vmfs drive with net use * http://localhost:50080/vmfs
Get error
System error 67 has occurred.
The network name cannot be found.
I can open the webaddress in IE and see the drive
Running Windows 2012 R2, java 8
Hy! Try to install Desktop Experience feature and check that Web Client service is running.
Is there a way to gain write access to a vmfs version 5 file system from a linux or windows machine?
The most recent version of vmfs tools that I’ve found only provide read access to vmfs version 5 file systems.
vmfs-tools provide read-only access to vmfs datastore
However, you can copy the virtual machine files to a different (working) vmfs datastore
My goal was to gain access to the VMFS to repair some broken things and not just pull data from it. In the end, since my setup is rather small, I just bit the bullet and created new datastores and pulled what I needed from the old ones into the new ones then wiped out the old datastores which eliminated the problem. It seems like something more surgical would have been better but in the end, I needed to get the job done.
Always wonder why these examples are not on a REAL os like Red-hat or Cent. Ubuntu for kids.
Hi, my problem is that I received the exception:
“Exception in thread “main” java.io.IOException: This file has no allocation table (RDM)”
What can I do?
This was an outstanding article that helped me get past a hurdle I was having cloning a bunch of new machines. FYI to others, keep in mind you should “sysprep” your windows OS after you start it up. Thanks for posting this!
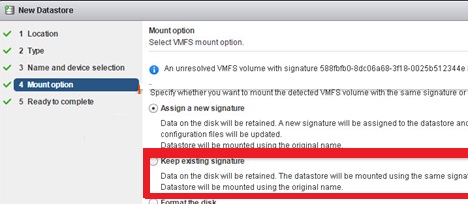
I don’t see “keep existing signature” as an option. I am using vmware esxi 6.7 – is this an older version in your screenshots?
This screenshot is from ESXi 6.0. What VMFS mount options are available in your ESXi 6.7?
Mount options aren’t available at all, so there’s 4 options instead of 5. Can only add a new datastore and it doesn’t show this device as available because it’s already formatted. It does show the drive under Storage Devices. And I’ve successfully found the partition with a windows tool.
PHIL, did you ever figure out a solution? I am running into the same issue, trying to use 6.7 and mount old VMFS
One option is to use qemu-img to convert to a raw or a qcow2 partition. Obviously this is painful if you need to boot up in VMware again but if you just need to grab files it is probably easiest to just convert to raw.
I got a need to restore data from failed RAID10. ESXi 6.5 was able to boot, but completely hangs on trying to do something like “ls /vmfs/volumes/”.
This article was a great start for data recovering operation! Everything worked fine. As I had to work with VMFS6 – there is another tool available: vmfs6-tools. The rest – worked in the same way.