PowerShell Remoting is a great tool that allows you to connect and run commands on remote computers via WinRM. If computers are joined to the Active Directory domain, then PSRemoting uses Kerberos to authenticate to remote hosts. However, if your computers are in a workgroup, you will have to use NTLM (TrustedHosts) or SSL certificates for authentication. Let’s look at how to configure and use PSRemoting (WinRM) in a Workgroup (Non-Domain) environment.
In this example, there are two hosts in a Windows workgroup:
- Administrator workstation —
192.168.13.100 - User’s computer —
192.168.13.222
Our task is to connect to the user’s computer remotely via PowerShell Remoting.
The first step is to enable and configure WinRM on the remote host. You will have to enable WinRM locally or remotely (for example, using RDP, psexec, or GPO).
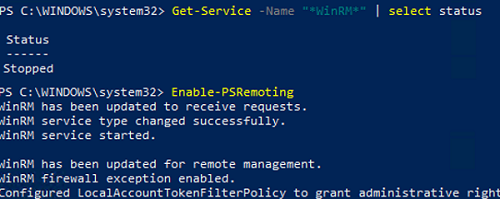
Make sure that the WinRM service is running on the target user’s computer:
Get-Service -Name "*WinRM*" | select status
If the service is not running, enable it:
Enable-PSRemoting
WinRM has been updated to receive requests.
WinRM service type changed successfully.
WinRM service started.
WinRM has been updated for remote management.
WinRM firewall exception enabled.
Configured LocalAccountTokenFilterPolicy to grant administrative rights remotely to local users.
If the Public type of network connection is set on a computer, you will see the following error when enabling WinRM:
Set-WSManQuickConfig : ... WinRM firewall exception will not work since one of the network connection types on this machine is set to Public. Change the network connection type to either Domain or Private and try again.
Change the network type to Private (Set-NetConnectionProfile -NetworkCategory Private) or run the command below:
Enable-PSRemoting –SkipNetworkProfileCheck
Open the port TCP/5985 in Windows Defender Firewall to connect to WinRM. The easiest way is to open a Windows Firewall port using PowerShell. In this example, we will open the remote access only for the IP address of the administrator’s computer (more secure), but you can open it for everyone (specify Any instead of an IP address):
Set-NetFirewallRule -DisplayName "Windows Remote Management (HTTP-In)" -RemoteAddress 192.168.13.100
 Enable-NetFirewallRule -DisplayName "Windows Remote Management (HTTP-In)"
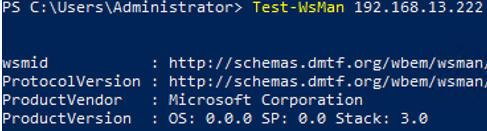
On the administrator computer, make sure that the user’s computer now accepts remote connections via PSRemoting:
Test-NetConnection 192.168.13.222 –Port 5985
 Test-WsMan 192.168.13.222
However, if you try to connect to a user computer remotely using the Invoke-Command or Enter-PSSession cmdlets, the following error appears:
Enter-PSSession 192.168.13.222
Enter-PSSession : Connecting to remote server 192.168.13.222 failed with the following error message: The WinRM client cannot process the request. If the authentication scheme is different from Kerberos, or if the client computer is not joined to a domain, then HTTPS transport must be used or the destination machine must be added to the TrustedHosts configuration setting. Use winrm.cmd to configure TrustedHosts. Note that computers in the TrustedHosts list might not be authenticated. PSRemotingTransportException.
The WinRM HTTP Listener on the remote computer only allows connection with Kerberos authentication.
Get-ChildItem -Path WSMan:\localhost\Service\Auth\
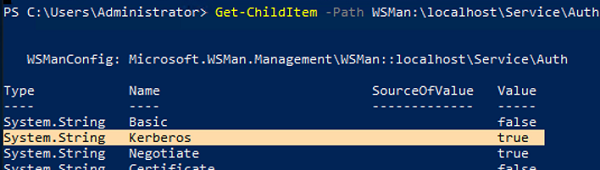
In order to use Negotiate authentication with NTLM, your computer must trust the remote computer. In a domain, this is achieved using Kerberos, while in a workgroup environment, you’ll have to add the computer’s IP addresses to TrustedHosts.
Add a user computer to TrustedHosts on the administrator’s computer (you can do it using its IP address or FQDN):
Set-Item wsman:\localhost\client\TrustedHosts -Value 192.168.13.222 -Force
get-Item WSMan:\localhost\Client\TrustedHosts
To clear the TrustedHosts list:
Set-Item WSMan:\localhost\Client\TrustedHosts -Value "" –Force
To add a new computer to the TrustedHosts list, use the -Concatenate option:
Set-Item WSMan:\localhost\Client\TrustedHosts -Value 192.168.13.200 -Concatenate
You can also allow remote connection to all computers (usually, it is not recommended as one of the major disadvantages of NTLM authentication is vulnerable to various malicious attacks).
Set-Item wsman:\localhost\Client\TrustedHosts -value *
Then try to connect to the remote computer over PSRemoting:
Enter-PSSession -ComputerName 192.168.13.222 -Credential 192.168.13.222\root
Enter the remote computer’s administrator password and make sure that the connection has been established successfully (the hostname or the IP address of the remote computer is displayed in the PowerShell prompt).

Now you can execute commands and scripts on remote workgroup computers using the Invoke-Command. For example, restart a computer remotely:
Invoke-Command -ComputerName 192.168.13.222 -Credential 192.168.13.222\root –ScriptBlock {Restart-Computer}
Or run a PowerShell script:
Invoke-Command -ComputerName 192.168.13.222 -Credential 192.168.13.222\root -FilePath c:\Scripts\GetComputerInfo.ps1
Note that to authenticate on a remote computer, you must enter a user password using the –Credential option. If you have many computers in your network with different local admin passwords, it is convenient to store connection passwords in a vault. It may be either a Windows Credential Manager password vault or an external store, like KeePass, LastPass, HashiCorp Vault, Azure Key Vault, or Bitwarden.
You can use the PowerShell Secret Management module to access saved passwords in such a vault. Now, in order to connect to a remote computer via PSRemoting, it is enough to:
- Save a connection password, for example, to Credential Manager:
cmdkey /add:192.168.13.222 /user:root /pass:Password1 - Get the name and the password from the vault using the CredentialManager module:
$psCred = Get-StoredCredential -Target "192.168.13.222" - Connect to the remote computer using PSRemoting and the saved password:
Enter-PSSession -ComputerName 192.168.13.222 -Credential $psCred
In new PowerShell Core versions (v6 or v7), you can use the Secure Shell (SSH) protocol to connect to a remote computer via PowerShell Remoting. To do this, the built-in SSH server must be enabled in Windows.
The -HostName (instead of –ComputerName) and -UserName (instead of -Credential) options allow to set the computer name and user for the SSH connection
Enter-PSSession -HostName 192.168.50.20 -UserName maxbak
You can even authenticate to Windows using an SSH key (use the –KeyFilePath parameter to specify the path to the private SSH key):
Enter-PSSession -HostName root@192.168.13.222:22 -KeyFilePath c:\PS\your_rsa_key
3 comments
Excellent article. It’s critical to get the trusted hosts list set up properly and also the firewall config to open the port at the receiver.
This saved me a ton of work, thanks again!
Great guide!!
Thank you
Excellent articale.