Windows OS Hub
  • Windows Server
    • Windows Server 2022
    • Windows Server 2019
    • Windows Server 2016
    • Windows Server 2012 R2
    • Windows Server 2012
    • Windows Server 2008 R2
    • SCCM
  • Active Directory
    • Active Directory Domain Services (AD DS)
    • Group Policies
  • Windows Clients
    • Windows 11
    • Windows 10
    • Windows 8
    • Windows 7
    • Windows XP
    • MS Office
    • Outlook
  • Virtualization
    • VMWare
    • Hyper-V
    • KVM
  • PowerShell
  • Exchange
  • Cloud
    • Azure
    • Microsoft 365
    • Office 365
  • Linux
    • CentOS
    • RHEL
    • Ubuntu
  • Home
  • About

Windows OS Hub

  • Windows Server
    • Windows Server 2022
    • Windows Server 2019
    • Windows Server 2016
    • Windows Server 2012 R2
    • Windows Server 2012
    • Windows Server 2008 R2
    • SCCM
  • Active Directory
    • Active Directory Domain Services (AD DS)
    • Group Policies
  • Windows Clients
    • Windows 11
    • Windows 10
    • Windows 8
    • Windows 7
    • Windows XP
    • MS Office
    • Outlook
  • Virtualization
    • VMWare
    • Hyper-V
    • KVM
  • PowerShell
  • Exchange
  • Cloud
    • Azure
    • Microsoft 365
    • Office 365
  • Linux
    • CentOS
    • RHEL
    • Ubuntu

 Windows OS Hub / PowerShell / Running PowerShell Script (*.PS1) as a Windows Service

November 27, 2019 PowerShell

Running PowerShell Script (*.PS1) as a Windows Service

Any PowerShell script can be transformed to a real Windows service that runs in the background and starts automatically during your server boot. You can create a Windows service using srvany.exe or instsrv.exe tools (from Windows Server Resource 2003 Kit) which allow you to run the powershell.exe process with a parameter that contains the path to your PS1 script file.

The main disadvantage of creating a service using this method is that srvany.exe does not control a PowerShell script execution state, and if the app crashes (hangs up), the service does not see it and goes on working. To create a Windows service from a file that contains a PowerShell script, in this article we will use the NSSM (Non-Sucking Service Manager) toolkit, which does not demonstrate the above mentioned disadvantages.

You can download and install NSSM manually or using Chocolatey. Firstly, install Choco itself:

Set-ExecutionPolicy Bypass -Scope Process -Force; `
iex ((New-Object System.Net.WebClient).DownloadString('https://chocolatey.org/install.ps1'))

Then install the NSSM package:

choco install nssm

In this example, we will track the changes in a specific Active Directory group in real time and inform a security administrator using a pop-up notification and e-mail (the script is given in this article) .

So, we have a PowerShell code that needs to be saved as a PS1 file. Let’s add an infinite loop that performs a check every minute:

while($true) {
#Your PS code
Start-Sleep –Seconds 60
}

Of course, to implement such a scenario you can create a separate task in the Task Scheduler. But if you have to respond to changes in real time, the separate service method is better.

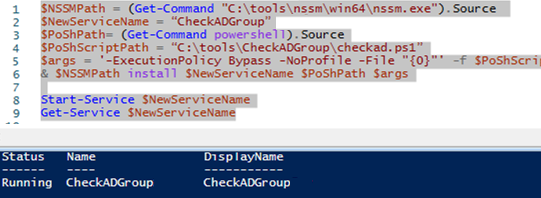
You can create a service from a PowerShell script using NSSM directly from PowerShell:

$NSSMPath = (Get-Command "C:\ps\nssm\win64\nssm.exe").Source
$NewServiceName = “CheckADGroup”
$PoShPath= (Get-Command powershell).Source
$PoShScriptPath = “C:\ps\CheckADGroup\checkad.ps1”
$args = '-ExecutionPolicy Bypass -NoProfile -File "{0}"' -f $PoShScriptPath
& $NSSMPath install $NewServiceName $PoShPath $args
& $NSSMPath status $NewServiceName

Start your new service:

Start-Service $NewServiceName

Check the service status in PowerShell:

Get-Service $NewServiceName

running powershell script as a windows service

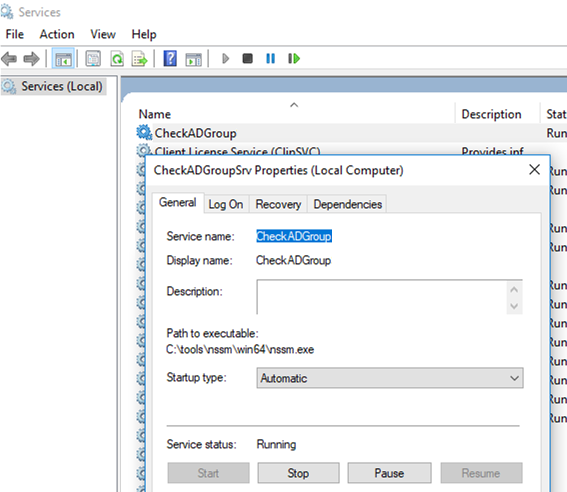
So you have created and started your new Windows service. Make sure that it has appeared in the services management console (services.msc).

CheckADGroup has appeared, it is configured to start automatically and is currently running. As you can see, your PowerShell script is running inside the nssm.exe process.

windows service from a powershell script using nnm

Please note that the service is running under the System account. If you use other modules in your PowerShell scripts (in my case, Get-ADGroupMember from Active Directory for Windows PowerShell is used to get the list of members in the domain security group), this account must have access to the PS module files and AD connection permissions (in my case). You can also start this service under another domain account (or a gMSA account) and allow users to stop/restart the service if they do not have local admin rights.

In order the service can show notifications in a user session enable the Allow service to interact with desktop option on the Log on tab.

To make it work in Windows 10 and Windows Server 2012 R2/2016, change the DWORD NoInteractiveServices parameter value in the registry key HKEY_LOCAL_MACHINE\System\CurrentControlSet\Control\Windows to 0 and run the Interactive Services Detection Service:

Start-Service -Name ui0detect

However, Interactive Services Detection Service has been completely removed from Windows 10 build 1803, and you won’t be able to switch to Session 0. So you won’t see the notification windows displayed under System account.

You can change the service description using this command:

& $NSSMPath set $NewServiceName description “Monitoring of AD group changes”

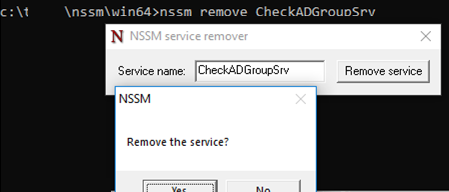
To remove the service you have created, use the sc delete command or:

nssm remove CheckADGroup

nssm remove powershell service

0 comment
2
Facebook Twitter Google + Pinterest
previous post
Creating Multiple Partitions on a USB Drive in Windows 10
next post
Configuring Storage Replica on Windows Server 2016

Related Reading

Using PowerShell Behind a Proxy Server

July 1, 2022

Checking Windows Activation Status on Active Directory Computers

June 27, 2022

Configuring Multiple VLAN Interfaces on Windows

June 24, 2022

How to Disable or Enable USB Drives in...

June 24, 2022

FAQ: Licensing Microsoft Exchange Server 2019/2016

June 14, 2022

Leave a Comment Cancel Reply

Categories

  • Active Directory
  • Group Policies
  • Exchange Server
  • Microsoft 365
  • Azure
  • Windows 11
  • Windows 10
  • Windows 7
  • Windows Server 2019
  • Windows Server 2016
  • Windows Server 2012 R2
  • PowerShell
  • VMWare
  • Hyper-V
  • MS Office

Recent Posts

  • Using PowerShell Behind a Proxy Server

    July 1, 2022
  • How to Access VMFS Datastore from Linux, Windows, or ESXi?

    July 1, 2022
  • How to Deploy Windows 10 (11) with PXE Network Boot?

    June 27, 2022
  • Checking Windows Activation Status on Active Directory Computers

    June 27, 2022
  • Configuring Multiple VLAN Interfaces on Windows

    June 24, 2022
  • How to Disable or Enable USB Drives in Windows using Group Policy?

    June 24, 2022
  • Adding Domain Users to the Local Administrators Group in Windows

    June 23, 2022
  • Viewing a Remote User’s Desktop Session with Shadow Mode in Windows

    June 23, 2022
  • How to Create a Wi-Fi Hotspot on your Windows PC?

    June 23, 2022
  • Configuring SSH Public Key Authentication on Windows

    June 15, 2022

Follow us

woshub.com

ad

  • Facebook
  • Twitter
  • RSS
Popular Posts
  • How to Find the Source of Account Lockouts in Active Directory domain?
  • Get-ADComputer: Find Computer Details in Active Directory with PowerShell
  • How to Create a UEFI Bootable USB Drive to Install Windows 10 or 7?
  • Managing Printers and Drivers with PowerShell in Windows 10 / Server 2016
  • Adding Third-Party Drivers into VMWare ESXi 6.7 ISO Image
  • How to Delete Old User Profiles Using GPO and PowerShell?
  • Deploy PowerShell Active Directory Module without Installing RSAT
Footer Logo

@2014 - 2018 - Windows OS Hub. All about operating systems for sysadmins


Back To Top