Logging to simple text files is a convenient way to track all actions performed by a PowerShell script. Such a log file is useful for debugging script errors and reviewing executed actions. In this article, we’ll explore different ways to log the output of PowerShell scripts by writing to text log files.
Redirecting PowerShell Terminal Output to a Log File
By default, PowerShell command results are displayed in the console. To redirect the output of a PowerShell command to a text file, use one of the following methods:
- Redirection using
>>operator - Use
Add-Contentto add some plain text to the end of the log file - Use
Out-Fileto write formatted text to a file
Here are examples of three different commands that add a new line with the output of a PowerShell command to the log file.
Write-Output "Files are successfully created in $env:computername" >> C:\PS\Logs\TestLog.txt
 Add-Content -Path C:\PS\Logs\TestLog.txt -Value "Files are successfully created in $env:computername"
 "Files are successfully created in $env:computername" | Out-File -FilePath C:\PS\Logs\TestLog.txt –Append
 # The -Append parameter is used to add data to a file without overwriting existing data.
In all cases, the commands add a new line to a TXT file with the text you have specified.
Set-Content cmdlet.
The main disadvantages of using such logging commands:
- The current timestamp of when the event occurred is not logged
- Every time you want to write something to the log, you have to call a somewhat complex PowerShell construct
- The path to the log file is hardcoded
Adding a Logging Function to a PowerShell Script
If you prefer a more convenient logging method, the easiest way is to add a separate function to the PowerShell script that writes the data that it receives to a log file with a timestamp.
You can create a function as shown below:
$Logfile = "C:\PS\Logs\$($env:computername)posh.log"
 function WriteLog
 {
 Param ([string]$LogString)
 $Stamp = (Get-Date).toString("yyyy/MM/dd HH:mm:ss")
 $LogMessage = "$Stamp $LogString"
 Add-content $LogFile -value $LogMessage -Encoding UTF8
 }
$Logfile– set the path to the log file (the folder must exist).$($env:computername)posh.log– adds the computer name (hostname) to the log file name$Stamp– Get the current date and format it according to the timestamp template
Now, call the WriteLog function when you want to log something to a text file.
WriteLog "The script is run"
 WriteLog "Calculating..."
 Start-Sleep 20
 WriteLog "The script is successfully executed"
Now, the log file contains the timestamp when the new line (log entry) was added.

Now, you can replace the console output via Write-Host command in all PS1 scripts with WriteLog.
Get-Content -Tail 10 -Wait "C:\PS\Logs\$($env:computername)posh.log"
Automatic PowerShell Logging with Start-Transcript
PowerShell has another built-in transcript feature that writes all the commands that run in the console and their results to a text log file. To start recording commands in the current PowerShell session, run the command:
Start-Transcript
This will create a text log file in the Documents directory of the current user’s profile (the filename is specified in the console).
Transcript started, output file is C:\Users\user\Documents\PowerShell_transcript.DESKTOP-P2FHTKQ.+IzDgZiN.20210908163729.txt
Start-Transcript -Append C:\PS\Logs\PSScriptLog.txt
The -Append parameter specifies that new log entries should be appended to the end of the log file (without overwriting the existing data).
Run some PowerShell commands that print the results to the console. For example, let’s list the running processes, services, and get the AD replication status:
Write-Host "Transcript logging"
 Get-Process| where-object {$_.WorkingSet -GT 500000*1024}|select processname,@{l="Used RAM(MB)"; e={$_.workingset / 1mb}} |sort "Used RAM(MB)" –Descending
 Get-Service | Where-Object {$_.status -eq 'Running'}
 Get-ADReplicationFailure -Target mun-dc01
Stop logging for the current PowerShell session:
Stop-Transcript
Then, open the transcript log file.
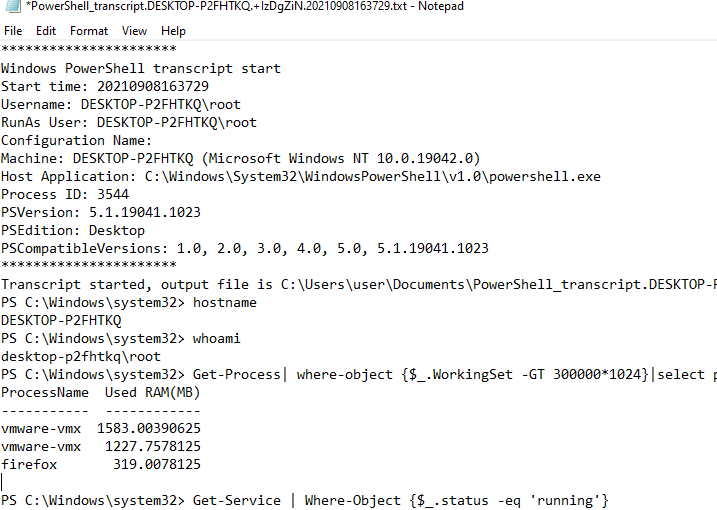
This text log contains the complete history of the PowerShell commands that were executed, along with any results output to the console.
The Start-Transcript and Stop-Transcript commands can be used in PowerShell scripts to natively log all actions and results.
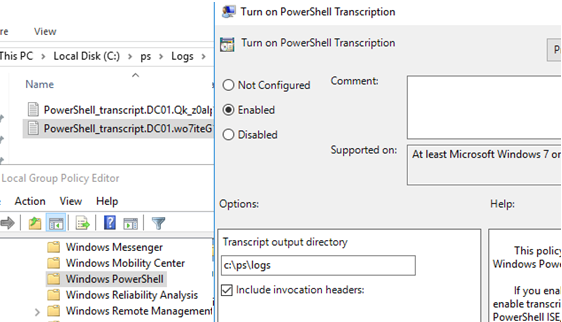
The “Turn on PowerShell Transcription” GPO option (Computer Configuration –> Administrative Templates –> Windows Components –> Windows PowerShell) enables the automatic logging of all PowerShell commands and their output on the computer. After updating the GPO settings on the computer, a separate text log file will be created for each running powershell.exe (pwsh.exe) process, and all PowerShell commands and their outputs will be logged.
For Windows PowerShell commands:
reg add "HKEY_LOCAL_MACHINE\Software\Policies\Microsoft\Windows\PowerShell\Transcription" /v "EnableTranscripting" /t REG_DWORD /d 1 /f
 reg add "HKEY_LOCAL_MACHINE\Software\Policies\Microsoft\Windows\PowerShell\Transcription" /v "EnableInvocationHeader" /t REG_DWORD /d 1 /f
 reg add "HKEY_LOCAL_MACHINE\Software\Policies\Microsoft\Windows\PowerShell\Transcription" /v "OutputDirectory" /t REG_SZ /d C:\PS\LOGS /f
For new PowerShell Core:
reg add "HKEY_LOCAL_MACHINE\Software\Policies\Microsoft\Windows\PowerShellCore\Transcription" /v "EnableTranscripting" /t REG_DWORD /d 1 /f
 reg add "HKEY_LOCAL_MACHINE\Software\Policies\Microsoft\Windows\PowerShellCore\Transcription" /v "EnableInvocationHeader" /t REG_DWORD /d 1 /f
 reg add "HKEY_LOCAL_MACHINE\Software\Policies\Microsoft\Windows\PowerShellCore\Transcription" /v "OutputDirectory" /t REG_SZ /d C:\PS\LOGS /f
2 comments
Watch out for the invalid characters on this site. Those darn curly quotes get me every tiime!
this will do that trick: just replace the first 0x0027 to the correct character 😉 took me a bit 🙂
-replace $([char]0x0027),$([char]0x0022)