The Windows 7 RTM distribution doesn’t support USB 3.0 and NVME controllers out-of-the-box, and you can encounter some problems when installing Windows 7 on a computer/laptop having USB 3.0/3.1 ports only or with an SSD drive connected via a PCI Express bus (NVMe). For example, a USB keyboard and mouse may not work in Windows 7 Setup, or the installer may require you to load drivers for USB/NVMe ports or devices:
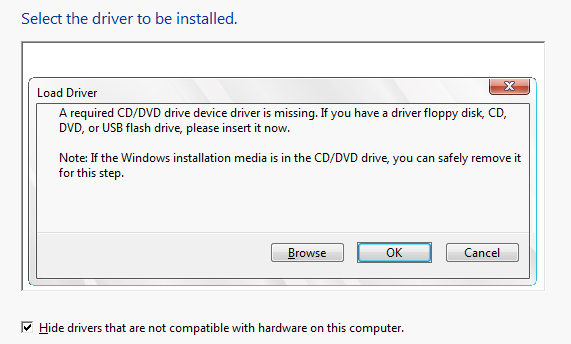
A required CD/DVD drive device driver is missing. If you have a driver’s floppy disk, CD, DVD, or USB flash drive, please insert it now.
Note: If the Windows installation media is in the CD/DVD drive, you can safely remove it for this step.
Accordingly, you cannot install Windows 7 (or Windows Server 2008 R2) on a computer on which all peripheral devices are connected via USB 3.0 ports. Or the Windows Installer will not see the PCI Express (NVMe) SSD.
All of the Windows 7 installation image modification operations described below are performed on a computer running Windows 10.
How to Inject USB 3.0 Driver into Windows 7 Install Media?
To install Windows 7 on some computer models, you can disable USB 3.0 mode in BIOS settings by switching to USB 2.0 compatibility mode (Legacy USB 2.0). In all other cases, you will have to modify Windows 7 install distro and integrate USB 3.0 drivers for your motherboard chipset to the boot and install WIM images.
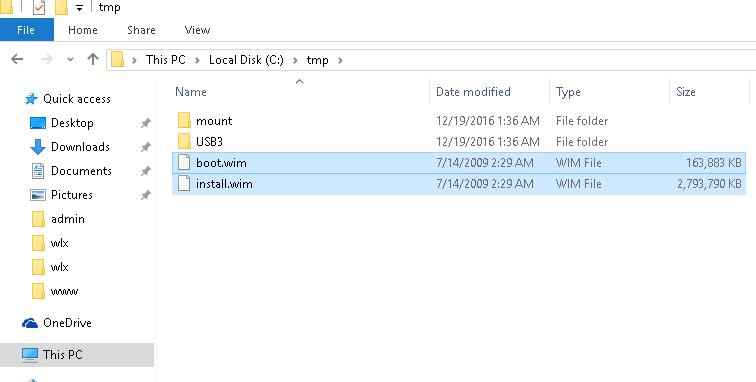
First of all, find and download USB 3.0 drivers for your chipset from the vendor’s website (in our example, it is Intel® USB 3.0 eXtensible Host Controller Driver for Intel® 7 Series/C216 Chipset Family). Create a new directory c:\tmp, and create two subfolders inside it: mount and USB3. Extract the driver archives to the USB3 folder. You can create several subfolders with different USB 3.0 drivers for popular chipset models inside the USB3 catalog.
Next, you need to integrate your drivers into the Windows 7 installation image (it may be an ISO file or a ready image copied to the installation USB stick). You need to copy two WIM files from the ISO image or Windows 7 installation media to the local c:\tmp directory on your drive.
- \sources\boot.wim – WinPE boot image used to boot the computer and run Windows Setup;
- \sources\install.wim – Windows 7 image that will be installed on your computer.
DISM /get-wiminfo /wimfile:install.swm
Now export each install.swm index into a single WIM file:
DISM /export-image /sourceimagefile:install.swm /swmfile:install*.swm /sourceindex:1 /destinationimagefile:install.wim /compress:max
 DISM /export-image /sourceimagefile:install.swm /swmfile:install*.swm /sourceindex:2 /destinationimagefile:install.wim /compress:max
Open an elevated command prompt Now mount the WinPE boot image (boot.wim) to the c:\tmp\mount directory and integrate the USB 3.0 drivers into it using DISM commands (according to the guide How to add drivers to a Windows image):
dism /mount-wim /wimfile:c:\tmp\boot.wim /index:2 /mountdir:c:\tmp\mount
 dism /image:c:\tmp\mount /add-driver:"c:\tmp\usb3" /recurse
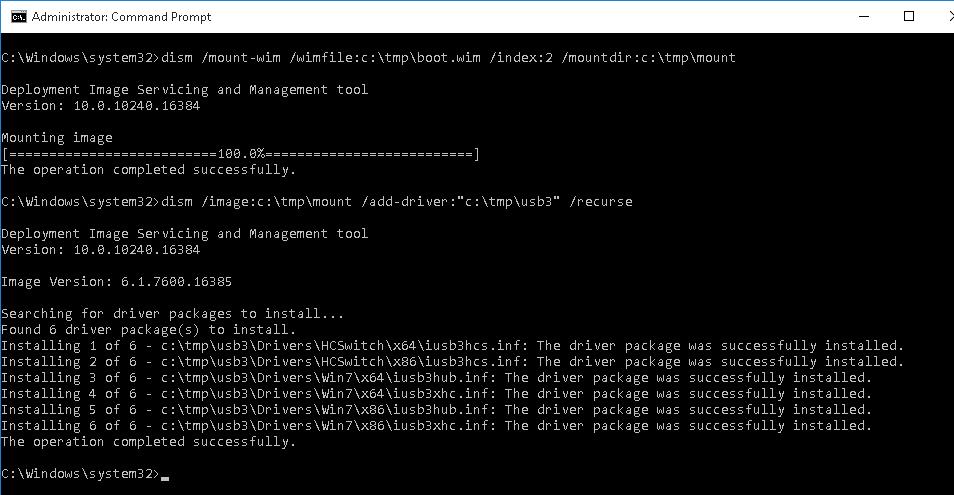
The following message indicates that the specified USB3 driver was successfully added to the boot.wim image of the Windows 7 Setup environment:
Installing 1 of 6 — c:\tmp\usb3\Drivers\HCSwitch\x64\iusb3hcs.inf: The driver package was successfully installed.
Save the changes in the image and unmount the boot.wim file (to avoid DISM errors, make sure that you closed all File Explorer windows and the file managers, which has the c:\tmp\mount directory open):
dism /unmount-wim /mountdir:c:\tmp\mount /commit
 dism /cleanup-wim
Similarly, you need to update the operating system installation image in the install.wim file. The main difference here is the install.wim image can contain several editions of Windows 7 with different indexes. So, you will have to add drivers to that Windows edition you are going to deploy on your desktop computers (or inject drivers to all available Windows 7 editions in turn).
You can list the available Windows 7 editions in the install.wim image as follows:
dism /Get-WimInfo /WimFile:c:\tmp\install.wim
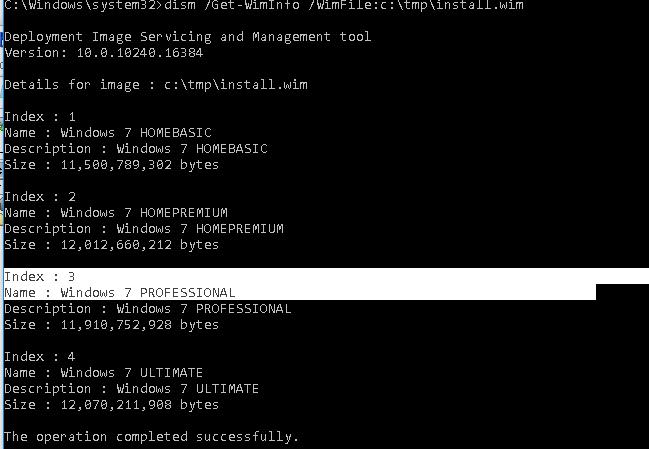
In our example, there are 4 different Windows editions in the install.wim image. We’ll add the USB 3.0 driver to Windows 7 PROFESSIONAL with the index 3 (this number will be used to address the edition in the DISM commands).
Then add the USB 3.0 drivers to the Windows install image as we did it above:
dism /mount-wim /wimfile:c:\tmp\install.wim /index:3 /mountdir:c:\tmp\mount
 dism /image:c:\tmp\mount /add-driver:"c:\tmp\usb3" /recurse
 dism /unmount-wim /mountdir:c:\tmp\mount /commit
 dism /cleanup-wim
If you are using a USB flash drive as the installation source, be sure to copy the boot.wim and install.wim files back after injecting the drivers.
How to Install Windows 7 to NVMe SSD?
In this part, we’ll show you how to create an NVM Express (NVMe)-enabled Windows 7 boot image for hard drives (typically SSDs) connected via a PCI Express (PCIe) bus.
When you try to install Windows 7 on a computer with an NVMe disk, the Windows installer will simply not see the SSD drive connected through this bus.
No drives were found. Click Load Driver to provide a mass storage driver for installation.

Windows 7 SP1 and Windows Server 2008 R2 SP1 distros don’t contain PCIe (and NVMe) drivers, you can only install the OS on a SATA SSD drive. Built-in support for NVMe appeared only in Windows 8.1. Microsoft has released special updates that enable support for NVM Express in Windows 7. Next, we will show you how to enable PCIe support in the Windows 7 installer and inject NVMe drivers into it.
- Download the following updates from the Microsoft Update Catalog: KB2990941-v3, KB3087873-v2. Save *.MSU files to the directory
c:\tmp\updates; - Download the NVMe driver for your controller and extract it to
c:\tmp\nvme; - Slipstream the updates and the drivers to the boot WinPE image (boot.wim):
DISM /Get-WimInfo /WimFile:c:\tmp\boot.wim
 DISM /Mount-Wim /WimFile:"C:\tmp\boot.wim" /Index:1 /MountDir:c:\tmp\mount
 DISM /Image:c:\tmp\mount /Add-Package /PackagePath:C:\tmp\updates
 DISM.exe /image:c:\tmp\mount /Add-Driver /driver:c:\tmp\nvme /recurse /ForceUnsigned
DISM /Unmount-Wim /MountDir:c:\tmp\mount /Commit - Run the same commands for the image with index 2 (on the second line, replace
/Index:1with/Index:2). - Now you need to integrate the update and the driver into the Windows installation image (install.wim). The image file can contain several versions of Windows 7 with different indexes. You can get a list of Windows versions with the command:
dism /Get-WimInfo /WimFile:c:\tmp\install.wim
Specify the index of the image to be updated (in our example it isIndex:2)
DISM /Get-WimInfo /WimFile:c:\tmp\install.wim
 DISM /Mount-Wim /WimFile:"C:\tmp\install.wim" /Index:2 /MountDir:c:\tmp\mount
 DISM /Image:c:\tmp\mount /Add-Package /PackagePath:C:\tmp\updates
 DISM.exe /image:c:\tmp\mount /Add-Driver /driver:c:\tmp\nvme /recurse /ForceUnsigned
 DISM /Unmount-Wim /MountDir:c:\tmp\mount /Commit
37 comments
Great article. Just followed to merge USB3.0 drivers into ISO for a Dell 7480. Worked a treat.
Many thanks.
Brilliant article. Easy to follow. Got the USB mouse and Keyboard working on a HP Elitedesk G3 Mini.
Thank you
Justin,
i tried to mount but it did not work…….
Hell ya it ended up working for m on my custom PC. decided to install after windows 10 blue screened me. right? wtf i did realize i needed to copy the .wim files from the tmp folders in C to the usb drive and replace the old ones with the new ones after that it worked! wireless mouse and keyboard no problem. 2 days trying to fix all this and now i can get back to gaming 😀 thank you! BTW intell explained i needed to get the usb drive from my motherboards website msi.
Awesome guide, well explained, saved me hours !, thanks so much !!!
Thank you!!!!
Been having a hell of a day trying to get W7P installed on an older Thinkpad. It had been downgraded to Windows 10, and this was causing too many headaches. Your write-up above was brilliant; now doing the final bits of Windows updates and other drivers. Thank you again!
You saved my life. Thanks very much
This worked great for getting Windows 7 installed on a 2013 Macbook Air, but once Windows is installed, the drivers are no longer present and the initial setup of the OS cannot be completed. Any suggestions?
You may need to add an additional driver for the USB device. I suppose that the keyboard doesn’t work on your Mac?
Or forget to integrate the USB drivers into your install.wim image.
Tried this tutorial but it doesn’t work to me… if you have a unit same as mine that it worked, please share…
Laptop:
Acer Aspire ES1-432
What driver did you try to integrate into your Windows 7 image?
Thanksssss A Lott…. BRO YOU saved my dayy…. 😘😘😘😊😊😊😊
Downgrading an hp15-233 to win7…bad dvd.
I’ve tried at least 10 different ways,from manually,to the gigabyte utility to merge the intel extensible drivers to the win7 pro iso,to install win7 from usb.
dism reports them correctly,available as 3rd party drivers in boot.wim and install.wim images.
I absolutly know these are the correct drivers for this SOC.
I even went as far as merging the signed MS usb3 drivers from the original win10 os on this machine.
Is win7 setup looking for something else?
I’ve spent a whole Sunday so far with no success.
It’s now become a QUEST and,I WILL NOT BE BEATEN.
Any ideas?
BTW make sure ALL windows explorer windows are closed to avoid dism errors when unmounting any wims.
After many hours, you saved me! Thanks! HP 705 G3 Mini and Windows 7 Pro INSTALLING!!!
The driver gets installed into boot.wim but when I try to install them into install.wim, it gives an error. I have checked the location and it’s correct.
If you get Error 5, then you need to take ownership and add Administrators with full control on all child objects to:
C:\tmp\mount\Windows\System32\DriverStore\FileRepository
Installation reports success but I still do not have control of my keyboard or mouse. Why does instructions refer to index 2 regarding boot.wim? I understand the reference in Install.wim. Gigabyte X470 Auros Ultra Gaming with Ryzen 2600X. BIOS is at F6. Is there a way to add a PS/2 port to this motherboard?
Have the same chipset, all dism operations succeeded. But after reboot and installation attemt still have the error “A required CD/DVD drive device driver is missing…” Appreciate any help. Sorry for bad English.
The driver gets installed into boot.wim but when I try to install them into install.wim, it gives an error. I have checked the location and it’s correct.
Error: 11
An attempt was made to load a program with an incorrect format.
Check the DISM log for errors: C:\WINDOWS\Logs\DISM\dism.log
Also check the paths and make sure that you unmounted the previous wim file using the “dism /unmount-wim” command
Thank you so much! Never knew DISM was such a breeze to work with!
Cheers!
I get an error on the command
“dism /image:c:\tmp\mount /add-driver:”c:\tmp\usb3″ /recurse”
I can’t find out why.
Please provide the full DISM error text and code
Also works with Windows 7 System Repair Disk. Note, there’s no “install.wim”, but updating boot.wim only did the trick for me with an HP Elitedesk 800 G2 Mini. Thanks.
DAMN .. I was wrecked with a HP system .. finally managed to load WIN 7 but USB port wasn’t detecting .. & also no network drivers.
Somewhere i seen USB 3 & bios in the enormous post .. i just went to bios ..set it to AUTO & yess .. USB is on ..
Thank you
I have a Dell 5480 and can only find the USB3 drivers in an EXE file, any idea how I unpack this archive please?
it works well
just add a little : “if you use USB drive for installation source, don’t forget to copy boot.wim & install.wim back after mounting driver”
Thanks for the note!
Awesome notes! got win 7 on dell 7480 latitude working.
I have tried this and just am not getting anywhere at all. No errors, everything about this goes according to the instructions, no problems following it at all. It just didn’t work. I still get to the same initial install screen with no response from keyboard or mouse. Windows 7 USB and wireless keyboard/mouse transmitter both in the USB 2.0 ports. I’ve also tried wired keyboards and mice and have changed up ports. I’ve even tried both indexes on Boot.Wim and all 4 indexes on Install.Wim and no change.
Using a Generic Mini-PC with below specs:
Specification:
CPU: Intel Pentium Processor J4205 (up to 2.6 GHz)
RAM: 12 GB DDR3L
Storage: 128 GB mSATA SSD
*SATA: Support 1 x 2.5 inch SATA HDD or SDD
Processor Graphics: Intel UHD Graphics 500
Graphics Base Frequency: 250 MHz
Graphics Burst Frequency: 800 MHz
Cache: 2 MB
# of Cores: 4
Processor Base Frequency:1.5 GHz
Burst Frequency: 2.6 GHz
WiFi:Dual Band, 2.4G/5G
LAN:10/100/1000M
Bluetooth: Version 4.2
Interface:
2 x USB 3.0 Port
2 x USB 2.0 Port
2 x HDMI Port
1 x RJ45 (1000Mbps LAN) Port
1 x Headphone Microphone Port
1 x DC in Port
Not sure why you didn’t link to the finished ISO hosted somewhere or uploaded as a torrent…
Thanks for great info!
Where do I download the extensible host controller? I can’t find it anywhere to download either through a duck search or the motherboard (Asus) ?
I can only find the CHIPSET not the host controller driver as a standalone …
This is not working for me. I have Acer aspire laptop with win 11 64 bit and NVMe disk
Windows 11 x64 using (UEFI), make sure you’re also using windows 7 x64 ISO.
Your instructions for loading a USB3 driver and a driver for my Samsung NVMe SSD were spot on and a major time saver. I was installing Windows 7 from a USB to a new Lenovo X270 and all the messages you referenced were exactly what I encountered.
After making the image changes following your instructions the installation proceeded normally as expected.
Thanks so much for the info!