In this article, I tried to describe the basic cmd and PowerShell commands that are useful for configuring and managing Windows Server Core hosts. I think this guide will be a useful reference for basic Server Core administration commands for both beginners and experienced system administrators.
Windows Server Core benefits:
- Lower resource requirements (minimal disk and RAM usage);
- Improved stability and security; fewer updates are required (due to less amount of code and installed components);
- Ideal for deploying infrastructure roles such as an Active Directory domain controller, DHCP server, Hyper-V host, SMB file server, or IIS web server.
Unlike Hyper-V Server, which is completely free, Server Core requires a separate license, just like a regular physical or virtual instance of Windows Server.
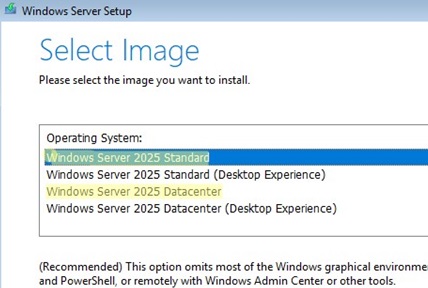
To install Windows Server 2025/2022/2019/2016 in the Core mode, you must select the typical installation option. If you select Windows Server (Desktop Experience), the GUI version of the operating system will be installed (in previous Windows Server versions, it was Server with a GUI).
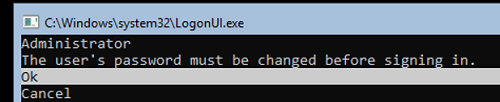
After installing Windows Server Core, a command prompt will appear. There, you will need to set a local administrator password.
Configure Windows Server Core Using SCONFIG
When you log in to a Windows Server Core host console, the built-in sconfig (Server Configuration Tool) script automatically launches. Otherwise, you can open it manually by entering the sconfig command in the console.
The sconfig utility lets you perform basic Server Core configuration tasks using a pseudo-graphical text menu. This menu contains the following items:
- 1: Domain/workgroup – change workgroup or join a domain
- 2: Computer name – change the computer name (hostname)
- 3: Add local administrators — add local administrator accounts
- 4: Remote management — Allow or disable remote management and ICMP ping responses in the firewall
- 5: Update settings – configure Windows Update settings
- 6: Install updates
- 7: Remote Desktop – Enable/disable RDP
- 8: Network settings — Configure network adapter settings (IP address, gateway, DNS server)
- 9: Date and time
- 10: Diagnostic data settings – Change telemetry settings
- 11: Windows activation
- 12: Log off user
- 13: Restart server
- 14: Shutdown server
- 15: Exit to command line (PowerShell)
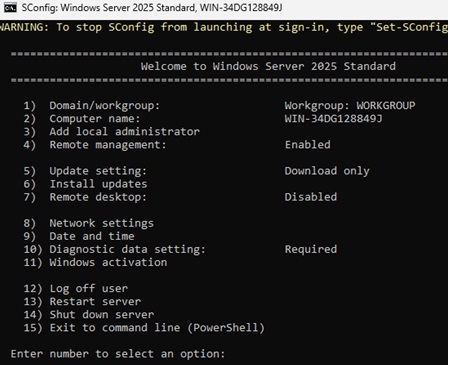
Each item in the sconfigmenu is numbered. To access a specific menu, enter its number and press Enter. Some items in the Sconfig main menu have submenus.
We will not review all of the Sconfig settings in detail since they are simple and self-explanatory. However, in most cases, administrators prefer to configure new Server Core hosts using PowerShell commands or scripts. It is easier and faster, especially in mass deployment scenarios.
Set-SConfig -AutoLaunch $false
When you log in to Server Core in Windows Server 2019/2016, a command prompt (cmd.exe) opens. In order to always run the PowerShell.exe console instead of the command prompt, you need to make some changes to the registry. Run the commands below:
Powershell.exe
 Set-ItemProperty -Path 'HKLM:\Software\Microsoft\Windows NT\CurrentVersion\WinLogon' -Name Shell -Value 'PowerShell.exe'
And restart a host:
Restart-Computer -Force

Ctrl+Alt+Delete, open the Task Manager -> File -> Run -> and run cmd.exe (or PowerShell.exe).Basic PowerShell Commands to Configure and Manage Server Core
Now, let’s take a look at the basic PowerShell commands that can be used to configure Windows Server Core.
Use this cmdlet to view system information about the server.
Get-ComputerInfo (similar to systeminfo.exe)
To get information about your Windows Server build and PowerShell version
Get-ComputerInfo | select WindowsProductName, WindowsVersion, OsHardwareAbstractionLayer
 $PSVersionTable

To reboot the Server Core host, run this PowerShell command:
Restart-Computer
To log off from the Server Core console:
logoff
If you installed Server Core in a virtual machine, you need to install special utilities and drivers to enhance interaction between the guest OS and the hypervisor:
- VMware Tools for VMware virtual machines
- VirtIO Drivers for Windows in Proxmox
- Hyper-V Integration Services in Hyper-V
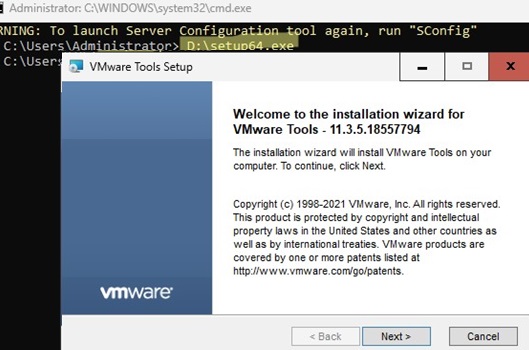
For example, in the case of VMware, mount the ISO image with VMTools and then run the installation from the command line.
D:\setup64.exe
Or for a silent installation of VMTools:
Start-Process D:\setup64.exe -Wait -ArgumentList "/s","/v","/qn","REBOOT=R" -WindowStyle Hidden
Configure Network Settings on the Server Core with PowerShell
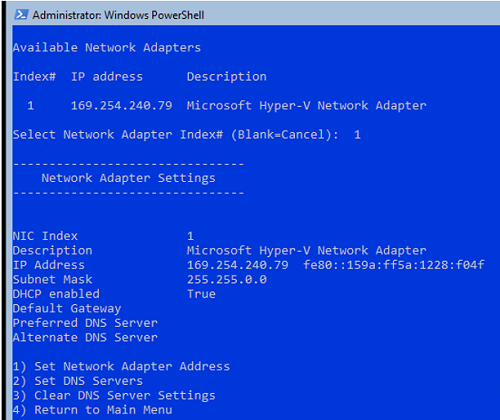
Now you need to configure network settings using PowerShell (by default, Windows is configured to receive an IP address from DHCP). List the available network adapters:
Get-NetIPConfiguration
Specify the network adapter interface index (InterfaceIndex) that needs to be changed, then you want to change and set a new IP address and DNS servers:
New-NetIPaddress -InterfaceIndex 4 -IPAddress 192.168.1.100 -PrefixLength 24 -DefaultGateway 192.168.1.1
 Set-DNSClientServerAddress –InterfaceIndex 4 -ServerAddresses 192.168.1.11,192.168.101.11
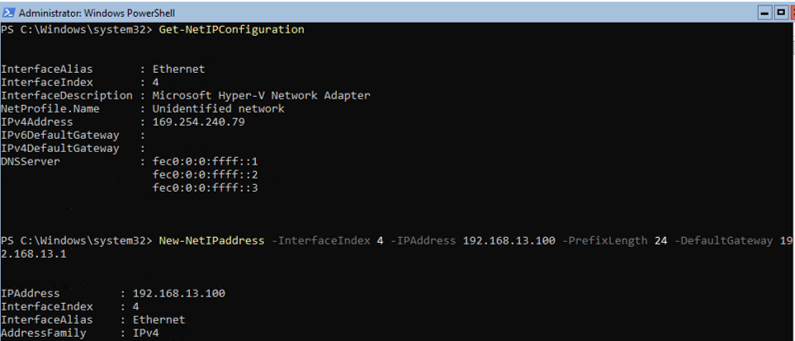
Check the current network settings:
Get-NetIPConfiguration
Set-DnsClientServerAddress –InterfaceIndex 4 –ResetServerAddresses
 Set-NetIPInterface –InterfaceIndex 4 -Dhcp Enabled
To enable/disable a network adapter:
Disable-NetAdapter -Name "Ethernet0"
 Enable-NetAdapter -Name "Ethernet 0"
To enable, disable, or check the status of IPv6 support for a network adapter:
Disable-NetAdapterBinding -Name "Ethernet0" -ComponentID ms_tcpip6
 Enable-NetAdapterBinding -Name "Ethernet0" -ComponentID ms_tcpip6
 Get-NetAdapterBinding -ComponentID ms_tcpip6
To configure winhttp proxy server for PowerShell or system connections:
netsh Winhttp set proxy <servername>:<port number>
Set Time and Date in Windows Server Core
You can configure date, time, and time zone settings using a graphical tool timedate.cpl or with PowerShell:
Set-Date -Date "07/21/2025 09:00"
 Set-TimeZone "Central Europe Standard Time”
Set Computer Name, Join Domain, and Activate Host
To change a computer name (hostname):
Rename-Computer -NewName be-srv01 -PassThru

To join a server to the on-premises Active Directory domain:
Add-Computer -DomainName "corp.woshub.com" -Restart
To add additional users to the local Administrators group, you can either configure a Group Policy or add the users manually.
Add-LocalGroupMember -Group "Administrators" -Member "corp\jsmith"
To activate Windows Server, enter your product key:
slmgr.vbs –ipk <productkey>
 slmgr.vbs –ato
Or you can activate Windows on a KMS server. For example, to activate Windows Server Core 2025 Standard on a KMS host:
slmgr /ipk TVRH6-WHNXV-R9WG3-9XRFY-MY832
 slmgr /skms kms.corp.woshub.com:1688
 slmgr /ato
Enabling Remote Administration of Windows Server Core
Enable remote access to the Windows Server Core computer via RDP:
cscript C:\Windows\System32\Scregedit.wsf /ar 0
Allow remote host management:
Configure-SMRemoting.exe –Enable
 Enable-NetFirewallRule -DisplayGroup “Windows Remote Management”
Check current Remote Management settings:
Configure-SMRemoting.exe -Get
To enable WinRM for PowerShell Remoting:
Enable-PSRemoting –force
In order to connect to this Server Core host remotely via PowerShell Remoting (WinRM) from another computer (in a workgroup environment), you must first add its name or IP address to the TrustedHosts list on the client computer.
Set-Item WSMan:\localhost\Client\TrustedHosts -Value "192.168.123.123"
Next, use Enter-PSSession to establish a remote interactive session with the server.
Enter-PSSession -ComputerName "192.168.123.123" -Credential (Get-Credential)

Configuring Windows Firewall on Server Core
This article provides detailed information on how to configure the Windows Defender Firewall using PowerShell. I’ll only leave a few basic commands here.
Enable Windows Defender Firewall for all profiles:
Set-NetFirewallProfile -Profile Domain,Public,Private -Enabled True
Change the network adapter type from Public to Private:
Get-NetConnectionProfile | Set-NetConnectionProfile -NetworkCategory Private
To disable the Windows Firewall completely (not recommended):
Get-NetFirewallProfile | Set-NetFirewallProfile -enabled false
To enable connection via remote management tools:
Enable-NetFireWallRule -DisplayName "Windows Management Instrumentation (DCOM-In)"
 Enable-NetFireWallRule -DisplayGroup "Remote Event Log Management"
 Enable-NetFireWallRule -DisplayGroup "Remote Service Management"
 Enable-NetFireWallRule -DisplayGroup "Remote Volume Management"
 Enable-NetFireWallRule -DisplayGroup "Remote Scheduled Tasks Management"
 Enable-NetFireWallRule -DisplayGroup "Windows Firewall Remote Management"
 Enable-NetFirewallRule -DisplayGroup "Remote Administration"
How to Install Updates on Windows Server Core
Although Windows Update Group Policies are the preferred method for managing update settings, it is also possible to configure them manually.
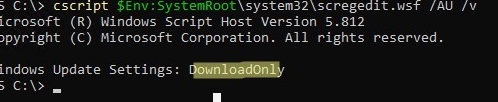
Check the current Windows Update settings:
cscript $Env:SystemRoot\system32\scregedit.wsf /AU /v
In this case, the Windows updates are downloaded but not installed automatically (DownloadOnly).
Enable the automatic download and installation of updates.
cscript $Env:SystemRoot\system32\scregedit.wsf /AU 4
Disable automatic Windows updates installation:
cscript $Env:SystemRoot\system32\scregedit.wsf /AU 1
Get a list (history) of installed updates:
Get-Hotfix
Or
wmic qfe list
To install Windows updates manually, you can use the wusa tool:
wusa kbnamexxxxx.msu /quiet
Remove an installed update by its KB ID.
wusa /uninstall /kb:5042132
For installing and managing updates from the CLI, the PSWindowsUpdate module for PowerShell is convenient.
Managing Windows Core Roles, Services, and Processes
To get a list of all available roles on Windows Server Core, run the following PowerShell command:
Get-WindowsFeature
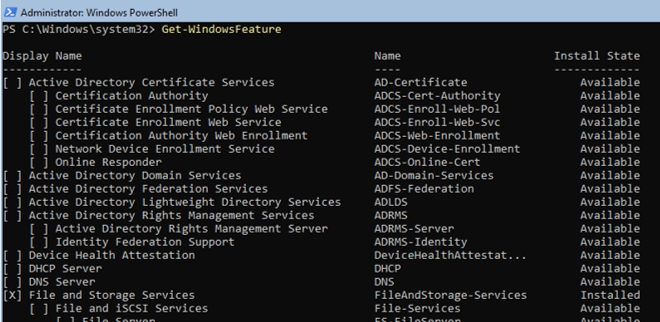
Get a list of all installed roles and features in Windows Server (used to quickly understand what the server is used for):
Get-WindowsFeature | Where-Object {$_. installstate -eq "installed"} | ft Name,Installstate
For example, use the following command to install the DNS role:
Install-WindowsFeature DNS -IncludeManagementTools
To get a list of all services in Windows:
Get-Service
List only stopped services:
Get-Service | Where-Object {$_.status -eq “stopped”}
Restart a specific service:
Restart-Service -Name spooler
Managing running processes is possible through both the Graphical Task Manager (taskmgr.exe) and the PowerShell.
Get-Process cmd, wuaucl* | Select-Object ProcessName, StartTime, MainWindowTitle, Path, Company|ft
Use the New-ScheduledTaskAction cmdlet to create a new item in the Task Scheduler. List the enabled scheduled tasks:
Get-ScheduledTask -TaskPath | ? state -ne Disabled
Useful Windows Server Core Commands
Finally, I will share some useful PowerShell commands and scripts that I often use for managing Server Core.
Use the built-in Storage Disk Management module to get the status and health of physical disks.
Get-PhysicalDisk | Sort Size | FT FriendlyName, Size, MediaType, SpindleSpeed, HealthStatus, OperationalStatus -AutoSize
Get-WmiObject -Class Win32_LogicalDisk |
 Select-Object -Property DeviceID, VolumeName, @{Label='FreeSpace (Gb)'; expression={($_.FreeSpace/1GB).ToString('F2')}},
 @{Label='Total (Gb)'; expression={($_.Size/1GB).ToString('F2')}},
 @{label='FreePercent'; expression={[Math]::Round(($_.freespace / $_.size) * 100, 2)}}|ft

Check the reasons for the last 10 server reboots (to see who restarted the server and when).
Get-WinEvent -FilterHashtable @{logname='System';id=1074}|ft TimeCreated,Id,Message | select -last 10
List the installed apps in Windows:
Get-ItemProperty HKLM:\Software\Wow6432Node\Microsoft\Windows\CurrentVersion\Uninstall\* | Select-Object DisplayName, DisplayVersion, Publisher, InstallDate | Format-Table –AutoSize
To download and extract a ZIP file from an external website:
Invoke-WebRequest https://servername/file.zip -outfile file.zip
 Expand-Archive -path '.\file.zip' -DestinationPath C:\Users\Administrator\Documents\
To copy all files from a specific directory to a remote computer over the network, you can use the Copy-Item cmdlet:
$session = New-PSSession -ComputerName be-dc01
 Copy-Item -Path "C:\Logs\*" -ToSession $session -Destination "C:\Logs\" -Recurse -Force
Use the built-in pnputil tool to install a device driver manually:
Pnputil –i –a c:\install\hpspp\hpdp.inf
In order to add a printer, you must first install the Print-Services role.
Install-WindowsFeature Print-Services
Then, you can install a printer.
printui.exe /il
To send a text file to a printer:
Get-Content C:\sampletest.txt | Out-Printer
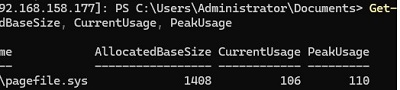
Display information about paging file usage.
Get-CimInstance Win32_PageFileUsage | Select-Object Name, AllocatedBaseSize, CurrentUsage, PeakUsage
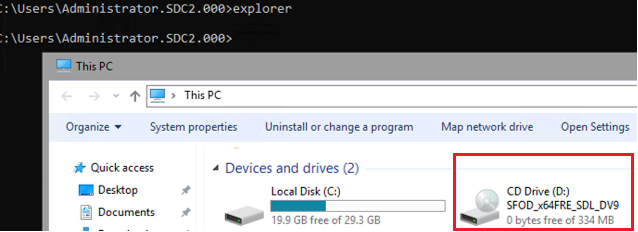
Microsoft also offers a special package, Server Core App Compatibility Feature on Demand (FOD), which allows you to install some graphical tools and management snap-ins on Windows Server Core host (MMC, Eventvwr, Hyper-V Manager, PerfMon, Resmon, Explorer.exe, Device Manager, PowerShell ISE). This FOD image is available for download as an ISO (an active Microsoft subscription is required). You can install it as follows:
Add-WindowsCapability -Online -Name ServerCore.AppCompatibility~~~~0.0.1.0
Installing the Server Core App Compatibility feature will require an additional 200 MB of RAM on the Server Core host.
This article compiles the most useful commands for managing Windows Server Core. I will periodically update this article by adding new commands that I find useful for my daily tasks.