A RAM disk is a virtual drive created in a free area of RAM that the OS sees as a normal local hard drive. The advantage of RAM Drive is its very high read/write speed (up to 10 times faster than SSD and up to 2-3 times faster than NVME M.2). A RAM disk can be used on computers with large amounts of RAM to store cache and temporary application files. Mostly RAM drive is used to store browser cache, temporary SQL databases, graphics or video rendering application cache, etc. This improves application performance and significantly offloads physical disks. The contents of the RAM disk are usually erased when the computer is restarted.
Create a RAM Disk Drive on Windows 10 and 11
Windows 10 and 11 don’t have built-in tools for creating RAM drives, so you’ll need to use third-party apps(AMD RAMDisk, ImDisk, PassMark OSFMount, StarWind RAM Disk, etc.).
In this example, we will look at the open-source ImDisk Toolkit (https://sourceforge.net/projects/imdisk-toolkit/). Its advantages:
- Free
- Lightweight
- There is no limit to the size of the RAM drive
- Saves RAM drive files to the local disk when the computer is turned off.
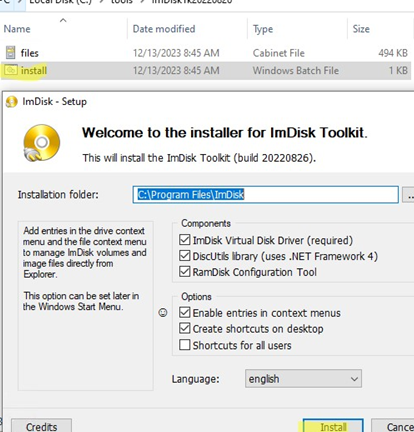
- Download and install the ImDisk Toolkit program by running install.bat;

- Once the installation is complete, open the RamDisk Configuration shortcut on your desktop;
- On the Basic tab, you need to specify the size of the RAM drive(it is generally recommended that no more than 20-30% of the RAM should be allocated for this purpose), assign a drive letter, and choose whether the RAM drive should start automatically on Windows boot;
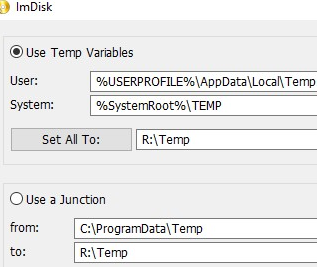
- You can use environment variables or symbolic links to automatically redirect TEMP folders to the RAM disk;
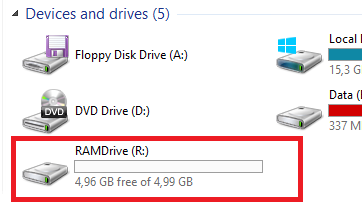
- Click Mount to enable RAM Drive. Open File Explorer and check that a new drive of the specified size appears;
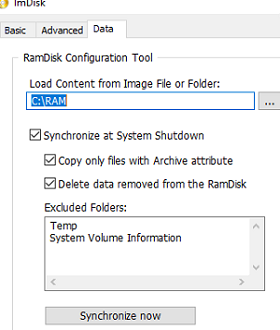
- By default, the contents of the RAM drive are cleared when Windows restarts. You can automatically save the contents of the RAM disk to a local folder when you turn off the computer. To do this, go to the Data tab, specify the target directory, and check the option Synchronize at System Shutdown. The contents of this directory are copied to the RAM disk when the operating system boots.

You can move certain application caches to the RAM disk using Windows symbolic links. For example:
Edge Cache:
mklink /j "%userprofile%\AppData\Local\Microsoft\Edge\User Data\Default\Cache\" "R:\edge\Default\Cache"
 mklink /j "%userprofile%\AppData\Local\Microsoft\Edge\User Data\Default\Code Cache\" "R:\edge\Default\Code Cache"
 mklink /j "%userprofile%\AppData\Local\Microsoft\Edge\User Data\Default\Service Worker\CacheStorage\" "R:\edge\Default\Service Worker\CacheStorage"
Microsoft Teams Cache:
mklink /j "%userprofile%\AppData\Roaming\Microsoft\Teams\Cache\" "R:\ msteams\Cache"
 mklink /j "%userprofile%\AppData\Roaming\Microsoft\Teams\Code Cache\" "R:\msteams\Code Cache"
 mklink /j "%userprofile%\AppData\Roaming\Microsoft\Teams\Service Worker\CacheStorage\" "R:\msteams\Service Worker\CacheStorage"
Or you can change the cache path in the app settings. For example, to enable the Google Chrome browser to store data on a RAM drive, add the following parameter to its shortcut:
"C:\Program Files (x86)\Google\Chrome\Application\chrome.exe" --disk-cache-dir="R:\Chrome"
Google Chrome will cause less wear and tear on your SSD drive in this mode.
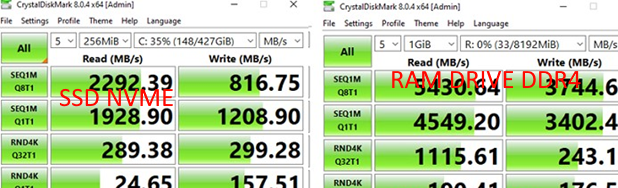
Check RAM drive read/write performance using the Crystal Disk Mark Tool. In this test, a DDR4 RAM disk’s read/write speed is 2-3 times faster than an SSD NVME M.2 drive.
Creating In-Memory RAM Drive on Windows Server
In Windows Server, you can create a RAM drive without using third-party tools. You can use the iSCSI driver to allocate a part of the RAM on the server.
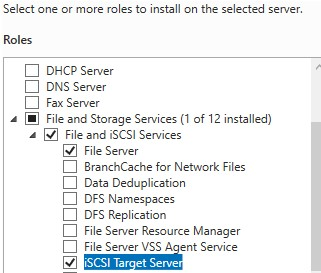
Install the iSCSI Target Server role using the Server Manager (File and Storage Services -> File and iSCSI Services).
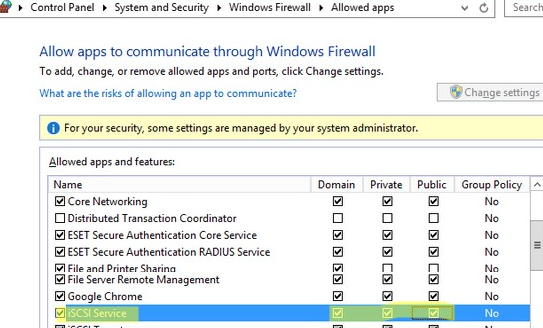
Open ports for the iSCSI service in the Windows Defender Firewall. You can allow access in the Windows Firewall graphical management console, or you can enable firewall rules using PowerShell:
Set-NetFirewallRule -Name MsiScsi-in-TCP -Enabled True
 Set-NetFirewallRule -Name MsiScsi-out-TCP -Enabled True
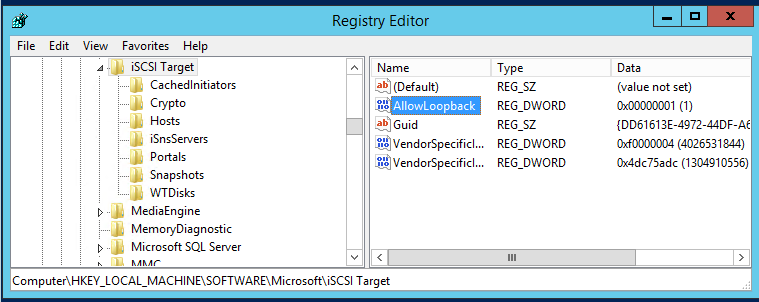
To allow traffic to the loopback interface for iSCSI, change the value of the DWORD parameter AllowLoopBack to 1 in the HKLM\Software\Microsoft\iSCSI Target registry key. You can change the registry parameter from PowerShell with a command:
Set-ItemProperty -Path 'HKLM:\SOFTWARE\Microsoft\iSCSI Target' -Name AllowLoopBack -Value 1
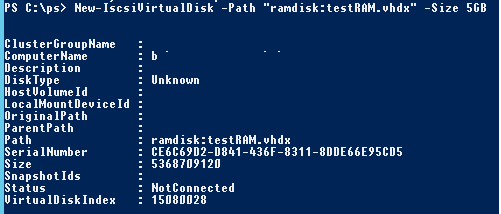
Then create a 5GB virtual RAM drive:
New-IscsiVirtualDisk -Path "ramdisk:testRAM.vhdx" -Size 5GB
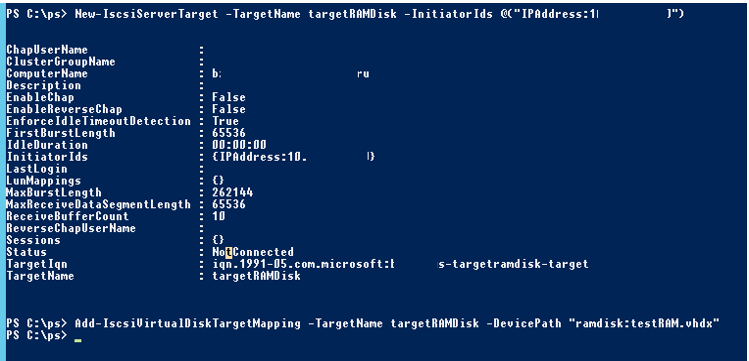
Now you need to create an iSCSI target pointing to the IP address of your server (not localhost!):
New-IscsiServerTarget -TargetName targetRAMDisk -InitiatorIds @("IPAddress:10.1.1.200")
Connect the RAM disk to the created iSCSI target:
Add-IscsiVirtualDiskTargetMapping -TargetName targetRAMDisk -DevicePath "ramdisk:testRAM.vhdx"
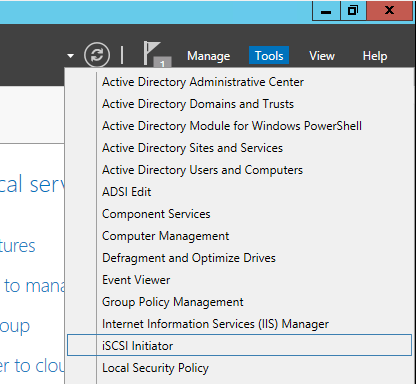
Go to Server Manager and select Tools -> iSCSI Initiator.
Specify the IP address of your server in the Targets tab and click Quick Connect to add your iSCSI target.
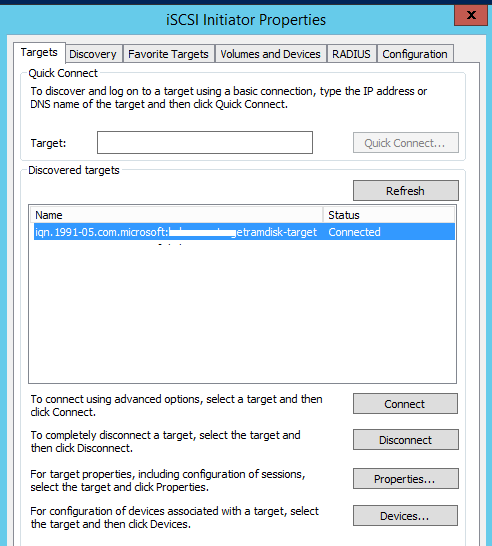
Get-IscsiTarget | Connect-IscsiTarget
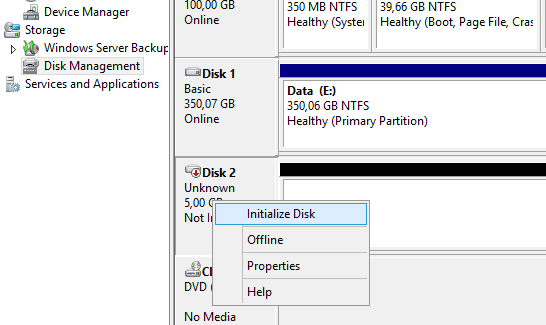
Now open the Disk Management Console (diskmgmt.msc) and check that you have a new 5GB drive. This is the RAM disk we created. Initialize the disk, create a partition and format it, and then assign a drive letter.
Get-Disk | Where partitionstyle -eq 'raw' | Initialize-Disk -PartitionStyle MBR -PassThru | New-Partition -AssignDriveLetter -UseMaximumSize | Format-Volume -FileSystem NTFS -NewFileSystemLabel "disk2" -Confirm:$false
Now you can move app files to the RAM drive and reconfigure your software to use it.
When the server is restarted, the RAM disk is removed with all its contents and must be re-created.
Unfortunately, the test showed that the performance (iOPS) of a RAM disk created via an iSCSI target on Windows Server was almost 2 times lower than that of an ImDisk RAM disk.
Use the following commands to remove your RAM drive:
Remove-IscsiVirtualDiskTargetMapping -TargetName targetRAMDisk -DevicePath "ramdisk:testRAM.vhdx"
 Remove-IscsiServerTarget -TargetName targetRAMDisk
 Remove-IscsiVirtualDisk -Path "ramdisk:testRAM.vhdx"
5 comments
Great tutorial. I was able to create my ram disk.
“After rebooting the server, the RAM disk is removed with all its contents and you will have to re-create it again.”
Is there a way to make the RAM disk perpetual on a Windows Server?
I have an automatic service that starts automatically and I need to make sure that the drive is mounted at system boot up so that the service can make use of the disk.
Adrian, maybe running the power shell script at startup and setting the app service with automatic delayed start.
Excellent!
very slow for me on vm: C: FC SSD, M: ramdisk
C:\chudy\test1>winsat disk -drive m
Windows System Assessment Tool
> Running: Feature Enumeration ”
> Run Time 00:00:00.00
> Running: Storage Assessment ‘-drive m -ran -read’
> Run Time 00:00:00.38
> Running: Storage Assessment ‘-drive m -seq -read’
> Run Time 00:00:01.44
> Running: Storage Assessment ‘-drive m -seq -write’
> Run Time 00:00:02.55
> Running: Storage Assessment ‘-drive m -flush -seq’
> Run Time 00:00:00.44
> Running: Storage Assessment ‘-drive m -flush -ran’
> Run Time 00:00:00.47
> Disk Random 16.0 Read 110.98 MB/s 7.2
> Disk Sequential 64.0 Read 273.13 MB/s 7.6
> Disk Sequential 64.0 Write 546.02 MB/s 8.1
> Average Read Time with Sequential Writes 0.082 ms 8.8
> Latency: 95th Percentile 0.141 ms 8.9
> Latency: Maximum 0.865 ms 8.9
> Average Read Time with Random Writes 0.090 ms 8.9
> Total Run Time 00:00:05.36
C:\chudy\test1>winsat disk -drive c
Windows System Assessment Tool
> Running: Feature Enumeration ”
> Run Time 00:00:00.00
> Running: Storage Assessment ‘-drive c -ran -read’
> Run Time 00:00:00.23
> Running: Storage Assessment ‘-drive c -seq -read’
> Run Time 00:00:02.61
> Running: Storage Assessment ‘-drive c -seq -write’
> Run Time 00:00:01.84
> Running: Storage Assessment ‘-drive c -flush -seq’
> Run Time 00:00:01.55
> Running: Storage Assessment ‘-drive c -flush -ran’
> Run Time 00:00:01.67
> Disk Random 16.0 Read 188.32 MB/s 7.7
> Disk Sequential 64.0 Read 3377.72 MB/s 9.3
> Disk Sequential 64.0 Write 754.20 MB/s 8.3
> Average Read Time with Sequential Writes 0.558 ms 7.9
> Latency: 95th Percentile 1.368 ms 8.1
> Latency: Maximum 7.964 ms 8.2
> Average Read Time with Random Writes 0.580 ms 8.6
> Total Run Time 00:00:08.03
C:\chudy\test1>
Why copy a thought process