SNMP (Simple Network Management Protocol) is a classic protocol for monitoring and collecting information about network devices (servers, network hardware, workstations, printers, etc.). SNMP is quite a lightweight and fast protocol, it uses UDP ports 161 and 162 to transfer data. In this article, we’ll show how to install and configure SNMP service on Windows Server 2022/2019 and Windows 10/11.
How to Install SNMP Service on Windows Server 2022/2019
In Windows Server, you can install the SNMP service using Server Manager. Select Add roles and features -> Features. Click SNMP Service (if needed, also check SNMP WMI Providers).
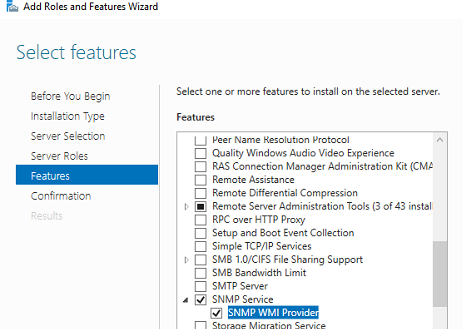
Click Next -> Install and wait till the installation is over.
Installing SNMP Agent on Windows Server Core
In Windows Server Core, you can install SNMP using the Windows Admin Center web interface or PowerShell.
If you are using the Windows Admin Center, connect to your Windows Server host, and select Roles and Features -> SNMP Service.

Since there is no graphical interface on Windows Server Core and the Server Core host can be managed from the command prompt, you can install the SNMP service using PowerShell.
You can use the Install-WindowsFeature PowerShell cmdlet to install roles and features on Windows Server.
Check that the SNMP service is not installed:
Get-WindowsFeature SNMP*
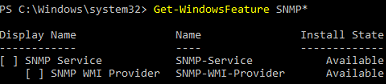
Install the SNMP role and WMI provider:
Install-WindowsFeature SNMP-Service,SNMP-WMI-Provider -IncludeManagementTools
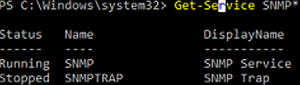
Make sure that SNMP services are running:
Get-Service SNMP*
In our example, the SNMP service is running, and SNMPTRAP is stopped.
Enabling SNMP Service in Windows 10/11
You can use the SNMP service not only on Windows Server but also on Windows 10 and 11 desktops. In Windows 10/11, the SNMP service is a part of the Features on Demand (like RSAT or OpenSSH).
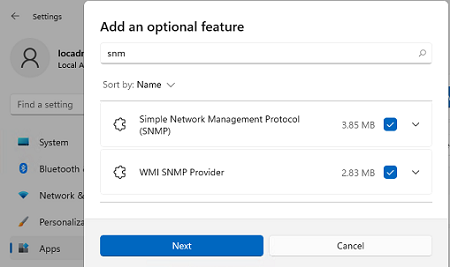
You can install SNMP via the Settings panel. Go to Apps -> Optional features -> Add an optional feature -> View features.
Select Simple Network Management Protocol (SNMP) and WMI SNMP Provider in the list of available components. To start the installation, click Next (you will need an Internet connection to Microsoft servers).
To install the SNMP service using PowerShell, run the command below:
Add-WindowsCapability -Online -Name SNMP.Client~~~~0.0.1.0
To install the SNMP service offline (without an internet connection), download the Windows 10/11 Features on Demand ISO image from your account on the Volume Licensing Service Center (VLSC) website.
To install SNMP from the ISO image offline, use this command:
Add-WindowsCapability -Online -Name SNMP.Client~~~~0.0.1.0 -LimitAccess -Source \\munfs01\Distr\Win11\FoD
How to Configure SNMP Service on Windows?
You can configure the SNMP service options with the services.msc console. Find the SNMP Service in the list and open its properties.
Note that the SNMP service has some additional tabs:
- Agent
- Traps
- Security
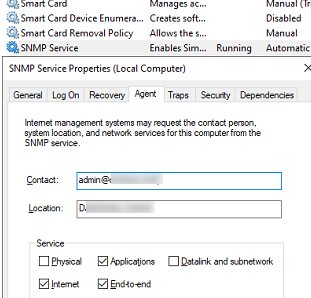
The Agent tab contains basic information about the device (administrator contact information, location). Here you can also select the type of information that the device can send when polling via SNMP.
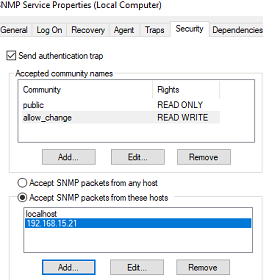
In earlier SNMP protocol versions (SNMP 1 and SNMP 2), a community string is used for authentication. In the Security tab, you can create multiple connection strings.
You can select one of five available access levels for the community:
- READ ONLY — allows getting information from a device
- READ WRITE —get information and edit a device configuration
- NOTIFY — allows receiving SNMP traps
- READ CREATE – to read data, change, and create objects
- NONE
You can create multiple community strings. To do it, enter a name and select the permissions. To monitor the server state, the READ ONLY privilege is enough.
In the Accept SNMP packets from these hosts list, you can enter the names or IP addresses of the hosts allowed to query the device. If you don’t want to use the allowed device list, leave Accept SNMP packets from any hosts here.
The Traps tab allows setting the list of the hosts to which the SNMP agent should send SNMP traps. An SNMP Trap is a broadcast UDP packet used for asynchronous notification of the manager (for example, a notification about a critical event).
Remember to create rules allowing inbound and outbound traffic for SNMP queries and traps in your Windows Defender Firewall. You can enable firewall rules with PowerShell.
There are several predefined rules for SNMP traffic in Microsoft Defender Firewall:
Get-NetFirewallrule -DisplayName *snmp* |ft
- SNMPTRAP-In-UDP
- SNMPTRAP-In-UDP-NoScope
- SNMP-Out-UDP
- SNMP-In-UDP-NoScope
- SNMP-Out-UDP-NoScope
- SNMP-In-UDP
You can enable all rules or just a specific one:
Get-NetFirewallrule -DisplayName *snmp* | Enable-NetFirewallRule
 Get-NetFirewallrule SNMP-Out-UDP | Disable-NetFirewallRule

There is the SNMP Trap in the list of Windows services. It is used to receive messages from other SNMP agents and forward them to SNMP servers (usually it is a monitoring system querying devices using via, for example, PRTG or Zabbix).
If you configure SNMP on Windows Server Core, you won’t be able to use the SNMP service GUI to set its settings. You will have to make changes to the registry using PowerShell instead. SNMP service settings are located under the registry key HKEY_LOCAL_MACHINE\SYSTEM\CurrentControlSet\Services\SNMP\Parameters.
The following commands will set the agent description:
New-ItemProperty -Path "HKLM:\SYSTEM\CurrentControlSet\services\SNMP\Parameters\RFC1156Agent" -Name "sysContact" -Value "admin@woshub.com" -PropertyType REG_SZ
 New-ItemProperty -Path "HKLM:\SYSTEM\CurrentControlSet\services\SNMP\Parameters\RFC1156Agent" -Name "sysLocation" -Value "MUN_DCn2" -PropertyType REG_SZ
You will have to create a separate key with the community name under HKLM\SYSTEM\CurrentControlSet\services\SNMP\Parameters\TrapConfiguration for each SNMP trap.
New-Item -Path "HKLM:\SYSTEM\CurrentControlSet\services\SNMP\Parameters\TrapConfiguration\public1"
Set the community permissions:
New-ItemProperty -Path "HKLM:\SYSTEM\CurrentControlSet\Services\SNMP\Parameters\ValidCommunities" -Name "public1" -Value 4 -PropertyType DWord
- 1 — NONE
- 2 — NOTIFY
- 4 — READ ONLY
- 8 — READ WRITE
- 16 — READ CREATE
For each community, you can set a list of hosts they are allowed to accept queries from:
New-ItemProperty -Path "HKLM:\SYSTEM\CurrentControlSet\Services\SNMP\Parameters\PermittedManagers" -Name "1" -Value "mun-mon1.woshub.com" -PropertyType REG_SZ
Restart your SNMP service to apply new settings from the registry:
Get-Service SNMP|Restart Service
If you want to deploy the SNMP service settings to multiple Windows computers/servers in your domain, use Group Policy Preferences to modify the registry.
To make sure if SNMP is working, use the snmpwalk tool (available in any Linux distro):
# snmpwalk -v 2c -c public1 -O e 192.168.12.200
In this example, we have polled our Windows host using SNMPv2.
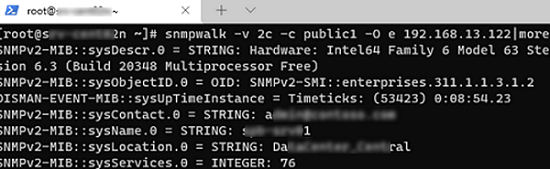
The tool has returned basic host information (syscontact, sysname, syslocation) and a lot of data on the Windows server state.
5 comments
Hello,
Thanks for information.
Can you recommend an open source SNMP server?
If you need a monitoring server, to log and do events based on the snmp status of the devices, look for Zabbix or Cacti.
Zabbix, Nagios Core, Cacti, Prometheus
Is there any way we can check SNMP version in Windows 2012 R2?
How do you configure the SNMP TRAP service ? and where does it store/log the Trap it receives ?