The Mandatory Profiles feature in Windows allows to create read-only user profiles. A mandatory profile is a special pre-configured type of roaming profile that doesn’t save changes made by the user during the session.
Any changes made to the profile during the session, as well as the various files stored, are lost when a user logs out. At the next logon, the mandatory profile is loaded unchanged. Such a profile can only be changed by an administrator. Mandatory profiles can be used on public computers, information kiosks, schools, and other educational institutions where user changes must be discarded when the session ends.
Types of Mandatory User Profiles in Windows
A mandatory profile is a profile that is configured by the administrator and cannot be changed by the user. If the user logs in with such a profile, they can make any changes to their environment, but these changes will be lost on logout.
The mandatory profile can be stored either locally or in a shared network folder (in this case, it can be used on multiple computers)
There are two types of mandatory user profiles in Windows:
- Normal mandatory user profile – an administrator renames the NTuser.dat file (which contains the HKEY_CURRENT_USER branch of the user registry) to NTuser.man. If the NTuser.man file is found in a profile, Windows understands that this profile is read-only and does not save changes to it. If such a profile is stored in a shared network folder, the user can still log on to the computer with a previously cached version of the mandatory profile if the file server is unavailable.
- Super mandatory user profile — when using this type of profile, the directory containing the user profile is renamed (the .man extension is added to the end of the folder name). Users with this profile type won’t be able to log in if the server where the profile is stored is unavailable.
This guide explains how to create a local mandatory profile and how to assign it to a user on a computer running Windows 10 or Windows 11.
How to Create a Mandatory User Profile in Windows
There are two ways to create a mandatory profile template in Windows:
- The first option is to create a workspace environment for the user and apply settings to the Default profile in Audit mode (
Ctrl+Shift+F3) +sysprepwith the Unattend.xml answer file, where theCopyProfile = Trueoption is enabled (This method is described here) - The second method is to copy the settings from the default profile and make the changes to the profile under the Administrator account.
Next, we will only look at the second method of creating a mandatory profile.
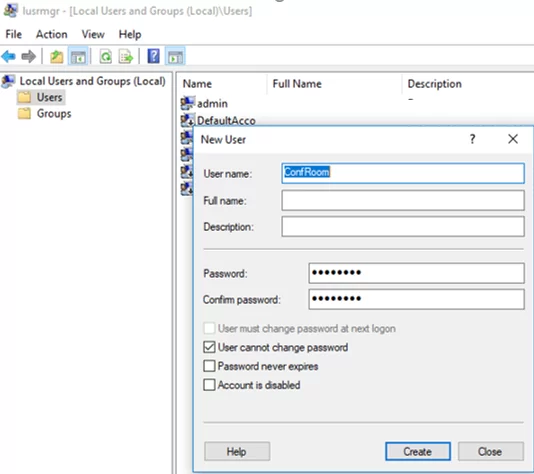
- Log on to the computer using the administrator account and open the Local Users and Groups console (
lusrmgr.msc). - Create a new account, for example, ConfRoom

- Then copy the Default profile into a separate directory with a specific extension. For Windows 11, Windows Server 2022/2019, Windows 10 1607 and later, add the V6 suffix to the directory name. For example,
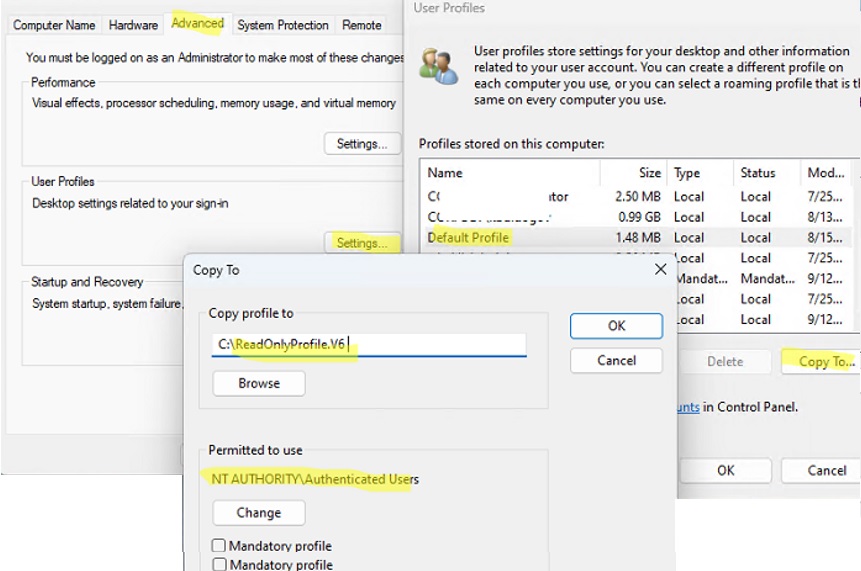
C:\ReadOnlyProfile.V6 - Open the system settings (
SystemPropertiesAdvanced.exe) and click the Settings button under the User Profiles section - Select the Default Profile and click Copy To;
- Select
C:\ReadOnlyProfile.V6as the directory to copy the profile to. Or you can copy the default profile template to a shared network folder by specifying a UNC path, for example\\server1\profiles\ReadOnlyProfile.V6). - In Permissions, select NT AUTHORITY\Authenticated Users. Do not tick the Mandatory Profile option!

Assign a Read-Only (Mandatory) Profile to a User
Now assign the mandatory profile to a target user.
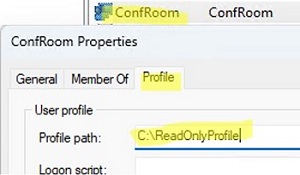
If you are using a local mandatory profile, specify the path to the C:\ReadOnlyProfile directory in the Profile Path in the user properties on the Profile tab (Do not specify the V6 suffix in this case!!).
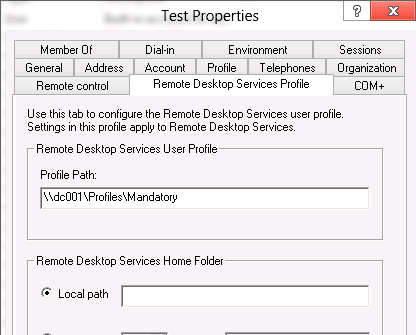
If you configure a mandatory roaming user profile in the AD domain, you can specify the UNC path to the directory containing the profile in the account properties in the ADUC console.
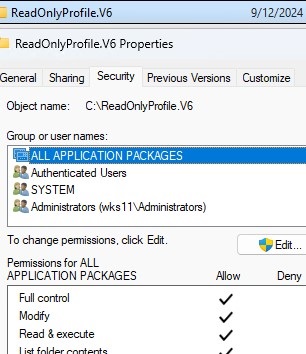
Open the properties of the C:\ReadOnlyProfile.V6 folder and assign Full Control privileges to the All Application Packages group. As a result, this folder should have the following list of permissions ((with permission inheritance to all child objects):
- ALL APPLICATION PACKAGES – Full Control (without it, the Start Menu will not work properly)
- Authenticated Users – Read and Execute
- SYSTEM – Full Control
- Administrators – Full Control
Then open the registry editor, select the HKEY_USERS key, and click File -> Load hive. Load the C:\ReadOnlyProfile.V6\ntuser.dat file that contains the user’s registry.
Right-click on the registry hive you added and select Permissions. Grant the Authenticated Users and All Application Packages security groups Full Control permissions on this registry key.
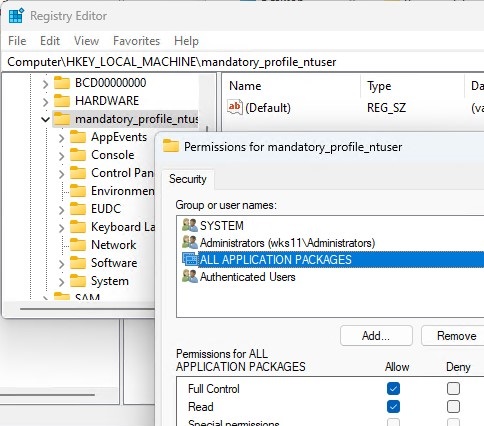
Then unload ntuser.dat file from the registry editor by selecting File -> Unload Hive.
Configure the following policy settings in the local GPO editor (gpedit.msc):
- Computer Configuration > Policies > Administrative Templates > System > User Profiles -> Delete cached copies of roaming profiles =
Enabled
- Disable the First Sign-in Animation: Computer Configuration -> Administrative Templates -> System -> Logon -> Show first sign-in animation =
Disabled - Computer Configuration -> Administrative Templates -> Windows Components -> OOBE -> Don’t launch privacy settings experience on user logon =
Enabled. - When using roaming profiles, create a DWORD registry key called SpecialRoamingOverrideAllowed with a value of 1 in the HKLM\Software\Microsoft\Windows\CurrentVersion\Explorer\ reg key to display the Start menu correctly.

Now sign in with a new user account and make the necessary settings (change appearance, place shortcuts, place necessary files, configure software, etc.).
End the user session and log on using the administrator account. Then rename NTUSER.DAT into NTUSER.MAN in the user profile folder.

Now try to log on computer as a user with the mandatory profile and make sure that after you log off no changes are saved in the profile.
Now log in as a user with a mandatory profile and check that the user can fully work in their profile: configure environment settings, install and configure per-user apps. Run the PowerShell command to verify that the mandatory profile is in use:
gwmi win32_userprofile | select localpath,roamingpath,status

The path to the mandatory profile is specified in the roamingpath parameter. Status=4 indicates the mandatory profile type is used.
After logging out, all changes to the user profile (including history, cookies, application settings, temporary files) are not saved.
If you need to make changes to a mandatory profile, rename the NTUSER.MAN file to NTUSER.DAT and configure the environment under the user account. Then rename it back to NTUSER.MAN.
If you are using mandatory profiles on RDS servers, use the following Group Policy options to set the path to the profile directory and enable the use of mandatory profiles: Computer Configuration -> Policies -> Administrative Templates -> Windows Components -> Remote Desktop Services -> Remote Desktop Session Host -> Profiles.
- Use mandatory profiles on the RD Session Host server = Enabled
- Set path for Remote Desktop Services Roaming User Profile = Enabled + specify the UNC path
Note that when using folder redirection with the mandatory profile, it is not recommended to redirect the AppData (Roaming) folder.
4 comments
Hi,
You say :
If you need to make changes to a mandatory profile, rename the NTUSER.MAN file to NTUSER.DAT and configure the environment under the user account. Then rename it back to NTUSER.MAN.
No ? If you change profile you should regenerate syprep after change mandatory and to export the new manadatory profile.
Also, Is it possible to have an article that deals with the same subject but with Windows 11? Especially for the management of the start menu and the taskbar shortcuts. Because with Windows 11, more things have changed.
Thank you.
Best regards.
M.Ben
There is no need to run sysprep after making changes to the mandatory profile. Mandatory user profiles and the sysprep tool serve different purpose:
Sysprep is used or cloning and deployment, in the process of deploying a custom Windows image to computers.
Mandatory profiles prevent changes from being saved in the user’s environment.
Hi,
When rename user.dat to user.man, the connexion is slow ? To during 44 s ? Why ?
Best regards
Ben
Hi,
If user have read and execute right cannot modify your roaming profile user.dat ? Before rename to mandatory the user should be have modify right to change settings for application, background, …
Best regards,