PowerShell Remoting (PSRemoting) enables administrators to remotely manage Windows computers and servers, run scripts and commands, and perform administrative tasks. PowerShell Remoting is built on the Windows Remote Management (WinRM) service, which enables administrators to execute commands on remote computers. WinRM uses the HTTP (TCP/5985), HTTPS (TCP/5986), or SSH (TCP/22) protocols to communicate with remote computers.
In this article, we’ll cover how to enable, configure, or disable the PowerShell Remoting (WinRM) protocol in Windows, as well as how to allow remote connections via PSRemoting for non-administrator users.
Enable and Test PowerShell Remoting (WinRM) on Windows
PowerShell Remoting is disabled by default in desktop editions of Windows 10 and 11, but is always enabled in Windows Server. To check if PowerShell Remoting is enabled on your computer, run the following command:
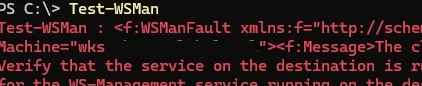
Test-WSMan
This error indicates that PSRemoting is not configured.
Error Code="2150858770" The client cannot connect to the destination specified in the request. Verify that the service on the destination is running and is accepting requests. Consult the logs and documentation for the WS-Management service running on the destination, most commonly IIS or WinRM.
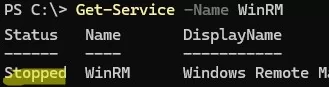
The Windows Remote Management (WS-Management) service is also stopped.
Get-Service -Name WinRM
The WinRM listener is also missing:
WinRM enumerate winrm/config/listener
Use one of these commands to quickly enable WinRM and configure PSRemoting in Windows:
Enable-PSRemoting
or
winrm quickconfig
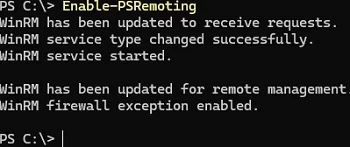
The following changes are made to the system by this command:
- It runs the WinRM service and enables its autostart.
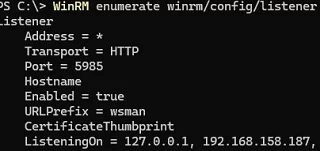
- Creates a WinRM HTTP listener. Its settings can be displayed using the command:
WinRM enumerate winrm/config/listener
- Enables the WinRM rules in the Windows Firewall (the default TCP ports are 5985 and 5986):
Get-NetFirewallRule -DisplayName "Windows Remote Management (HTTP-In)"|ft - Registers and enables PowerShell session configurations (list it:
Get-PSSessionConfiguration) - Restarts the WinRM service

WinRM firewall exception will not work since one of the network connection types on this machine is set to Public. Change the network connection type to either Domain or Private and try again.
In this case, either change the network type to Private or Domain, or ignore the network type check when enabling WinRM using the following command:
Enable-PSRemoting –SkipNetworkProfileCheck -Force
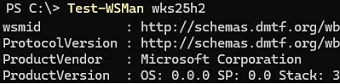
Check the availability of the WinRM and PowerShell services on a remote computer by running the command (in this example, these services are ready to accept connections):
Test-WSMan -ComputerName wks25h2
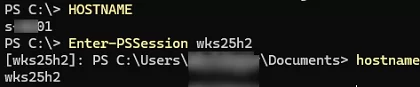
You can now connect to this computer via PowerShell Remoting. The following PS commands are usually used by administrators to connect to user computers remotely:
Enter-PSSession– used for interactive access to the console of a remote computer.Invoke-Command– used to run several commands or PowerShell scripts on one or more remote computers.
By default, the WinRM HTTP listener uses the Kerberos protocol for authentication and functions within an Active Directory domain when connecting to a remote computer by its FQDN:
Get-ChildItem -Path WSMan:\localhost\Service\Auth\
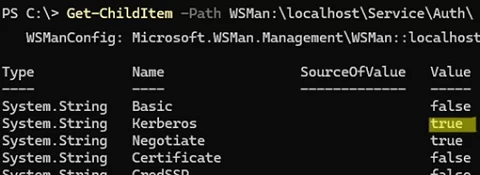
The less secure NTLM authentication method is used when connecting to a remote computer via its IP address or to a computer in a workgroup. This method is disabled by default in WinRM.
Connecting to remote server 192.168.158.187 failed with the following error message : The WinRM client cannot process the request. If the authentication scheme is different from Kerberos, or if the client computer is not joined to a domain, then HTTPS transport must be used or the destination machine must be added to the TrustedHosts configuration setting. Use winrm.cmd to configure TrustedHosts. Note that computers in the TrustedHosts list might not be authenticated.

In order for the administrator’s computer to trust the remote computer, the user’s IP address or computer name must be added to the TrustedHosts list in the PowerShell PSRemoting configuration.
Set-Item wsman:\localhost\client\TrustedHosts -Value 192.168.158.187 -Force
List computers in TrustedHosts:
get-Item WSMan:\localhost\Client\TrustedHosts
Add an asterisk (*) to TrustedHosts to allow the administrator to connect to any computer (not secure!):
Set-Item WSMan:\localhost\Client\TrustedHosts -Value *
To secure WinRM connections, you can additionally:
- PowerShell Remoting over SSH transport
- Configure WinRM over HTTPS with an SSL certificate
Allow Remote PowerShell Access (WinRM) for Non-Admin Users
By default, a user must be a member of the local Administrators group to connect remotely to a computer via PowerShell Remoting. You can also grant remote WinRM connections for non-admin users without local admin permissions.
If you try to establish a PowerShell session with a remote computer using a non-privileged user account, you’ll see an access denied error:
Enter-PSSession : Connecting to remote server lon-srv1 failed with the following error message : Access is denied. InvalidArgument: FullyQualifiedErrorId : CreateRemoteRunspaceFailed

The following command displays the list of groups allowed to connect to a computer remotely via PowerShell Remoting:
(Get-PSSessionConfiguration -Name Microsoft.PowerShell).Permission
By default, remote WInRM access is allowed for the following built-in groups:
- BUILTIN\Administrators — AccessAllowed,
- BUILTIN\Remote Management Users — AccessAllowed

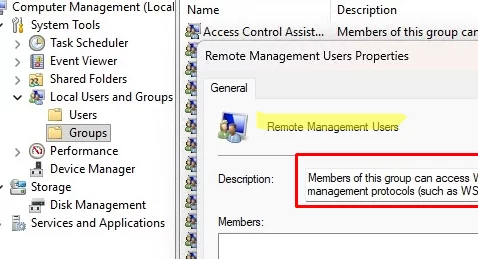
Thus, to grant a user access to PSRemoting, simply add them to the “Remote Management Users” group. This group is granted access to WMI resources via management protocols, such as WS-Management.
You can add a user to this group using either the Computer Management snap-in (compmgmt.msc), the PowerShell command Add-LocalGroupMember -Group "Remote Management Users" -Member "jsmith" , or you can add a user to a group via GPO.
The specified non-admin user can now connect to this computer via PSRemoting.

You can grant a user temporary permission to connect remotely via PowerShell by modifying the security descriptor of the current Microsoft.PowerShell session on the computer (these permissions will remain in effect until you restart the computer),
Open the list of current permissions:
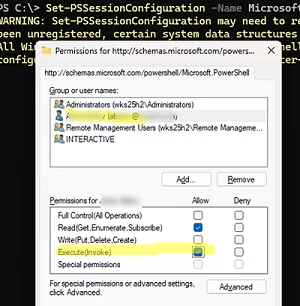
Set-PSSessionConfiguration -Name Microsoft.PowerShell -showSecurityDescriptorUI
Add a user or group to the ACL and grant them the Execute (Invoke) permissions.
For future use, you can copy the current access string in SDDL format:
(Get-PSSessionConfiguration -Name "Microsoft.PowerShell").SecurityDescriptorSDDL
As you can see, the SID of the user who was added to the security settings is now included in the SDDL.
This SDDL string can be used to grant a specific user access to PowerShell Remoting on any computer.
$SDDL = "O:NSG:BAD:P(A;;GA;;;BA)(A;;GXGR;;;S-1-5-21-2323243421-3342677354-2633435451-55422122)(A;;GA;;;RM)S:P(AU;FA;GA;;;WD)(AU;SA;GXGW;;;WD)"
Set-PSSessionConfiguration -Name Microsoft.PowerShell -SecurityDescriptorSddl $SDDL

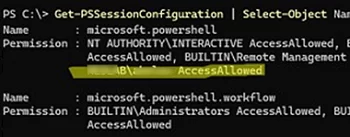
Get current PSSession permissions:
Get-PSSessionConfiguration | Select-Object Name, Permission
Disable PowerShell Remoting and WinRM in Windows
Use the following command to disable PowerShell Remoting on a computer:
Disable-PSRemoting -Force
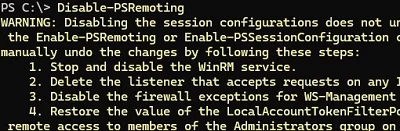
However, this doesn’t return the computer to the state it was in before PSRemoting was enabled. To undo all the changes that the Enable-PSRemoting cmdlet made to your computer’s configuration, you must perform some manual steps.
Remove the WinRM listener.
List winrm listeners:
dir wsman:\localhost\listener
You can either delete a listener by its name or delete all created listeners.
Remove-Item -Path WSMan:\Localhost\listener\<Listener name>
Remove-Item -Path WSMan:\Localhost\listener\listener* -Recurse
Disable the WinRM service:
Stop-Service WinRM; Set-Service WinRM -StartupType Disabled -PassThru
Disable the firewall exception rules for WinRM:
Get-NetFirewallRule -DisplayGroup "Windows Remote Management" | Where-Object {$_.Enabled -eq "True"}| Disable-NetFirewallRule -whatif
Disable the LocalAccountTokenFilterPolicy registry parameter to prevent remote access under accounts with local administrator permissions.
reg add "HKLM\SOFTWARE\Microsoft\Windows\CurrentVersion\Policies\System" /v "LocalAccountTokenFilterPolicy" /t REG_DWORD /d 0 /f
How to Disable Remote PowerShell Access for Exchange Users
By default, all users of Exchange Server (including Exchange Online) can remotely connect to Exchange via PowerShell. However, a user’s permissions are determined by the Exchange roles assigned to them. For security reasons, it is recommended to disable remote PowerShell connections to the Exchange shell for non-admin users and service accounts. To accomplish this, disable the RemotePowerShellEnabled option in the properties of the relevant users.
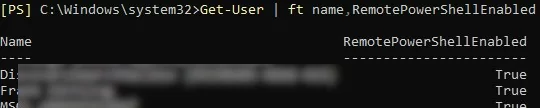
List the Exchange users who have remote PowerShell access permissions.
Get-User -ResultSize Unlimited -Filter 'RemotePowerShellEnabled -eq $true'
To disable a user’s remote access to Exchange via PowerShell, set RemotePowerShellEnabled to $false.
Set-User -Identity jsmith@woshub.com -RemotePowerShellEnabled $false
1 comment
The advice to copy the new SDDL and simply apply it to other computers is a bad idea. What you want to do is capture the part of the SDDL that corresponds to the new user/group and then APPEND it to the existing SDDL on other computers