BitLocker Drive Encryption technology helps protect data on your local and external drives by encrypting the contents of logical volumes. In this article, we’ll have a look at two ways to extract data from a BitLocker-encrypted partition. The first involves decrypting the BitLocker-protected partition using the standard Windows tools. The second way suggests that the file system of the encrypted drive is corrupted (the area of the drive where BitLocker stores its metadata is damaged) or that Windows won’t boot.
- Requirements for data recovery from a BitLocker volume
- How to Unlock a BitLocker Encrypted Drive in Windows?
- Disable BitLocker Encryption for System Drive in Windows Recovery Environment
- Using BitLocker Repair Tool (Repair-bde) to Recover Encrypted Drive
- How to Access BitLocker Encrypted Drive on Linux?
Requirements for data recovery from a BitLocker volume
To recover data from a drive that is encrypted with BitLocker, you would need to have at least one of the BitLocker protection elements:
- BitLocker password (the one that you enter in the Windows GUI to unlock the encrypted drive);
- The BitLocker Recovery key;
- System startup key (.bek) – a key file on a USB flash drive that allows you to automatically decrypt the boot partition without requiring the user to enter a password.
The BitLocker recovery key is a unique sequence of 48 characters. The recovery key is generated before Bitlocker starts the partition encryption. You can print the recovery key, save it as a text file on external media, or save it to your Microsoft account.
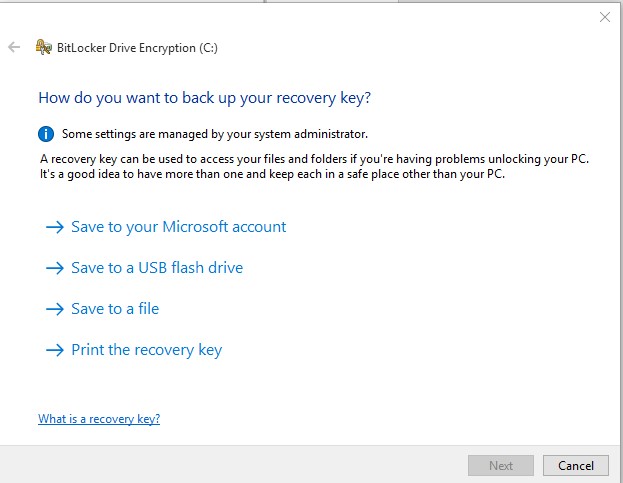

You can find the Bitlocker recovery key in your account on the Microsoft website https://onedrive.live.com/recoverykey.

For computers that are joined to an Active Directory domain, an administrator can configure GPOs to automatically save BitLocker recovery keys in the computer’s account attribute in AD.
How to Unlock a BitLocker Encrypted Drive in Windows?
The easiest way to unlock a BitLocker-encrypted drive is from the Windows GUI.
Connect the drive to your computer and go to the Control Panel -> System and Security -> BitLocker Drive Encryption (available in Professional and Enterprise Windows editions). Select the BitLocker-encrypted disc and click Unlock Drive.

Depending on the security method, specify the password, PIN, or connect the smart card to unlock the drive. If you don’t know the password, you can use the recovery key to decrypt the volume. Select Advanced settings -> Enter recovery key.

If you have more than one recovery key, you can identify the one you need by the Key ID part displayed in the prompt window. If you have entered the correct key, the drive will be unlocked and you will be able to access files on the BitLocker drive.
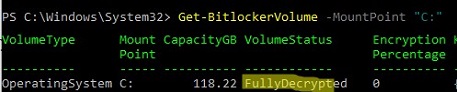
You can also use PowerShell to disable BitLocker protection for a specific volume:
Disable-BitLocker -MountPoint "C:"
Wait for partition decryption to be complete. Check that the drive has been decrypted:
Get-BitlockerVolume -MountPoint "C:"
VolumeStatus: FullyDecrypted
Disable BitLocker Encryption for System Drive in Windows Recovery Environment
If your system drive is encrypted by BitLocker and Windows no longer boots (due to incorrect updates, Blue screen of death, freezes on startup, etc.), you can use Windows Recovery Environment (Windows RE) to decrypt the drive.
The WinRE recovery environment should start automatically if Windows fails to boot 3 times in a row. You can also boot your computer from any Windows installation USB flash drive, MS DaRT recovery image, or other LiveCD. If you are using a Windows installation media, press Shift+F10 at the language selection stage (or in WinRE select Troubleshoot -> Advanced options -> Command Prompt).
The WinPE command prompt should appear.
You need to find a Bitlocker encrypted drive letter. To check the status of all available drives in WinPE, run:
manage-bde -status
The result of the command for one (or several) of the drives should contain the following text: “BitLocker Drive Encryption: Volume D”. So you have disk D encrypted.
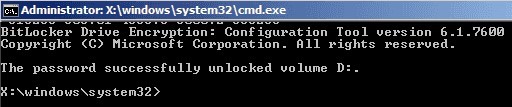
Unlock the drive by running the command:
manage-bde -unlock D: -pw
The command prompts for a BitLocker password:
Enter the password to unlock this volume:
If the password is correct, a message will appear:
The password successfully unlocked volume D:.<p/re>
If you don’t know the BitLocker password, you can use the recovery key to unlock the volume:
manage-bde -unlock D: -RecoveryKey J:\1234567...987ABCDE4564.bek
Your drive is unlocked and you can start repairing the Windows boot loader or fixing other problems.
To unlock the drive and disable BitLocker drive protection altogether, run:
manage-bde -protectors -disable D:
Restart your computer. The drive is now unencrypted.
Using BitLocker Repair Tool (Repair-bde) to Recover Encrypted Drive
To recover data from a damaged/inaccessible BitLocker volume, you must use the Repair-bde (BitLocker Repair Tool) console tool.
Try to decrypt and extract the data to a new drive using the BitLocker password. The repair-bde utility allows you to restore data from a damaged volume to a new partition. Note that the target partition must be larger than the source BitLocker volume and that existing data on the target volume will be deleted (!).
- Open the command prompt as an administrator;
- Run the following command:
repair-bde D: F: -pw –Force, where D: is a disk with the BitLocker data, and E: is an empty drive (partition) to extract the decrypted data to; - Specify the Bitlocker Password (used by the user to unlock the encrypted volume using the Windows GUI).
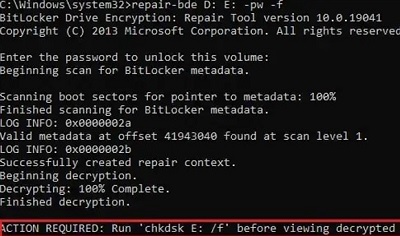
The repair-bde utility will attempt to recover critical metadata from your encrypted volume and use it for decryption.
If the data has been successfully decrypted, the following message will appear:
Decrypting: 100 completed
Finished decryption.
ACTION REQUIRED: run chkdsk E: /f before viewing decrypted data
You can use the recovery key or the system boot key to decrypt the volume if you don’t know the BitLocker password (if the system partition is encrypted).
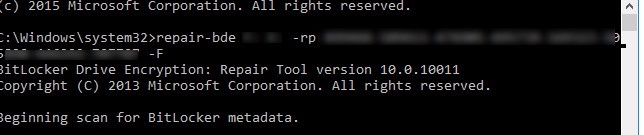
Use a Recovery Key to start recovering data from the BitLocker partition:
repair-bde D: E: -rp 288209-513086-417508-646412-162954-590672-167552-664563 –Force
If BitLocker is used to encrypt the Windows system partition and a special boot key on a USB flash drive is used to boot the operating system, you can decrypt the volume as follows:
repair-bde D: E: -rk I:\2F538474-923D-4330-4549-61C32BA53345.BEK –Force
where 2F538474-923D-4330-4549-61C32BA53345.BEK s the BitLocker drive encryption startup key on the USB flash drive I: (this file is hidden by default).
After unlocking the volume, you need to check the target drive using the command:
Chkdsk E: /f
How to Access BitLocker Encrypted Drive on Linux?
You can also open a BitLocker-encrypted drive from Linux. To do this, you will need the DisLocker tool and a BitLocker recovery password or key.
Use your package manager to install the tool. If you are running Ubuntu/Debian, use the command:
$ sudo apt-get install dislocker
Go into the mnt directory and create two directories (one for the encrypted partition and one for the decrypted one):
$ cd /mnt
 $ mkdir encrypted
 $ mkdir decrypted
Locate the encrypted partition (fdisk -l command) and decrypt it using the BitLocker password:
$ sudo dislocker -V /dev/sdb1 -u -- /mnt/encrypted
If you have a recovery key, use this command:
$ sudo dislocker -r -V /dev/sdb1 -p your_bitlocker_recovery_key /mnt/encrypted
The DisLocker utility uses the Filesystem in Userspace (FUSE) driver to access an encrypted partition in read-only mode.
The dislocker-file will appear in the target directory. This file contains your NTFS data partition.
To see all the files on the unencrypted partition, you can mount it:
$ sudo mount -o loop /mnt/encrypted/dislocker-file /mnt/decrypted
16 comments
Just to note that
repair-bde F: G:-pw –Force
didn’t work for me, but
repair-bde F: G:-rp <Recovery Password> –Force
did work.
can u tell me i forget my bit-lock password and i dont have also recovery key. i just have recovery key id i get it from command prompt. tell me how can i unlock my external hard drive or recover my data in decrypt?
visit this page and log in with the microsoft account used on the computer of which you nee to recover data: https://account.microsoft.com/devices/recoverykey
on this page you will find the recovery key
I deleted my bit locker drive and installed windows on it!! Since I noticed recovered files and now I have a lot of unknown files (I guess because their encrypted).
Is there any way to decrypt this files instead of drive?
Well explained
To the poster, thanks so much, this is the only thing that worked for me.
hi michael can u tell me i forget my bit-lock password and i dont have also recovery key. i just have recovery key id i get it from command prompt. tell me how can i unlock my external hard drive or recover my data in decrypt?
Is there anyway to de-encrypt the drive without needing another hard drive of the same capacity to extract to?
chris i forget my password and unfortunately i did not save key in my any document. can u tell me how can i recover this??
Bit of background…. I lent someone my drive and later on when I connected it to my computer there was no folders on it other than a .txt file names “Bitlocker recovery key ####- etc. On opening that file there is information on an identifier and a Bitlocker recovery key.
Checking the volume confirms that there is terrabytes of information on the drive but only this one text file
When i run the Bitlocker status command the information returned states that the drive is not locked?
When I run the other commands it asks for a target drive with enough space for the transfer but I don’t have a drive handy but i fear this attempt will also fail because it isn’t “Encrypted” – but is?
Hi please I need help
Yesterday I tried to encryption of my hard disk using the bitlocker but then at 24℅ it froze for about 2 hours
I thought it was problem so I decide to pause and start the encryption all over
After reboot I realised the encryption worked and the hard disk was locked but to my utter dismay I can’t access
After inputing the password I am not about to acces s my hard disk😢
How do I go about it without formatting the drive 🙏🏽
This method doesn’t work for me because my drive only shows up for like 30 seconds, and then disappears. When I enter the repair-bde command and use the password, it says “D:\ is not a valid volume” or something similar like that.
I had a corrupted boot disk on a MS Surface. These instructions were the only method I found that enabled me to decrypt the drive and recover the files. Huge save. Thank you.
Windows 10 Update (coincidentally?) broke my system and forced me into a permanent autorepair loop. Breaking out to the command prompt allowed me to un-bitlock my C: drive and chkdsk/f it which then allowed me to restart OK. THANK YOU!! The only issue was that I didn’t know my 48 digit (8 x 6) code was a recovery key not a password so I needed the -rp option instead of -pw . From that point it was plain sailing. THANK YOU.
Not only did this guide not help me, but it wiped the master boot record off my other Bitlocker drive and I had to completely format it and reencrypt it. Horrible guide.
Thanks a lot. your detailed explanation helped me to recover my system.
in fact my problem was I tried Bitlocker functionality on my work laptop and I know the password very well. but when I setup Bitlocker, I did on OS partition and kept the recovery key on my data partition.
I used windows 10 installation bootable USB as you suggest, and running reached to my data partition and extracted my recovery key, then restarted my PC with that…And now I am back to work on my PC.
Thanks a lot….