In this article, we’ll look at how to update a computer running Windows 10 to Windows 11 25H2 on unsupported hardware (without a TPM chip, UEFI, or with an old CPU). Microsoft’s minimum requirements for installing Windows 11 include the presence of a hardware TPM chip, UEFI, and a modern CPU released after 2017. If your PC doesn’t meet Windows 11’s minimum system requirements, it will be marked as incompatible and will not receive an upgrade offer through Windows Update
This post explains how to manually upgrade a computer that doesn’t meet the minimum requirements from Windows 10 to Windows 11 25H2 (an in-place upgrade). With this method, you can upgrade to Windows 11 without performing a clean reinstallation of the operating system or losing any data or installed apps.
Prepare for the Upgrade from Windows 10 to Windows 11
To update your computer, you need the official Windows 11 25H2 ISO image, which can be downloaded directly from the Microsoft website or created using the Media Creation Tool (https://www.microsoft.com/software-download/windows11).
The latest version of Windows 10 is 22H2. Make sure your computer is running this version:
- Press
Win+R - Run the command:
winver - This will show you which version of Windows is installed.


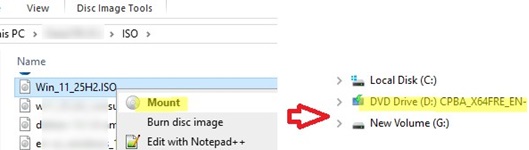
Mount the ISO file that contains the Windows 11 25H2 installation image. A virtual DVD drive will appear and be assigned the drive letter D:\ (by default).
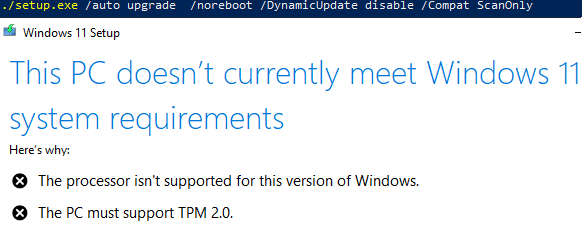
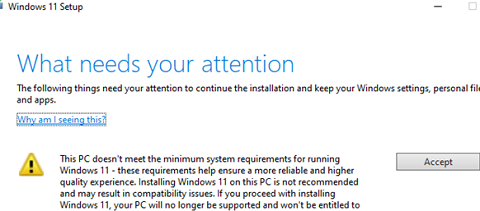
To manually upgrade an old computer from Windows 10, 22H2 to Windows 11, run the setup.exe file from a mounted ISO image containing build 25H2. If your computer’s hardware doesn’t meet the minimum requirements, the following message will appear:
- The process isn’t supported for this version of Windows
- The PC must support TPM 2.0
To check if your computer’s hardware is compatible with Windows 11 25H2, open a command prompt and navigate to the virtual DVD drive:
cd d:\
Run the command:
./setup.exe /auto upgrade /noreboot /DynamicUpdate disable /Compat ScanOnly
In this mode, Windows Setup runs a compatibility check without performing an upgrade.
Bypass Compatibility Checks When Upgrading to Windows 11
To prevent the Windows 11 setup program from checking your computer’s hardware compatibility, you need to make changes to the registry.
According to Microsoft’s official documentation, there is an official way to bypass the hardware requirement by adding the AllowUpgradesWithUnsupportedTPMOrCPU registry parameter (link). This option allows you to skip the TPM 2.0 chip and CPU checks when upgrading the OS.
Run the following command to create this registry parameter:
reg add HKLM\SYSTEM\Setup\MoSetup /f /v AllowUpgradesWithUnsupportedTPMorCPU /d 1 /t reg_dword
The AllowUpgradesWithUnsupportedTPMOrCPU registry parameter allows the old CPU and the presence of a TPM 2.0 chip to be ignored, but a TPM 1.2 chip is still required. You will not be able to update in this way if the TPM is missing.
The following PowerShell command checks for the presence of a TPM chip on a computer:
Get-TPM
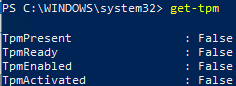
If the TPM chip is missing (TpmPresent=False), there are workarounds to upgrade to Windows 11 without checking hardware compatibility.
Run the following commands in an elevated command prompt:
reg delete "HKLM\SOFTWARE\Microsoft\Windows NT\CurrentVersion\AppCompatFlags\CompatMarkers" /f
 reg delete "HKLM\SOFTWARE\Microsoft\Windows NT\CurrentVersion\AppCompatFlags\Shared" /f
 reg delete "HKLM\SOFTWARE\Microsoft\Windows NT\CurrentVersion\AppCompatFlags\TargetVersionUpgradeExperienceIndicators" /f
 reg add "HKLM\SOFTWARE\Microsoft\Windows NT\CurrentVersion\AppCompatFlags\HwReqChk" /v "HwReqChkVars" /t REG_MULTI_SZ /s "," /d "SQ_SecureBootCapable=TRUE,SQ_SecureBootEnabled=TRUE,SQ_TpmVersion=2,SQ_RamMB=8192" /f
 reg add "HKLM\SYSTEM\Setup\MoSetup" /v "AllowUpgradesWithUnsupportedTPMOrCPU" /t REG_DWORD /d 1 /f
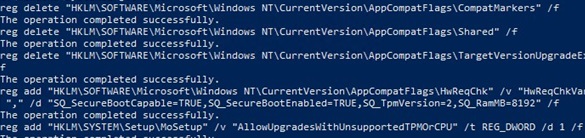
- The first three commands remove registry entries containing data about previous upgrade attempts and failed hardware requirements checks.
- Then, the HwReqChk registry parameter is added to make it seem like the computer passed the minimum requirements compatibility check (TPM, CPU, RAM, etc.).
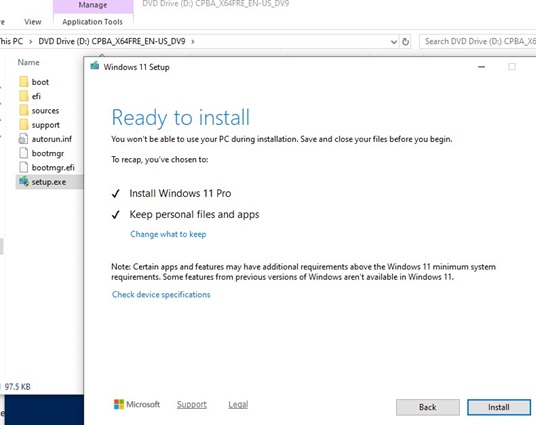
Once these changes have been implemented, run the setup.exe file from the Windows 11 installation media. You can now perform an in-place upgrade of Windows 10, ignoring hardware checks while keeping your installed programs and files (check the Keep personal files and apps option).
Upgrade Windows 10 to Windows 11 with /Product Server Option
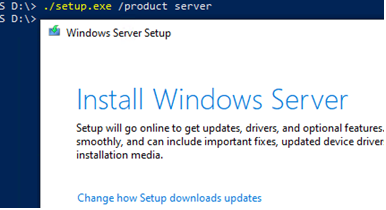
Another way to upgrade to Windows 11 is to run setup.exe with the argument indicating that you are installing a Windows Server edition, which bypasses the CPU and TPM chip verification checks.
Open a command prompt and run the Windows 11 update wizard in special mode:
./setup.exe /product server
Or:
D:\sourcs\setupprep.exe /product server
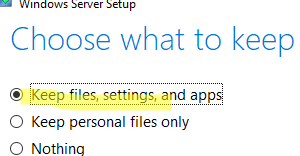
During the upgrade, select the option to keep your installed files, settings, and programs.
Even though you specified the Windows Server installation options, the desktop (client) Windows edition remains the same.
After the upgrade is complete, check the Windows 11 version and build using the command:
Get-ItemProperty -Path 'HKLM:\SOFTWARE\Microsoft\Windows NT\CurrentVersion ' | select ProductName, DisplayVersion, CurrentBuild
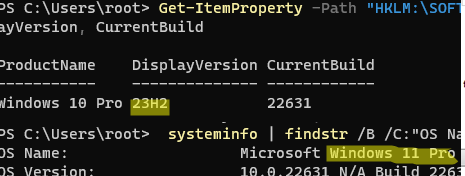
As you can see, the upgrade to Windows 11 Pro was completed successfully.
A previous bypass method of upgrading to Windows 11 on unsupported hardware involved modifying the appraiserres.dll file on the installation media.
- Copy the Windows 11 installation ISO image files to your local drive (or burn the ISO image to a USB stick)
- Clear the contents of the
appraiserres.dllfile in the sources folder:Clear-Content C:\Win11_ISO\sources\appraiserres.dll -Force - Then run the
setup.exefile and continue with the Windows 11 upgrade.
To silently upgrade your computer to Windows 11, you can use the setup.exe command-line options:
start /wait d:\setup.exe /Auto Upgrade /Quiet /DynamicUpdate disable /showoobe None /Telemetry Disable /compat IgnoreWarning /NoReboot
It is also advisable to disable the new update protection option called Safeguard Holds, which blocks the delivery of new Windows versions to systems with known compatibility issues.
reg add HKLM\SOFTWARE\Policies\Microsoft\Windows\WindowsUpdate /f /v DisableWUfBSafeguards /d 1 /t reg_dword
It corresponds to the GPO option Disable safeguards for Feature Updates under Computer Configuration -> Administrative Templates -> Windows Components -> Windows Update -> Manage updates offered from Windows Updates.
Update from October 2025. You can also use the Flyby11 third-party tool to upgrade a computer that doesn’t meet the Windows 11 system requirements. I prefer avoiding third-party tools on my production systems, especially since system requirement checks can be easily bypassed using only built-in tools.
14 comments
thank you very much for your help, i was stuck after installing a windows server 2019 it crushed my system.
i have tried reinstalling with no luck until it kept restart each time i boot with a usb until you help me thanks
Thanks for this guide, I’m wondering what could happens to the those unsupported computers which are upgraded to Windows 11… In my company we have many computers which are totally capable to work fine with W11 but are unsupported by Microsoft, so I’m considering the risk of an upgrade… 😉
creating a security risk doing this commercially.
The issue is that certain features require some special CPU instructions, but they aren’t enabled by default and not needed for a personal use case.
Will a W11 install as described above receive regular security updates ?
thanks
Microsoft has confirmed that devices running Windows 11 on unsupported hardware will continue to receive security patches and other updates through Windows Update, but these devices are not guaranteed to receive all feature updates in the same way as supported devices.
For what I understand, this isn’t acurate. Microsoft has not guaranteed that W11 PCs using unsupported hardware will receive any updates. https://support.microsoft.com/en-us/windows/windows-11-on-devices-that-don-t-meet-minimum-system-requirements-0b2dc4a2-5933-4ad4-9c09-ef0a331518f1
At the moment, my test Win 11 VM, running on unsupported hardware (no TPM and no secure boot), gets all the security updates. Of course, there is no guarantee from MSFT that these devices will continue to receive updates in the future.
Thanks for the proof.👍
Thx so much for this
Thanks a lot, it worked.
I have used RUFUS to create the USB media to use on my unsupported CPU. do I just create without using the RUFUS ignore features and just create the USB as I am using the registry change above.. Woudl the media creation tool also work?
Yes, you can use the Media Creation Tool to create a bootable USB stick and follow this guide to bypass the system requirements using the registry option
AllowUpgradesWithUnsupportedTPMOrCPU.Hey guys, my current windows 10 machine does not have the TPM chip so it won’t allow me to upgrade to windows 11. I do have a new I5 motherboard and cpu that meet all of the hardware requirements, so how do I get the old win 10 system to boot on the new motherboard (cpu, mem, hardware) so I can upgrade this to win 11??? None of the approaches seem to match this scenario. Any input would be appreciated.
If you want to install Windows 11 25H2 on unsupported PC. Using the Windows ADK (Assessment and Deployment Kit) or AIK (Automated Installation Kit) with a setupconfig.ini file is a more legitimate and less risky method to bypass certain hardware checks during Windows 11 installation, especially on unsupported PCs.
How the setupconfig.ini Bypass Works:
You create a custom setupconfig.ini file that instructs the Windows installer to skip specific hardware requirement checks, such as TPM, Secure Boot, or CPU compatibility.
This method leverages the Windows setup’s built-in configuration options, making it a cleaner approach compared to file patches or registry hacks