User Account Control (UAC) is a default Windows security feature designed to prevent unwanted changes to the operating system. When a program tries to perform an action that requires administrator privileges, such as installing software or changing system settings, registry, or system files, UAC alerts the administrator and asks for confirmation. This reduces the risk of unauthorized changes and the execution of malicious code with administrator privileges.
In this article, we’ll look at how to manage UAC settings on a single computer, or multiple computers in a domain using Group Policies.
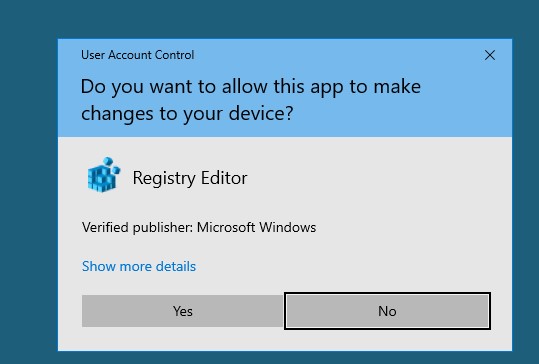
What does the UAC prompt look like? For example, if you attempt to elevate process privileges in a local administrator session, a UAC confirmation prompt appears:
User Account Control
Do you want to allow this app to make changes to your device?
Configure User Account Control (UAC) Levels in Windows
To manage UAC settings in Windows, a special applet is available in the Control Panel, which can be launched from the classic Control Panel or with the UserAccountControlSettings.exe command.
Use the slider to change the User Account Control protection level on a computer. There are 4 predefined UAC levels available:
- Level 4 — Always notify — the highest UAC protection level;
- Level 3 — Notify only when programs try to make changes to my computer (default) – default protection level (used by default);
- Level 2 — Notify only when programs try to make changes to my computer (do not dim my desktop) – almost the same as the previous level, but without switching to Secure Desktop with desktop locking;
- Level 1 — Never notify – UAC is disabled.
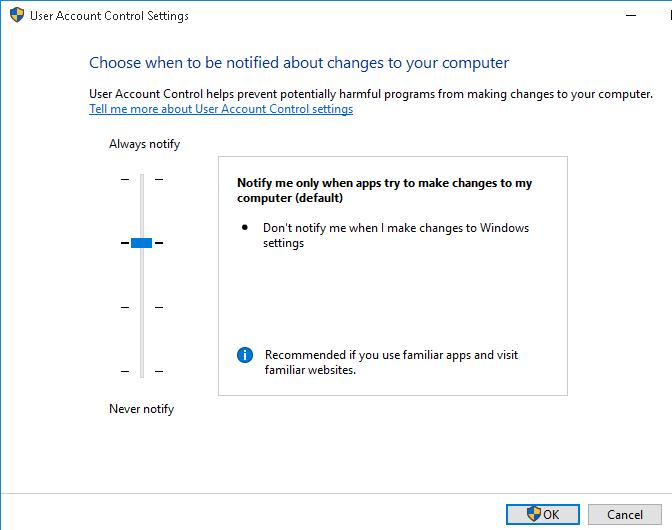
Note that moving the slider to the bottom Never notify (Level 1) position doesn’t completely disable UAC. This mode only enables automatic confirmation of administrator elevation requests without displaying the UAC prompt. Elevation requests are automatically denied in non-admin user sessions.
To disable UAC completely, you must disable the local group policy option User Account Control: Run all administrators in Admin Approval Mode. See below for details.
Managing UAC Settings via Group Policy
It is possible to manage UAC settings in Windows through Group Policy. The names of the UAC-related Group Policy options begin with User Account Control and can be found in this GPO editor section Computer Configuration -> Policies -> Windows Settings -> Security Settings -> Local Policies -> Security Options.
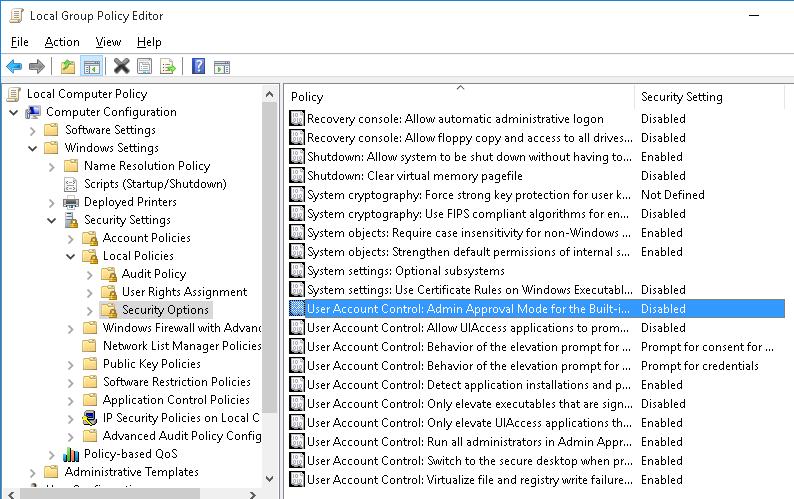
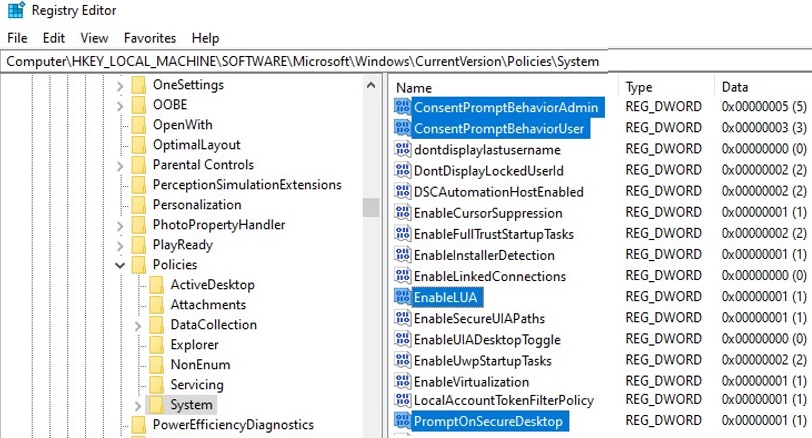
The following table contains a list of UAC policies, their possible values (including defaults), and the corresponding registry parameters (located under the HKLM\SOFTWARE\Microsoft\Windows\CurrentVersion\Policies\System registry key).
| Policy Name | Registry Parameter | Values |
| User Account Control: Admin Approval Mode for the Built-in Administrator account | FilterAdministratorToken | 0 (Default) = Disabled 1 = Enabled |
| User Account Control: Allow UIAccess applications to prompt for elevation without using the secure desktop | EnableUIADesktopToggle | 0 (Default) = Disabled 1 = Enabled |
| User Account Control: Behavior of the elevation prompt for administrators in Admin Approval Mode | ConsentPromptBehaviorAdmin | 0 = Elevate without prompting 1 = Prompt for credentials on the secure desktop 2 = Prompt for consent on the secure desktop 3 = Prompt for credentials 4 = Prompt for consent 5 (Default) = Prompt for consent for non-Windows binaries |
| User Account Control: Behavior of the elevation prompt for standard users | ConsentPromptBehaviorUser | 0 = Automatically deny elevation requests 1 = Prompt for credentials on the secure desktop 3 (Default) = Prompt for credentials |
| User Account Control: Detect application installations and prompt for elevation | EnableInstallerDetection | 1 = Enabled (default for Workgroup) 0 = Disabled (default for domain-joined Windows device) |
| User Account Control: Only elevate executables that are signed and validated | ValidateAdminCodeSignatures | 0 (Default) = Disabled 1 = Enabled |
| User Account Control: Only elevate UIAccess applications that are installed in secure locations | EnableSecureUIAPaths | 0 = Disabled 1 (Default) = Enabled |
| User Account Control: Run all administrators in Admin Approval Mode | EnableLUA | 0 = Disabled 1 (Default) = Enabled |
| User Account Control: Switch to the secure desktop when prompting for elevation | PromptOnSecureDesktop | 0 = Disabled 1 (Default) = Enabled |
| User Account Control: Virtualize file and registry write failures to per-user locations | EnableVirtualization | 0 = Disabled 1 (Default) = Enabled |
| User Account Control: Behavior of the elevation prompt for administrators running with Administrator Protection | These options were introduced in Windows 11 in late 2024 to control the new Local Administrator Protection feature. | |
| User Account Control: Configure type of Admin Approval Mode |
User Account Control Slider Levels and GPO/Registry Settings
When you change the UAC protection level by using the slider in the Control Panel, Windows changes the values of the following registry entries.
| UAC Slider Level | PromptOnSecureDesktop | EnableLUA | ConsentPromptBehaviorAdmin |
| Level 4 – Always Notify | 1 | 1 | 2 |
| Level 3 – Notify only when programs try to make changes to my computer (default) | 1 | 1 | 5 |
| Level 2 – Notify only when programs try to make changes to my computer (do not dim my desktop): | 0 | 1 | 5 |
| Level 1 – Never Notify | 0 | 1 | 0 |
Therefore, if you want to use the GPO to configure UAC settings that correspond to the specific slider level, you only need to configure 3 policy parameters (described above).
For example, apply the following registry parameters to set UAC level 3:
Windows Registry Editor Version 5.00
[HKEY_LOCAL_MACHINE\SOFTWARE\Microsoft\Windows\CurrentVersion\Policies\System]
"PromptOnSecureDesktop"=dword:00000001
"EnableLUA"=dword:00000001
"ConsentPromptBehaviorAdmin"=dword:00000005
"ConsentPromptBehaviorUser"=dword:00000003
"EnableInstallerDetection"=dword:00000001
"EnableVirtualization"=dword:00000001
"ValidateAdminCodeSignatures"=dword:00000000
"FilterAdministratorToken"=dword:00000000
The values of the ConsentPromptBehaviorUser, EnableInstallerDetection, EnableVirtualization, ValidateAdminCodeSignatures, and FilterAdministratorToken parameters are the same for all levels.
How to Disable UAC with Group Policy
Let’s look at how to completely disable User Account Control (UAC) in Windows through Group Policy.
On a standalone computer, use the Local Group Policy Editor gpedit.msc. If you need to deploy the Group Policy settings to multiple domain computers, use the Group Policy Management Console – gpmc.msc (let’s consider this option).
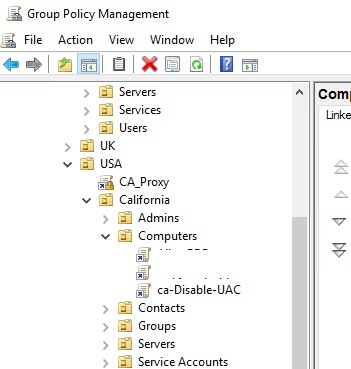
- In the Group Policy Management snap-in, click the OU containing computers where you want to disable UAC and create a new GPO

- Edit the policy and go to the section Computer Configuration -> Policies -> Windows Settings -> Security Settings -> Local Policies -> Security Options;
- To completely disable UAC, set the following parameter values:
- User Account Control: Behavior of the elevation prompt for administrators in Admin Approval Mode =
Elevate without prompting; - User Account Control: Detect application installations and prompt for elevation =
Disabled; - User Account Control: Run all administrators in Admin Approval Mode =
Disabled; - User Account Control: Only elevate UIAccess applications that are installed in secure locations =
Disabled.
- User Account Control: Behavior of the elevation prompt for administrators in Admin Approval Mode =
- Reboot the target computers to update Group Policy settings and disable UAC. After the reboot, UAC will switch to “Never notify” mode.

You can also disable UAC for some users/computers via the registry and deploy the settings through Group Policy Preferences.
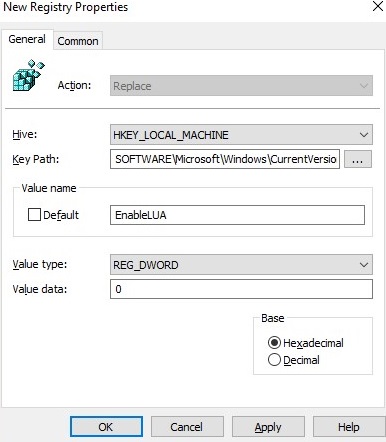
In the GPO editor, go to Computer Configuration -> Preferences -> Windows Settings -> Registry and create a new registry parameter with the following settings
- Action: Replace
- Hive: HKEY_LOCAL_MACHINE
- Key Path: SOFTWARE\Microsoft\Windows\CurrentVersion\Policies\System
- Value name: EnableLUA
- Value type: REG_DWORD
- Value data: 0
Then go to the Common tab and enable the options:
- Remove this item when it is no longer applied
- Item-Level targeting
Click the Targeting button and specify the computers or domain security groups to which you want to apply the UAC disable policy.
You can change the value of any parameter using the Registry Editor GUI or from the command prompt. For example, to disable UAC on a computer (a reboot is required), run the command:
reg.exe ADD HKLM\SOFTWARE\Microsoft\Windows\CurrentVersion\Policies\System /v EnableLUA /t REG_DWORD /d 0 /f.
Or a similar PowerShell command:
New-ItemProperty -Path HKLM:Software\Microsoft\Windows\CurrentVersion\policies\system -Name EnableLUA -PropertyType DWord -Value 0 -Force
11 comments
Methinks your values for the behavior on “standard users” is not accurate. Per this Microsoft link (https://technet.microsoft.com/en-us/library/dd835564(v=ws.10).aspx) the “default” value (level3) is “Prompt for consent on the secure desktop”.
Sorry, default value is “Prompt for credentials on the secure desktop”
You gotta love (hate) Microsoft documentation! In that same link/URL, they give conflicting information about the default value for “standard users”. In the first/top table, it says “User Account Control: Behavior of the elevation prompt for standard users ConsentPromptBehaviorUser Prompt for credentials on the secure desktop”. But in the last/bottom table, it says “ConsentPromptBehaviorUser User Account Control: Behavior of the elevation prompt for standard users 0 = Automatically deny elevation requests
1 = Prompt for credentials on the secure desktop
3 (Default) = Prompt for credentials”
SO WHICH IS IT MICROSOFT?!?
I apologize for questioning your page…
Using your level 1 settings does not corresponds to level 1 in Windows 10.
If I set these settings I can’t run Microsoft Edge and everythiing is run as administrator.
Simple way to check this is to rRight click start and run Powershell always runs it as admin even tho’ I don’t select the (admin) choice.
So how I make it behave like Windows 10 UAC level 1?
How does one go about locking out UAC access to users and administrators? I want to gray out the button so people cannot make changes to UAC. Forcing it to level 3 is great, but if a local admin (all my users) can just change it, it doesn’t do me much good. I want to disable access to UAC. Any help would be greatly appreciated!
Thanks for the info, this was very helpful!
In your first blue comment box, you have two links for two different pages, but they link to the same page. I believe the 2nd link was supposed to be for this page:
https://woshub.com/run-program-without-admin-password-and-bypass-uac-prompt/
HTH
👍
I am 79 yrs & not very pc savvy I purchased new motherboard 10/03/2022 windows 10 22H2 OS version on my Lenovo I took pc to a repair store having trouble with my videos&photos sharing pc working fine before this I do not know what they did but Windows Security Firewall showed up & Workgroup & School 2019 took my pc back to original purchase in 2017 but I never installed any Organizations & their built-in admins even back then I had Malwarebytes installed also 2022 they have me listed as new motherboard name so why did this security allow my old computer to take over & put my Lenovo to sleep these Admins block everything Updates file sharing all domains except their private domain, my att internet & modem is blocked I have tried every suggestion Microsoft said but to no avail I no longer have my Adminstrator & UAC rights Microsoft techs screwed it up even more I don’t want to do a clean or pay somone four or five hundred So i’m am asking when I bring up my computer & it shows last update 2017 then ask if no longer used DELETE it will my New Motherboard come back as installed on 10/03/2022??
Unfortunately, I have no idea what they did to your computer in the repair shop. A clean reinstallation of Windows from scratch might be the best solution for you.
reg add HKEY_LOCAL_MACHINE\\Software\\Microsoft\\Windows\\CurrentVersion\\Policies\\System\\ /v ConsentPromptBehaviorAdmin /t REG_DWORD /d 00000000 /f
Thank you for this! It helped me a lot.