Windows OS Hub
  • Windows
    • Windows 11
    • Windows Server 2022
    • Windows 10
    • Windows Server 2019
    • Windows Server 2016
  • Microsoft
    • Active Directory (AD DS)
    • Group Policies (GPOs)
    • Exchange Server
    • Azure and Microsoft 365
    • Microsoft Office
  • Virtualization
    • VMware
    • Hyper-V
  • PowerShell
  • Linux
  • Home
  • About

Windows OS Hub

  • Windows
    • Windows 11
    • Windows Server 2022
    • Windows 10
    • Windows Server 2019
    • Windows Server 2016
  • Microsoft
    • Active Directory (AD DS)
    • Group Policies (GPOs)
    • Exchange Server
    • Azure and Microsoft 365
    • Microsoft Office
  • Virtualization
    • VMware
    • Hyper-V
  • PowerShell
  • Linux

 Windows OS Hub / Windows 11 / How to Enable and Configure Wake-on-LAN (WoL) in Windows

April 1, 2024

How to Enable and Configure Wake-on-LAN (WoL) in Windows

Wake on LAN (WoL) is a computer networking feature used to remotely wake (turn on) a device that is in sleep (low power) mode. The device’s network interface card (NIC) can cause the computer to wake up after receiving a special broadcast packet (magic packet) containing its MAC address. In this article, we will look at how to enable and use Wake on LAN on a Windows device.

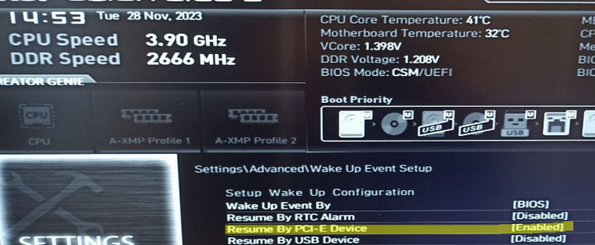
First, you need to enable Wake-on-LAN in your computer’s BIOS/UEFI firmware settings. Depending on your computer model and firmware version, the exact name of this option may vary. It can be called:

  • WOL (Wake-on-LAN)
  • Power On By PCI-E
  • Resume by PCI-E Device
  • Resume by PME
  • S4/S5 Wake on LAN
  • ErP

enable WOL in BIOS settings

On a brand-name computer, you can view and change BIOS/UEFI settings with PowerShell. For example, on a Lenovo laptop, you can use the following commands to enable the WOL option in BIOS:

$getLenovoBIOS = gwmi -class Lenovo_SetBiosSetting -namespace root\wmi
$getLenovoBIOS.SetBiosSetting("WakeOnLAN,Enable")
$SaveLenovoBIOS = (gwmi -class Lenovo_SaveBiosSettings -namespace root\wmi)
$SaveLenovoBIOS.SaveBiosSettings()

Then enable Wake on LAN (WOL) in the settings for your network adapter in Windows.

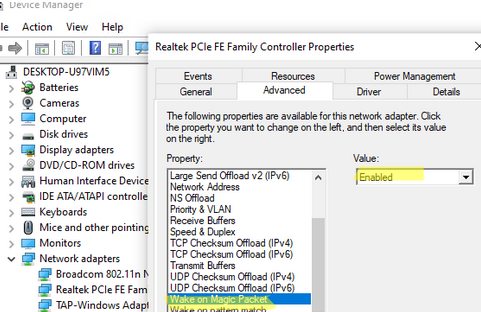
  1. Open the Device Manager console (devmgmt.msc);
  2. Open the properties of your physical NIC in the Network Adapters section;
  3. Go to the Advanced tab and make sure the Wake on magic packet option is enabled (the option name may vary depending on the network adapter). On Intel network cards, this option may be called PME (Power Management Event); Enable Wake on magic packet in NIC driver properties You can use PowerShell to check that the WakeOnLan option is enabled in the settings for your network adapter:
    Get-NetAdapter -Physical | Get-NetAdapterAdvancedProperty | where {($_.DisplayName -like '*WOL*') -or ($_.DisplayName -like '*Wake*')}
    PowerShell check if WOL is enabled
    To enable WOL for a NIC, run (Depends on driver and NIC vendor):
    Get-NetAdapter -Physical | Set-NetAdapterPowerManagement -WakeOnMagicPacket Enabled -WakeOnPattern Enabled
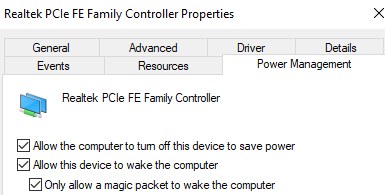
  4. Then go to the Power Management tab and allow the network adapter to wake the computer from sleep mode. Enable the Allow this device to wake the computer and Only allow a magic packet to wake the computer options. Network adapter: Allow the device to wake the computer
    You can enable this option using cmd:
    powercfg /deviceenablewake "Realtek PCIe GbE Family Controller"
Wireless Wi-Fi adapters also have remote wake-up support. This standard is called Wake on Wireless LAN (WoWLAN).

Use the following command to check which devices can wake your computer:

powercfg /devicequery wake_armed

which devices can wake the computer out of sleep: powercfg /devicequery wake_armed

The Realtek PCIe network card can wake the computer from sleep in this case.

For Wake on LAN to work, you don’t need to open any ports in the Windows Defender firewall. The UDP broadcast WOL Magic Packet is received and processed directly by the network card and doesn’t reach the Windows network stack.

You will now be able to send a WoL packet to turn on your computer remotely from another device on the same LAN. Magic Packet contains the hardware address of the network card (MAC address) of the computer you want to turn on. You can find out the MAC address of your NIC from the ipconfig /all command output, or by using PowerShell:

Get-NetAdapter -Physical

powershell check mac address

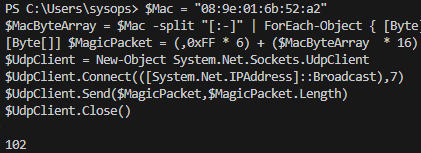
Let’s generate and send a WOL magic broadcast packet using a simple PowerShell script. In the following script, specify the MAC address of the device you want to wake up:

$Mac = "08:99:02:b6:25:2a"
$MacByteArray = $Mac -split "[:-]" | ForEach-Object { [Byte] "0x$_"}
[Byte[]] $MagicPacket = (,0xFF * 6) + ($MacByteArray  * 16)
$UdpClient = New-Object System.Net.Sockets.UdpClient
$UdpClient.Connect(([System.Net.IPAddress]::Broadcast),7)
$UdpClient.Send($MagicPacket,$MagicPacket.Length)
$UdpClient.Close()

PowerShell script: send Wake On LAN magic packet

If configured correctly, the remote computer should wake up.

To use WOL in segmented networks or networks divided into VLANs, you must enable the forwarding of WoL broadcast packets (UDP port 9) at the network L3 switch or router level.

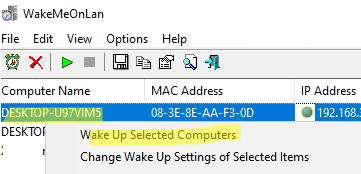
To wake up computers remotely, you can use the free Windows tool WakeMeOnLan from NirSoft. This tool allows you to scan your LAN and find all available devices, or you can manually add devices that you want to turn on remotely using WakeOnLan.

WakeMeOnLan - Turn on computers on network

WakeMeOnLan supports command line mode. Run the following command to wake up the remote device by its IP address. The tool will automatically resolve the IP address to the MAC according to the arp table:

WakeMeOnLan.exe /wakeup 192.168.13.115

Or enter its MAC address:

WakeMeOnLan.exe /wakeup 04-7C-16-DA-CA-63

You can also use WoL tools on smartphones. For example, Wake On LAN for Android. To start your computer remotely, connect to the same LAN via a Wi-Fi hotspot (access point).

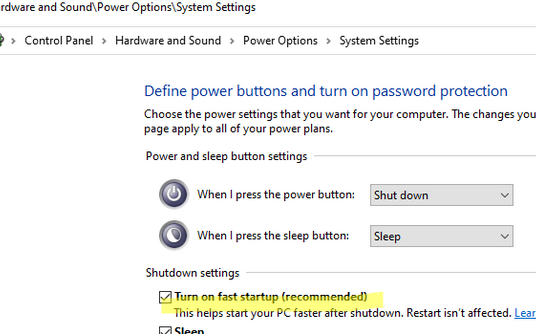
If your computer does not turn on after the Wake on LAN packet is sent, you may need to disable Windows Fast Startup in the power settings. Fast Startup is enabled by default in Windows 10 and 11, and it may prevent the computer from being woken up by WOL (or can be the reason why Windows won’t shut down).

Run powercfg.cpl and navigate Choose what the power buttons do -> Change settings that are currently unavailable -> uncheck the option Turn on fast startup (recommended).
Fast startup can prevent Wake-on-LAN

1 comment
4
Facebook Twitter Google + Pinterest
PowerShellWindows 10Windows 11
previous post
Fix: Your IT Administrator Has Limited Access to Virus & Threat Protection
next post
Prevent Server Manager from Starting at Logon on Windows Server

Related Reading

How to Allow Multiple RDP Sessions on Windows...

March 15, 2024

How to Install Remote Server Administration Tools (RSAT)...

March 17, 2024

Managing Windows Firewall Rules with PowerShell

March 11, 2024

Create a Custom Windows Image with Pre-installed Apps

February 28, 2024

How to Fix ‘An Operating System Wasn’t Found’...

August 24, 2023

Fixing ‘The Network Path Was Not Found’ 0x80070035...

August 31, 2023

How to Allow Non-Admin User to Start/Stop Service...

March 15, 2024

Updating PowerShell Version on Windows

March 12, 2024

1 comment

Jonah Reid October 28, 2024 - 1:55 am

Great guide thank you very much! Worked first time

Reply

Leave a Comment Cancel Reply

join us telegram channel https://t.me/woshub
Join WindowsHub Telegram channel to get the latest updates!

Recent Posts

  • Map a Network Drive over SSH (SSHFS) in Windows

    May 13, 2025
  • Configure NTP Time Source for Active Directory Domain

    May 6, 2025
  • Cannot Install Network Adapter Drivers on Windows Server

    April 29, 2025
  • Change BIOS from Legacy to UEFI without Reinstalling Windows

    April 21, 2025
  • How to Prefer IPv4 over IPv6 in Windows Networks

    April 9, 2025
  • Load Drivers from WinPE or Recovery CMD

    March 26, 2025
  • How to Block Common (Weak) Passwords in Active Directory

    March 25, 2025
  • Fix: The referenced assembly could not be found error (0x80073701) on Windows

    March 17, 2025
  • Exclude a Specific User or Computer from Group Policy

    March 12, 2025
  • AD Domain Join: Computer Account Re-use Blocked

    March 11, 2025

Follow us

  • Facebook
  • Twitter
  • Telegram
Popular Posts
  • How to Delete Old User Profiles in Windows
  • Fix: Remote Desktop Licensing Mode is not Configured
  • How to Install Remote Server Administration Tools (RSAT) on Windows
  • Configuring User Profile Disks (UPD) on Windows Server RDS
  • How to Create UEFI Bootable USB Drive to Install Windows
  • Wi-Fi (Internet) Disconnects After Sleep or Hibernation on Windows 10/11
  • How to Allow Non-Admin User to Start/Stop Service in Windows
Footer Logo

@2014 - 2024 - Windows OS Hub. All about operating systems for sysadmins


Back To Top