The Windows Error Reporting service (WER) is used to collect the debug information about system and third-party app failures and send error reports to Microsoft servers. This information should be analyzed by MSFT and if there is a solution, it will be sent to a user through Windows Error Reporting Response. Actually, few people use this feature, although Microsoft always leaves the WER service enabled by default in the latest Windows versions. In most cases, people remember about WER when they see that C:\ProgramData\Microsoft\Windows\WER\ReportQueue\ occupies much space on the system drive (up to several dozens of GB) even though NTFS compression is enabled for this directory by default.
Windows Error Reporting Service
Windows Error Reporting displays a dialog box when an application error occurs, prompting you to submit an error report to Microsoft. When you see the “YourAppName.exe has stopped working, Windows is collecting more information about the problem” error message in Windows, the Windows Error Reporting service runs the WerFault.exe tool to collect debug data (may include a memory dump).

User data is saved to the user profile:
%USERPROFILE%\AppData\Local\Microsoft\Windows\WER\
And the system data goes to the ProgramData directory:
%ALLUSERSPROFILE%\Microsoft\Windows\WER\
The Windows Error Reporting service is a separate Windows service. You can check the status of the service using the PowerShell command:
Get-Service WerSvc
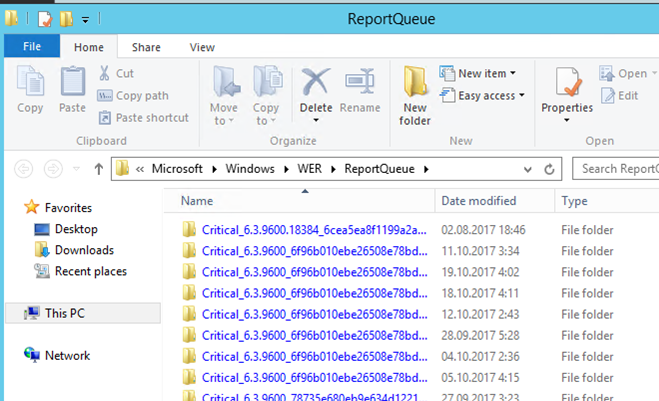
In the WER\ReportQueue\ directory there are a lot of folders with the names in the following format:
- Critical_6.3.9600.11285_{ID}_00000000_cab_3212dd23
- Critical_powershell.exe_{ID}_cab_332a45c5
- Critical_sqlservr.exe__{ID}_cab_b3a200181
- NonCritical_7.9.9600.11285__{ID}_0bfab19a
- AppCrash_cmd.exe_{ID}_dba332ad_12eb5425
As you can see, the directory name contains the severity level of an event and the name of the specific EXE file that has crashed. In all folders, there is a file called Report.wer, which contains the description of the errors and some files with the additional information.
How to Clear the WER\ReportQueue Folder on Windows?
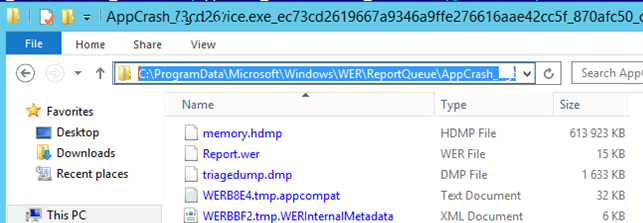
Typically, the size of each folder is small, but in some cases a memory dump is generated for a problem process that occupies much space. The screenshot below shows that the size of memory.hdmp is about 610 MB. A couple of such dumps can occupy several gigabytes of the system drive.
To clear all these errors and logs using the built-in tools, open the Control Panel and go to System and Security -> Security and Maintenance -> Maintenance -> View reliability history -> View all problem reports, then click Clear all problem reports.

To free up some disk space quickly, you can manually delete debug and log files generated by the WER service in the following folders:
- C:\ProgramData\Microsoft\Windows\WER\ReportArchive\
- C:\ProgramData\Microsoft\Windows\WER\ReportQueue\
The following PowerShell commands will remove all files older than 30 days from the WER directories:
Get-ChildItem -Path  'C:\ProgramData\Microsoft\Windows\WER\ReportArchive' -Recurse | Where-Object CreationTime -lt (Get-Date).AddDays(-30) | Remove-Item -Force -Recurse
 Get-ChildItem -Path  'C:\ProgramData\Microsoft\Windows\WER\ReportQueue' -Recurse | Where-Object CreationTime -lt (Get-Date).AddDays(-30) | Remove-Item -Force –Recurse
To clean up the WER directories in all user profiles, use the following PowerShell script:
$users = Get-ChildItem c:\users|where{$_.name -notmatch 'Public|default'}
 foreach ($user in $users){
 Get-ChildItem "C:\Users\$User\AppData\Local\Microsoft\Windows\WER\ " –Recurse -ErrorAction SilentlyContinue | Remove-Item –force –Recurse
 }
Disable Windows Error Reporting on Windows Server
On Windows Server 2019/2016/2012R2, you can manage the WER service state using PowerShell. You can disable the Windows Error Reporting service:
Get-Service WerSvc| stop-service –passthru -force
 Set-Service WerSvc –startuptype manual –passthru
You can disable WER on Windows using the built-in WindowsErrorReporting PowerShell module:
Get-Command -Module WindowsErrorReporting

You can check the status of the Windows Error Reporting service with the command:
Get-WindowsErrorReporting
To disable WER, run:
Disable-WindowsErrorReporting

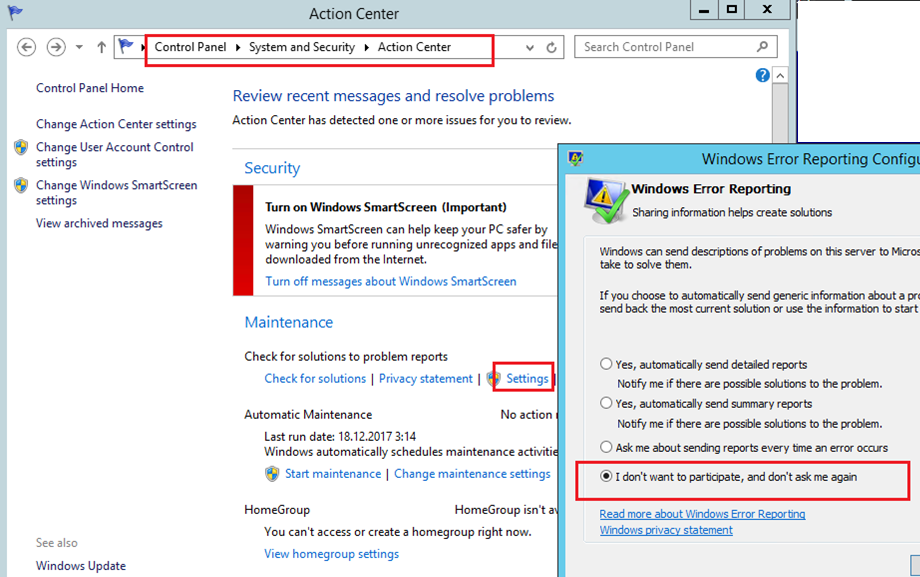
On Windows Server 2012 R2 you can disable Windows Error Reporting via the control panel (Control Panel -> System and Security -> Action Center -> Maintenance -> Settings -> select I don’t want to participate, and don’t ask me again.
How to Disable or Enable Error Reporting on Windows 10
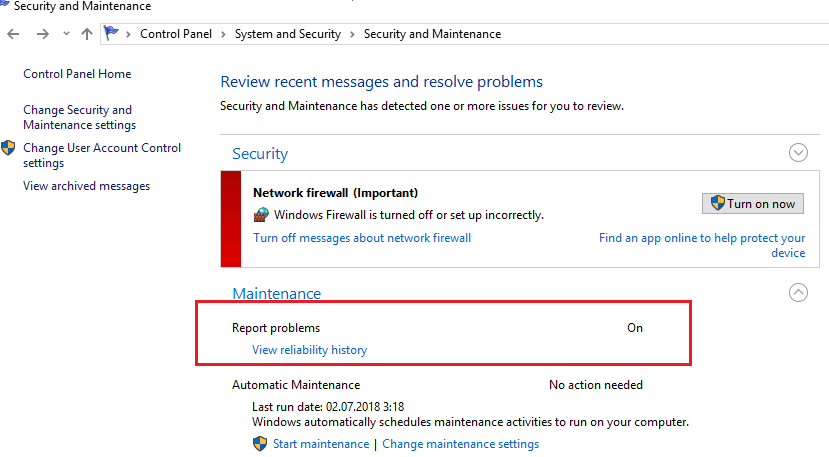
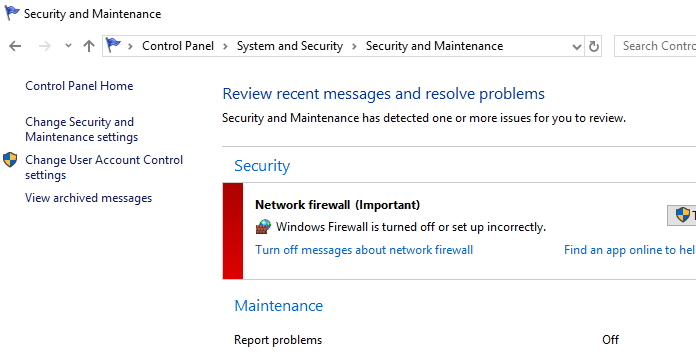
In Windows 10 you cannot disable the Error Reporting through the Control Panel. You can check the component status in the Control Panel -> System & Security -> Security and Maintenance -> Maintenance. As you can see, the Report problems parameter is enabled.
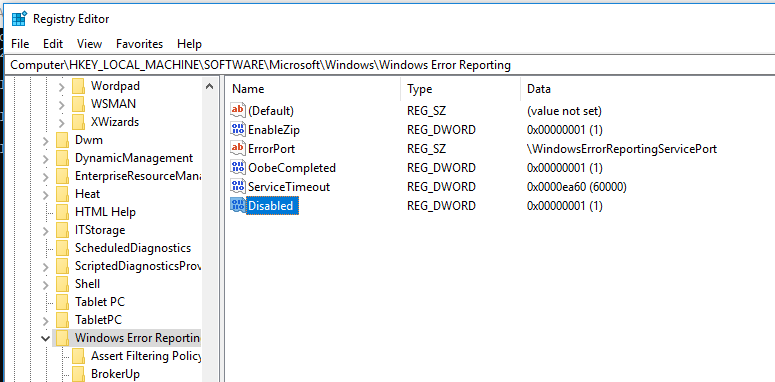
You can disable Windows Error Reporting on Windows 10 via the registry. To do it, create a new DWORD (32-bit) parameter with the name Disabled and the value 1 under the registry key HKLM\SOFTWARE\Microsoft\Windows\Windows Error Reporting.
You can disable Windows error collection for specific users with the command:
reg add "HKCU\Software\Microsoft\Windows\Windows Error Reporting" /v "Disabled" /t REG_DWORD /d "1" /f
Or disable WER for everyone:
reg add "HKLM\Software\Microsoft\Windows\Windows Error Reporting" /v "Disabled" /t REG_DWORD /d "1" /f
Now let’s check the status of the Report problems parameter in the Control Panel again. It should be Off.
How to Disable Automatic Windows Error Reporting via GPO
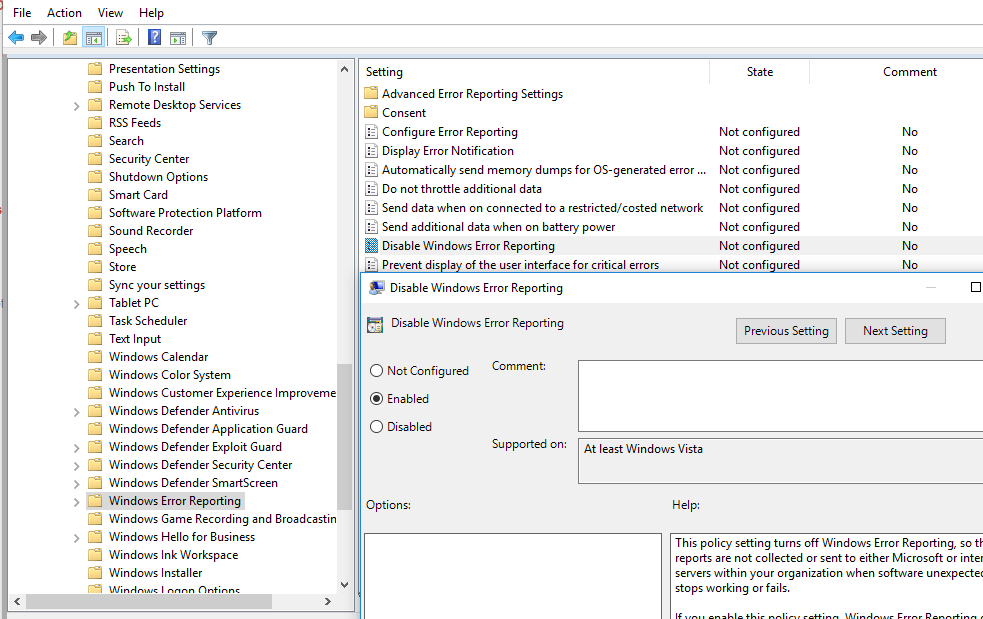
You can disable logging by the Windows Error Reporting service through Group Policy. Open the local (gpedit.msc) or domain GPO (gpmc.msc) editor and go to the following GPO section Computer Configuration -> Administrative Templates -> Windows Components -> Windows Error Reporting. Find the policy named Disable Windows Error Reporting and set it to Enabled. This will disable Windows data collection and error reporting.
Update the GPO settings (no reboot required).
As a result, Windows will no longer generate application and system error messages and will no longer be sent to Microsoft.
2 comments
THANK YOU for helping me disable the most useless and performance degrading feature in Windows. It might be different if error reporting actually resulted in fixes, but they clearly do not.
Esse serviço não serve para nada, só atrapalha, ele trava minhas máquinas.
desabilitado com sucesso, todos os procedimentos estão extremamente bem explicados.
This service is useless, it just gets in the way, it crashes my machines.successfully disabled, all procedures are extremely well explained.