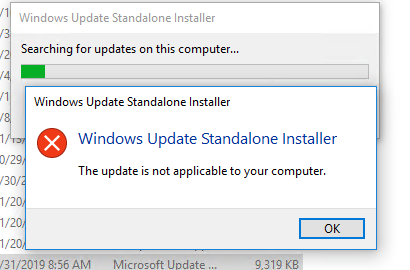
When manually installing MSU updates on Windows computers and servers, you may receive an error: Windows Update Standalone Installer: Searching for updates on this computer. This problem most often occurs when manually installing updates on computers in disconnected networks (isolated from the Internet). If your computer is updated automatically through Windows Update or the WSUS servers, this problem may not occur because the wuauserv agent checks for dependencies before installation.
In this article, we will look at why Windows thinks this update is not applicable to the computer and how to install such an update.
So, the error “The update is not applicable to your computer” appears when you try to manually install an MSU update package using the built-in wusa.exe tool (Windows Update Standalone Installer).
How to Resolve: “The Update is Not Applicable to Your Computer”?
- Check your computer uptime (
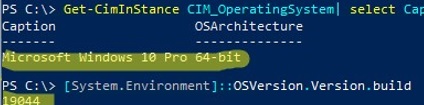
Get-CimInstance -ClassName Win32_OperatingSystem | Select LastBootUpTime). If your computer hasn’t been rebooted for a while (or after installing the latest updates), try to force restart Windows; - This update does not match your OS version, edition, build, bitness (processor architecture: x86, x64; ARM), or language. For example, you are trying to install an x86 update on a Windows x64. You can check the Windows version, architecture, and build number with the following PowerShell commands:
Get-CimInStance CIM_OperatingSystem| select Caption, OSArchitecture
 [System.Environment]::OSVersion.Version.build

Try to download an update suitable for your version of Windows.
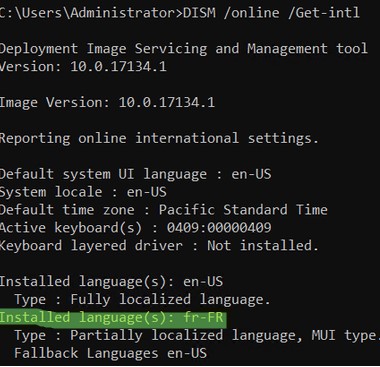
Regarding the system language. Sometimes the language of the installed Windows is different from the interface language used. Check the original Windows language using the command:dism /online /get-intl
This example shows that the computer is running an English version of Windows:Installed language(s): en-US Type : Fully localized language
Additionally, the French language interface pack (LIP) is installed:
Installed language(s) fr-FR: Partially localized language, MUI type: fr-FR

- The update is already installed. You can get a list of installed updates on your computer using the
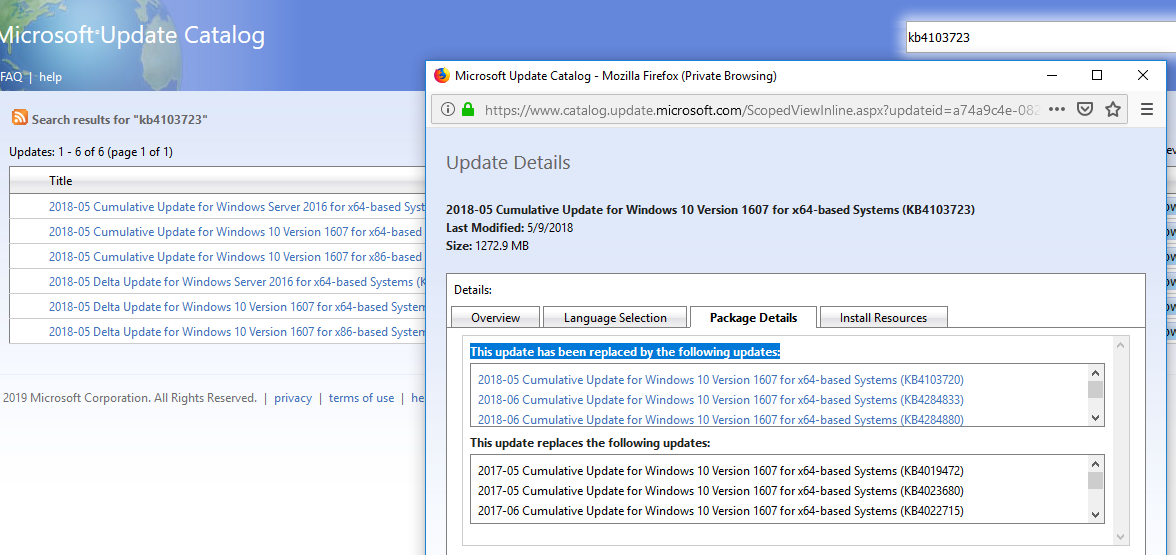
wmic qfe listcommand or the PSWindowsUpdate PowerShell module; - This update has been replaced or a newer update has been installed that replaces this update. Information about replacing updates can be found on the KB page of the Microsoft website. Usually, this information is listed on the Package Details tab (This update has been replaced by the following updates);

- The prerequisites for installing this update are not met. For example, most updates for Windows 7 require SP1 to be installed, updates for Windows 8.1 and Windows Server 2012 R2 require Update 1. You can find dependency information on the KB information page in the Microsoft Update Catalog (https://www.catalog.update.microsoft.com/Home.aspx). Read all KB requirements carefully. You may have to install some other update first before installing this update;
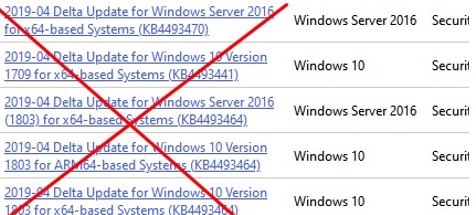
- Make sure you have downloaded the full MSU update for Windows and not the Delta update package;

- If the Windows Update service does not work correctly, you can try to run the Windows Update Agent reset script or use the Windows Update Troubleshooter (Settings -> Update & Security -> Troubleshoot > Windows Update and press Run the troubleshooter);
- If you received an * .msu update file from a third party, it may have been corrupted. Try to re-download the MSU update file from the Windows Update Catalog;
- Check the integrity of Windows system files using the commands:
Dism.exe /Online /Cleanup-Image /Restorehealthandsfc /scannow
Note that security updates for Windows are now released as cumulative updates. This means that you can install any newer monthly cumulative update for your Windows build (it contains all previous updates).
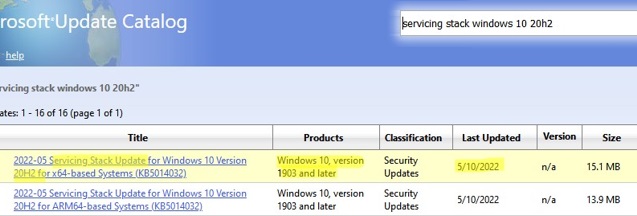
Before installing some cumulative Windows updates, you must first install the latest available Servicing Stack Update (SSU). This update can be found in the Windows Update Catalog using the following search query:
servicing stack windows 10 20h2
In this example, I found that the latest Servicing Stack Update for Windows 20h2 is released in May 2022. Download and install SSU before installing your update.
How to Manually Install Windows Updates from CAB Files?
You can try to install the MSU update file not with the WUSA.exe tool (the Windows Update Standalone Installer uses it), but by extracting the .CAB file and installing it directly to a Windows image using DISM or the Add-WindowsPackage command. The procedure for manually installing a CAB update might look like this:
- Extract the MSU update file:
expand -f:* "C:\Temp\windows10.0-KB4103723-x64.msu" C:\Temp\KB4103723 - A CAB will appear in the C:\Temp\KB4103723 directory with a name like Windows10.0-KB4103723-x64.cab;
- Install this CAB update file using DISM.exe (
DISM.exe /Online /Add-Package /PackagePath:c:\Temp\Windows10.0-KB4103723-x64.cab) or with PowerShell (Add-WindowsPackage -Online -PackagePath "c:\Temp\Windows10.0-KB4103723-x64.cab")
Checking Windows Update Error Code
Check the specific update installation error code in the Windows Event Viewer snap-in. Go to Event Viewer -> Windows Logs -> Setup and find an event from the WUSA source. Most likely it will contain an error like this:
Source: WUSA
Event ID: 3
Level: Error
Windows update could not be installed because of error 2149842967 “” (Command line: "C:\Windows\system32\wusa.exe" "C:\Downloads\Updates\windows10-kb4103723.msu")
It makes sense to search Google for information about this Windows Update installation error code. Also, the complete list of Windows Update error codes on this site can help you
Also, look for update installation errors in the %systemroot%\Logs\CBS\CBS.log file (look for errors by your KB number).
3 comments
In my case. I was downloading the DELTA file.
I went back on to the download catalog and saw my mistake, and I downloaded the proper file.
Make sure you download the appropriate file for your system.
In my case, the latest maintenance stack update was missing.
Always install the latest Windows servicing stack update (SSU) before installing Microsoft Windows updates
That’s right. Servicing Stack Updates (SSU) are needed as prerequisites before the Cumulative Update (CU) can be installed.