In this article, we’ll consider how to add (inject) drivers into the VMware ESXi installation ISO image (6.7 or 7.0). The ESXi installation image supports (certified) the most popular server models. If you try to install an ESXi image on a desktop computer, you will most likely encounter a situation where some device drivers (RAID controller, video card or network adapter, etc.) are missing from your distribution.
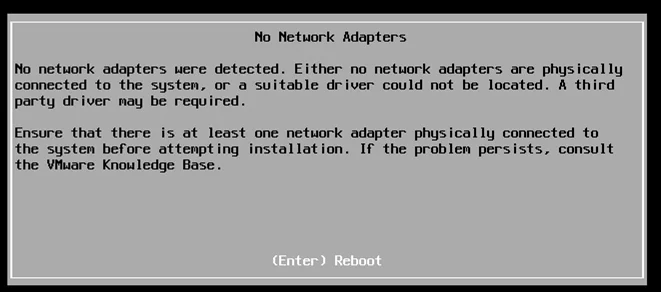
Most often, when trying to install ESXi from the original installation image on a desktop computer, you will see an error:
No Network Adapters.
No network adapters were detected. Either no network adapters are physically connected to the system, or a suitable driver could not be located. A third party driver may be required.
Ensure that the is at least one network adapter physically connected to the system before attempting installation. If the problem persists, consult the VMware Knowledge Base.
The standard ESXi ISO image doesn’t support most desktop NIC adapters. To install ESXi on such a computer, you will need to inject the drivers for your network adapter into your ESXi installation image
Let’s see how to add the driver to the VMware ESXi 6.x and 7.0 installation ISO. In this example, we’ll show how to integrate the driver for the Realtek network adapter into an ESXi image.
VMware recommends using the official vSphere ESXi Image Builder to customize ESXi images. But it requires vCenter Server Appliance (vCSA). Instead, most system administrators use the third-party ESXi-Customizer tool.
[contents h2]
How to Download Drivers for VMWare ESXi?
First, you must find and download ESXi drivers for your hardware. They can be found:
- On the VMWare website under VMware Compatibility Guide;
- You can use ESXi community drivers;Community Networking Driver for ESXi (https://flings.vmware.com/community-networking-driver-for-esxi) – a set of ESXi drivers from VMware Community that allows you to use most modern network adapters (not available in VMware HCL) connected via PCIe. USB Network Native Driver for ESXi (https://flings.vmware.com/usb-network-native-driver-for-esxi) – drivers to support popular USB network adapters (ASIX USB 2.0 — ASIX88178a, ASIX USB 3.0 — ASIX88179, Realtek USB 3.0 — RTL8152/RTL8153, and Aquantia AQC111U.
- Check the hardware vendor’s website;
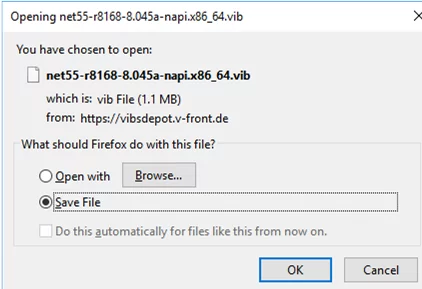
- On the website of ESXi-Customizer author’s (https://vibsdepot.v-front.de/wiki/index.php/List_of_currently_available_ESXi_packages). I have downloaded the driver
net55-r8168for my Realtek network adapter here; - Use Google search (something like “
Realtek NIC drivers for ESXi“).
Please note that you need the driver in one of the following formats: .vib, .tgz or .zip (offline bundle).
You can also find the drivers by device VID. Boot your computer using Linux LiveCD and see VID and PID of your device, by running this command:
# lspci -nn
Using these IDs, you can search .vib drivers on the Web.
Adding Drivers to ESXi ISO Image with ESXi-Customizer-PS
The ESXi-Customizer-PS PowerShell script (https://www.v-front.de/p/esxi-customizer-ps.html) can be used to integrate drivers and updates into the ESXi 5.x, 6.x, and 7.0 installation images. To use this script, you must have VMware PowerCLI module installed on your computer.
Download the current version (2.8.2) of the ESXi-Customizer-PS.ps1 file from GitHub (https://github.com/VFrontDe/ESXi-Customizer-PS/releases), unblock the PS1 file downloaded from the Internet (by checking Unblock in its properties), and open the PowerShell console:
Set-ExecutionPolicy -ExecutionPolicy RemoteSigned -Scope Process
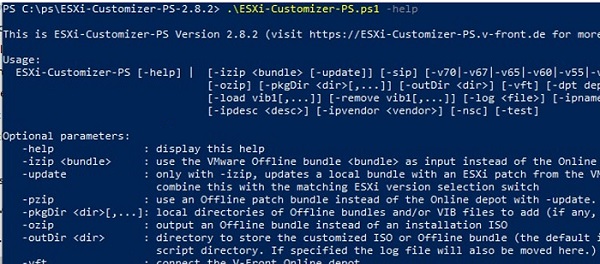
You can display help on the script parameters as follows:
.\ESXi-Customizer-PS.ps1 –help
An unexpected error occured:The VMware.ImageBuilder module is not currently supported on the Core edition of PowerShell.
This means that you are trying to run a PS1 script from a new version of PowerShell Core (pwsh.exe), which is not supported by the ESXi-Customizer-PS. Use the Windows PowerShell console instead (powershell.exe).
List available ESXi images:
.\ESXi-Customizer-PS.ps1 –sip

To download the latest ESXi 6.7 ISO image with updates from the VMware Online Depot website, run this command:
.\ESXi-Customizer-PS.ps1 -v67
In the same way you can download other ESXi image versions ( -v70 | -v67 | -v65 | -v60 | -v55 | -v51 | -v50).
The script allows you to use one of three modes:
- Create an ISO or Offline Bundle installation image directly from the VMware Online depot (default);
- Create an ISO installation image from the local Offline Bundle file(-izip);
- Update local ESXi Offline Bundle from VMware Online depot (-izip -update).
In order to generate an ESXi ISO and immediately inject all offline bundles and VIB driver packages from C:\distr\esxi\driver, use this command:
.\ESXi-Customizer-PS.ps1 -v67 -pkgDir C:\distr\esxi\driver
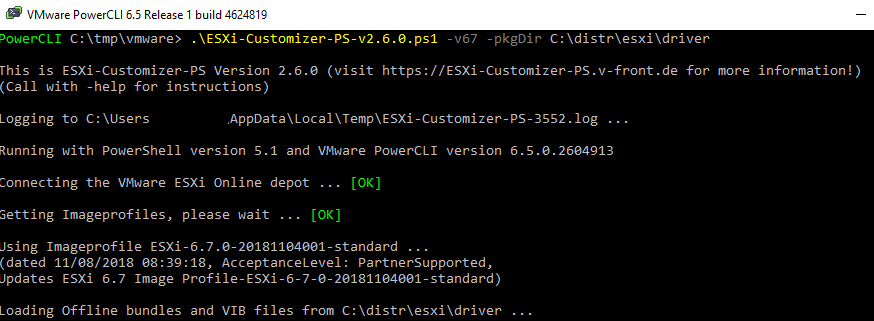
The installation ESXi ISO image will appear in the target directory in 15-20 minutes.
You can modify the offline bundle (this is a ZIP archive with ESXi installation files) by adding all VIB drivers from the specified directory to it:
.\ESXi-Customizer-PS.ps1 -izip .\VMware-ESXi-6.7.0-HPE-Gen9plus.zip -pkgDir C:\distr\esxi\driver
Using the following command, you can create an ESXi ISO from your offline bundle:
.\ESXi-Customizer-PS.ps1 -izip .\VMware-ESXi-6.7.0-HPE-Gen9plus.zip
The V-Front online repository has a rather large library of vib drivers. You can integrate specific drivers from this repository into an ESXi image like this:
.\ESXi-Customizer-PS.ps1 -v67 -vft -load sata-xahci,net55-r8168,net-e1000e,esx-ui
In this example, we’ll integrate the following drivers into the ESXi distribution:
- net-e1000e – a network driver for Intel I21782579LM/82574L;
- net51-r8169 – Realtek 8168/8111/8411/8118 NIC driver (it has been removed from ESXi 5.1 and newer);
- esx-ui — ESXi Embedded Host Client, a convenient host web interface (used by default from esxi 5.5);
- sata-xahci — map driver to correctly identify some SATA controllers.
As a rule, for most desktop devices it is enough to add the following drivers to the ESXi image:
-v60 -sip -vft -load net-e1000e,net51-r8169,net55-r8168,esx-ui,sata-xahci,net51-sky2,esxcli-shell
To update the Offline bundle with the latest patches from the VMware repository:
.\ESXi-Customizer-PS.ps1 -v67 -izip .\VMware-ESXi-6.7.0-HPE-Gen9plus.zip -update
If you receive: An unexpected error occured: Could not find trusted signer while exporting the image, disable driver signature verification with the -nsc (-noSignatureCheck) option. Also, try this option if an error occurs:
[WinError 10054] An existing connection was forcibly closed by the remote host.
Inject Custom Drivers to ESXi Image with ESXi-Customizer GUI
ESXi-Customizer (GUI) is a small graphical tool with a simple interface that allows you to automate the process of integrating drivers and .vib files into an ESXi ISO image.
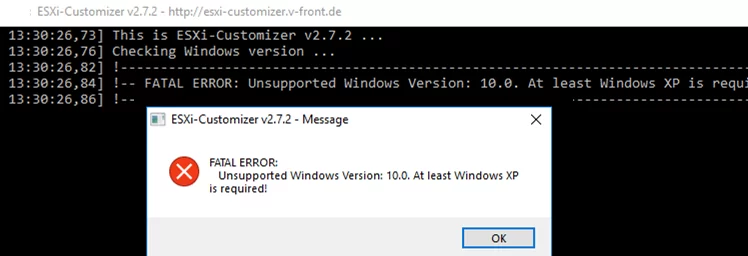
Download ESXi-Customizer-v2.7.2.exe (https://www.v-front.de/p/esxi-customizer.html), extract the archive, and run the tool (ESXi-Customizer.cmd). ESXi-Customizer doesn’t officially support modern Windows versions, so when started in Windows 10 or 11, an error appears:
---------------------------
ESXi-Customizer v2.7.2 - Message
---------------------------
FATAL ERROR: Unsupported Windows Version: 10.0. At least Windows XP is required!
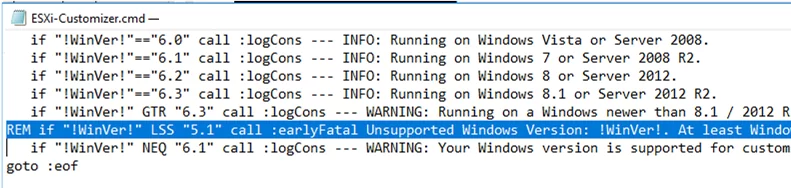
To fix it, edit the ESXi-Customizer.cmd file and comment out the following line (add REM in the beginning):
if "!WinVer!" LSS "5.1" call :earlyFatal Unsupported Windows Version: !WinVer!. At least Windows XP is required & exit /b 1
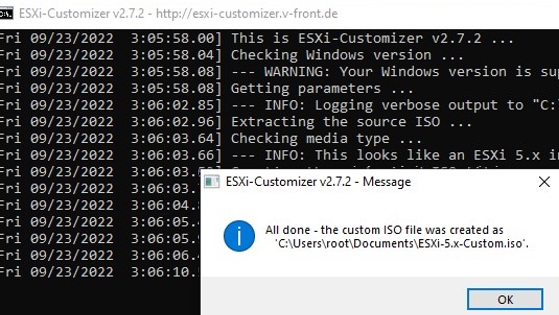
Save ESXi-Customizer.cmd file and run it. In the next window, specify the path to the source ESXi ISO image, the driver file (VIB file or TGZ archive with drivers), and the folder, to which the resulting image with the integrated driver must be saved. Uncheck the automatic update option.
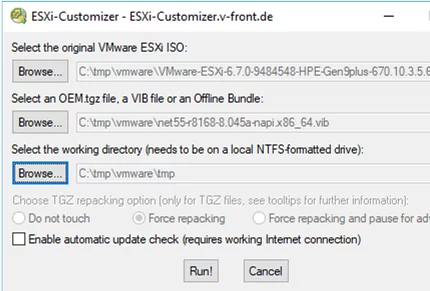
Click the Run button and n a few minutes a new ESXi ISO image will appear in the target directory. You can use this image to install ESXi on your hardware.
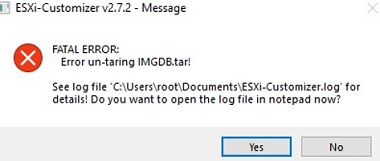
If you are trying to add drivers into an ISO image with ESXi 6.7 or 7.0, an error will appear:
FATAL ERROR:
Error un-taring IMGDB.tar!
In order to fix this fatal error, you need to manually modify the ESXi image:
- Extract your VMware ESXi installation ISO to a directory on disk;
- Install the 7zip archiver on your computer (you can quickly install apps on your computer using the winget package manager:
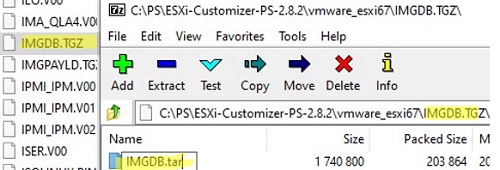
winget install 7zip.7zip); - Open the file IMGDB.TGZ with 7ZIP and rename the file inside to IMGDB.tar;

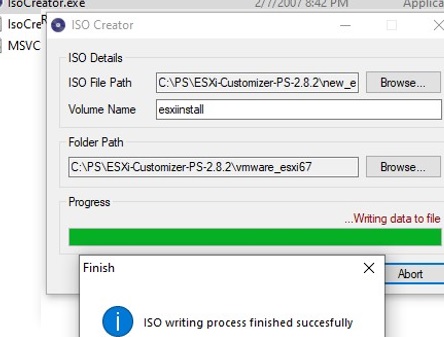
- Now you need to build the ISO image. You can use the free IsoCreator (download IsoCreator.msi, open the file with 7ZIP, and run
IsoCreator.exe); - Specify the directory with the ESXi installation files and the name of the ISO file;

- Now you can use this custom ISO image in ESXi-Customizer GUI.

Now you can use your ISO image to deploy ESXi on your target host.
Use vCenter Image Builder to Add Drivers to ESXi Custom Image
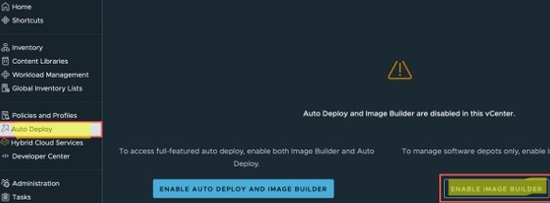
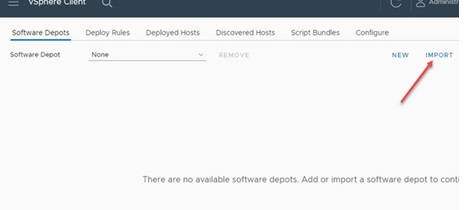
In vCenter Server, you can use the built-in Image Builder to modify your ESXi installation images. This service is disabled by default. Enable it via vCenter -> Auto Deploy -> Enable Image Builder.
Now you need to create a new Software Depot and import your ISO image, vib (zip) driver files, and the necessary ESXi updates into it.
Now clone your image. When cloning, you can choose which packages (drivers) to add to this ESXi depot.
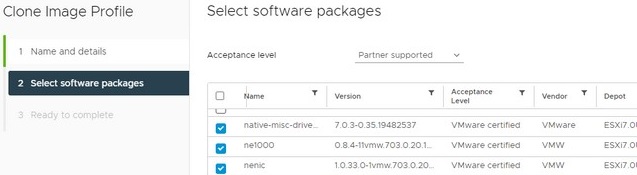
After that, click the Export button and download your ESXi installation ISO image with integrated third-party drivers.
32 comments
Excellent post! I used Using ESXi-Customizer GUI Tool and it worked. Thank you very much for this great article.
I always get an error message when trying to use the script:
**********************
nStart der Windows PowerShell-Aufzeichnung
Startzeit: 20200118184006
Benutzername: TD-VIRTUAL-IMAC\tdehl
RunAs-Benutzer: TD-VIRTUAL-IMAC\tdehl
Konfigurationsname:
Computer: TD-VIRTUAL-IMAC (Microsoft Windows NT 10.0.17763.0)
Hostanwendung: C:\Windows\System32\WindowsPowerShell\v1.0\powershell.exe
Prozess-ID: 1160
PSVersion: 5.1.17763.771
PSEdition: Desktop
PSCompatibleVersions: 1.0, 2.0, 3.0, 4.0, 5.0, 5.1.17763.771
BuildVersion: 10.0.17763.771
CLRVersion: 4.0.30319.42000
WSManStackVersion: 3.0
PSRemotingProtocolVersion: 2.3
SerializationVersion: 1.1.0.1
**********************
Running with PowerShell version 5.1 and VMware PowerCLI version 11.5.0.14899560
Connecting the VMware ESXi Online depot …
PS>TerminatingError(Add-EsxSoftwareDepot): “Der Typeninitialisierer für “VMware.ImageBuilder.Impl.IfServer” hat eine Ausnahme verursacht.”
An unexpected error occured:
Der Typeninitialisierer für “VMware.ImageBuilder.Impl.IfServer” hat eine Ausnahme verursacht.
Any idea what causes this error? Thank you.
Unfortunately, I cannot edit my post. Could you please delete the following lines in my previous post:
Benutzername: TD-VIRTUAL-IMAC\xxxx
RunAs-Benutzer: TD-VIRTUAL-IMAC\xxxx
Thank you.
WARNING
the .\ESXi-Customizer-PS-v2.6.0.ps1 form your link (https://www.v-front.de/p/esxi-customizer-ps.html)
has been detected as virus infected by Avast
Great Post! Finally one that worked for me, thanks for writing this up!
Hi mate, thanks for your post. I have a problem when do the offline packing. It shows ‘could not find a trusted signer.’ How to solve this please? Many thanks.
.\ESXi-Customizer-PS-v2.6.0.ps1 -nsc
Fianlly I solved it, you just need add ”-nsc” at the end of the whole command line, which is ”.\ESXi-Customizer-PS-v2.6.0.ps1 -izip .\VMware-ESXi-6.7.0-Update3-15160138-HPE-Gen9plus-670.U3.10.5.0.48-Dec2019-depot.zip -pkgDir E: -nsc”, not ”–no-sig-check”, not ” $DeployNoSignatureCheck=$true”, not”-NoSignatureCheck”!!!
Thanks Glume ! you saved my day. I was getting the error “[WinError 10054] An existing connection was forcibly closed by the remote host” in PowerShell. “-nsc” solved the problem.
Thanks I managed to find my nic driver and also managed to create my customized iso.
Quick and might be a stupid question: I already have my ESXI deployed how to update my ESXI with the driver.
Thanks
You can use vSphere Update Manager (VUM) to update ESXi or update a standalone ESXi host from cli (_https://docs.vmware.com/en/VMware-vSphere/6.7/com.vmware.esxi.upgrade.doc/GUID-A4301ADA-8E02-459D-BF9D-0AD308DA5325.html)
I manage to load the driver thanks once again for the explaination!
Alguien podría compartir la ISO por favor ya que no tengo mucha idea de como hacerla
I got an error
the vmware.imagebuilder module is not currently supported on the core edition of powershell
powershell version 6.2.7
Any help to fix it?
Thanks
when executing the same steps with 6.7 ISO image, getting the FATAL ERROR: Erron un-taring IMGDB.tar!
Can you suggest
In ESXi-Customizer.cmd change IMGDB.tar to _fdopen_
Hi I have 2 NIC same model requires same drivers i have reinstalled the driver but still only one NIC is showing in the vsphere client. How to make both usable.
Using version 6.0 ESXI
Everything works fine UNTIL… I Upload a 1GB ISO to a Datastore I get PSOD with
BUG: vmkdrivers/src_92/vmklinux_92/linux/net/skbuff.c:110 …
Could anyone please offer some guidance on this? This is only with one NIC connection (Patched Realtek Driver r8168). Ty
Got this problem: trying to give as a single package, but still wants to download and fails
An unexpected error occurred:
Error retrieving file for VIB ‘VMware_bootbank_esx-ui_1.43.10-20199807’: (“”, “Error opening file object for VIB ‘VMware_bootbank_esx-ui_1.43.10-20199807’: Expected value ‘[]’ for attribute ‘swplatforms’, but found value ‘[, ]’.”).
Specify the full command that you used to modify the image
ESXi-Customizer-PS-v2.6.0.ps1 -v67 -pkgDir C:\distr\esxi\driver
I finally got annoyed. I have 2x esxi production hosts and 2x proxmox hosts that are my homelab testing hosts. The only reason tehy dont have esxi on them is the fact my dell optiplex mciro sff 7080s dont recongize nic and sata drivers. WEll that is now fixed
I also moved my production esxi hots from 6..5 to 6.7 and vcenter to 6.7 as well
Thanks for this guide!
Using command –
.\ESXi-Customizer-PS-v2.6.0.ps1 -izip ESXi-6.7.0-20221001001s-standard_unverified.zip -vft -load net55-r8168 -pkgDir C:\DOVIBS\
to add VIBS I encounter –
An unexpected error occured:
Error retrieving file for VIB ‘VMware_bootbank_esx-ui_1.43.10-20199807’: (“”, “Error opening file object for VIB ‘VMware_bootbank_esx-ui_1.43.10-20199807’: Expected value ‘[]’ for attribute ‘swplatforms’, but found value ‘[, ]’.”).
(Same as Carlo mentioned above)
I got the same Error:
CMD: ESXi-Customizer-PS-v2.6.0.ps1 -v67 -pkgdir .\pkg
Running with PowerShell version 5.1 and VMware PowerCLI version 13.0.0.20797821
Connecting the VMware ESXi Online depot … [OK]
Getting Imageprofiles, please wait … [OK]
Using Imageprofile ESXi-6.7.0-20221004001-standard …
(dated 09/21/2022 13:35:37, AcceptanceLevel: PartnerSupported,
Updates ESXi 6.7 Image Profile-ESXi-6.7.0-20221004001-standard)
Loading Offline bundles and VIB files from .\pkg …
Loading \pkg\HPE_bootbank_scsi-hpdsa_6.0.0.76-1OEM.600.0.0.2494585.vib … [OK]
Add VIB scsi-hpdsa 6.0.0.76-1OEM.600.0.0.2494585 [OK, added]
Exporting the Imageprofile to \ESXi-6.7.0-20221004001-standard-customized.iso’. Please be patient …
An unexpected error occured:
Error retrieving file for VIB ‘VMware_bootbank_esx-ui_1.43.10-20199807’: (”, “Error opening file object for VIB ‘VMware_bootbank_esx-ui_1.43.10-20199807’: Expected value ‘[]’ for attribute ‘swplatforms’, but found value ‘[, ]’.”).
Hope this helps anyone as I was pulling my hair as well with this error. I managed to bypass (hopefully) by including “esx-ui” also after “-load sata-xahci,net55-r8168” drivers. But I haven’t tested the image yet to see if it works.
Also be sure to have Python 3.7.9 installed as some reported 3.7.0 or 3.7.1 had issues.
Other possible solution I found but haven’t tested was on a chinese blog. It says there that there’s an issue with the latest ESXi670-202210001 and you have to use the older one ESXi670-202207001. It will hopefully work with that one without including “esx-ui”.
Using this step > Inject Custom Drivers to ESXi Image with ESXi-Customizer GUI works for me with exi 6.7 image and dell optiplex 3070 with realtek driver….
Tks a lor for your post!
Can you share the link for that .iso file with me, Please
I was able to fix ISO for vmware 6.7 following up these steps.
Does anybody know if it can applied for version 7.0?
Tnx
I found anotherway, with this tuto : _https://www.geekdecoder.com/how-to-customize-esxi-install-with-realtek-drivers/
Renaming the IMGDB file is not possible in ISO’s dated 2019 and 2021. Simply because IMGDB.TGZ does not contain an IMGDB file. Rather there is some sort of tmp file that may appear like this: tmpjdp2cz9f. Making it impossible for ESXi-Customizer-v2.7.2 to successfully create the modified ISO. Has anyone else run into this issue. Thank you
@Fabio Less,
Yes, I did this for esix7.03 ISO, even after rename, tgz to tar. it still errors out when creating the ISO saying have problem for that file.
Esix 7.3 ISO worked for me without any customization . I just created bootable disk .
Problem solved 🙂 . Only took 5 years !!! . Like they say better later than never .