If several Wi-Fi networks are available, Windows automatically selects a wireless network with better signal strength (no matter what the speed of this connection is and how many devices are connected to it). However, when you connect your computer (laptop) to a wired Ethernet network, Windows keeps on using a Wi-Fi network, though the Ethernet connection speed is significantly higher, and the connection is more stable and not subject to interference. To switch to the cable Ethernet connection, a Windows user has to manually disable the Wi-Fi connection each time. Let’s see how to automatically turn off Wi-Fi when the Ethernet LAN cable is connected to Windows 10 or 11 device.
- WLAN Switching Options in BIOS/UEFI
- Disable Wi-Fi Upon Wired Connect with Wireless Adapter Driver
- Enable/Disable Wi-Fi Adapter When Connected to LAN with Task Scheduler
- Turn Off Wi-Fi on Ethernet Connection Using WLAN Manager PowerShell Script
- Disable Non-Domain Wireless Networks When Connected to LAN via GPO
WLAN Switching Options in BIOS/UEFI
Many laptop/desktop vendors have their own implementations of the LAN/WLAN Switching technology (it can be called differently). This technology suggests that only one network adapter can simultaneously transmit data on a computer. If while using a Wi-Fi network, a higher priority Ethernet connection appears on a device, the Wi-Fi adapter should automatically go into standby mode. This saves battery life and reduces the load on the wireless network.
You can enable the LAN/WLAN Switching option in the BIOS/UEFI settings or the properties of your wireless network adapter driver (it depends on your hardware vendor).
Restart your computer to enter the UEFI/BIOS settings, then find and enable the LAN/WLAN Switching option (on HP devices) or Wireless Radio Control (on Dell devices).
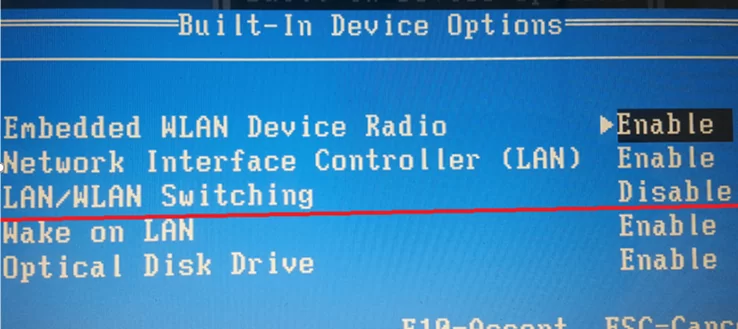
This feature may be called differently or completely absent in BIOS/UEFI of other manufacturers.
Disable Wi-Fi Upon Wired Connect with Wireless Adapter Driver
In the settings of some Wi-Fi adapter drivers, there is an option to automatically turn off the Wi-Fi if the high-speed Ethernet connection is available.
Open the Windows Device Manager (devmgmt.msc), find your Wireless network adapter in the Network adapters section and open its properties. Go to the Advanced tab.
Find the Disabled Upon Wired Connect item in the list of Wi-Fi adapter options. Change its value to Enabled and save the driver changes.
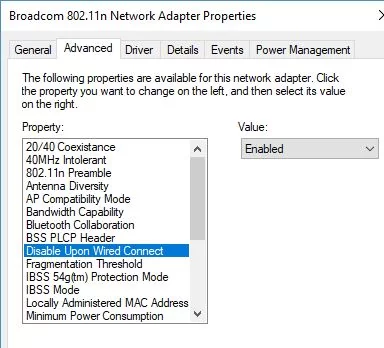
Thanks to this option, the wireless network driver will disconnect the adapter from the Wi-Fi network when an active Ethernet LAN connection is detected.
Not all Wi-Fi adapter models support this option. For other wireless network adapters, you can automate switching to Ethernet using a scheduler task or a PowerShell script.
Enable/Disable Wi-Fi Adapter When Connected to LAN with Task Scheduler
Let’s look at how to automatically enable and disable Wi-Fi adapters in Windows using special Task Scheduler jobs that are bound to an Ethernet cable connection/disconnection event ( we will use Windows Scheduler event trigger).
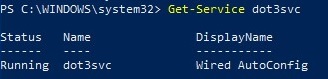
The first step is to enable the Wired AutoConfig service (dot3svc) and set it to start automatically. You can check the status of a service and change the startup mode using PowerShell:
Set-Service dot3svc -startuptype automatic -passthru
 Start-Service dot3svc
 Get-Service dot3svc
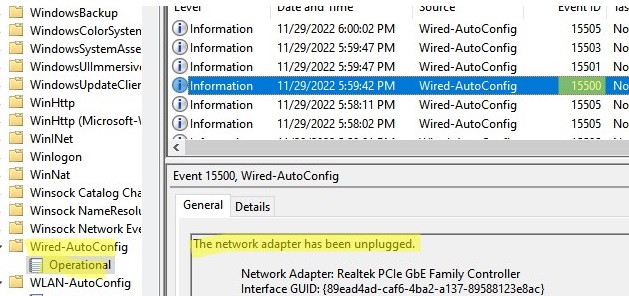
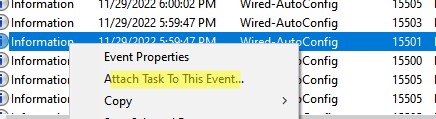
Now open the Event Viewer (eventvwr.msc) and go to Applications and Services Logs -> Windows -> Wired-AutoConfig -> Operational. Here we are interested in two following events:
- Event ID 15501 —
The network adapter has been connected. - Event ID 15500 —
The network adapter has been unplugged.
EventID: 32 — Network link is established ) and ( EventID: 27 – Network link is disconnected ).We will bind PowerShell commands to these events in order to enable and disable the Wi-Fi adapter automatically. To do this, you need to get the name of your Wi-Fi network adapter in Windows. You can list network adapters with PowerShell:
Get-NetAdapter
In our example, the adapter name is TPLinkWiFi.

Click on event 15501 in the Event Viewer and select Attach task to this event.
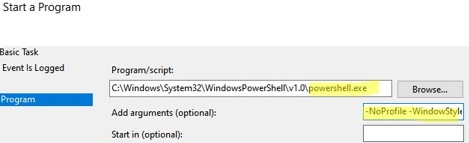
Specify the scheduler task name DisableWiFi_if_Ethernet_Connected-15501. Select Start a program as the task action. To disable the Wi-Fi adapter, you need to run the following command:
Program: C:\Windows\System32\WindowsPowerShell\v1.0\powershell.exe
Add arguments: -NoProfile -WindowStyle hidden -ExecutionPolicy Bypass -Command &{Disable-NetAdapter -Name TPLinkWiFi -confirm:$False}
Create another scheduler task for Event ID 15500 in the same way.
- Set the task name: EnableWiFi_if_Ethernet_Disconnected-15500
- Configure the task action:
Command:C:\Windows\System32\WindowsPowerShell\v1.0\powershell.exe
Argument:-NoProfile -WindowStyle hidden -ExecutionPolicy Bypass -Command &{Enable-NetAdapter -Name TPLinkWiFi -confirm:$False}
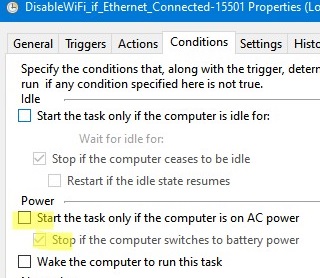
In the properties of both tasks, go to the Conditions tab and uncheck the Start the task only if the computer is on AC Power option.
Now try to connect the LAN cable. After a couple of seconds, your Wi-Fi adapter will be automatically disabled (Status=Dormant).

When Ethernet is disconnected, the task enables the wireless adapter and Windows automatically connects to your saved Wi-Fi network.
Turn Off Wi-Fi on Ethernet Connection Using WLAN Manager PowerShell Script
To automatically disconnect the Wi-Fi adapter when a computer is connected to a wired Ethernet network, you can use the WLAN Manager PowerShell script. You can find a newer WLAN Manager version with enhanced Windows 10 support and correct detection of virtual adapters on GitHub: https://github.com/jchristens/Install-WLANManager.
This PowerShell script will create a new Scheduler task that periodically checks for active network adapters. If the script detects any LAN (Ethernet) connection, the WLAN interface is automatically disabled. If the Ethernet network cable is disconnected, the script enables the wireless Wi-Fi adapter.
The script consists of two files:
- PSModule-WLANManager.psm1
- WLANManager.ps1
You can install WLAN Manager script on Windows. Open the elevated PowerShell prompt and allow to run the PS1 scripts:
Set-ExecutionPolicy RemoteSigned
Install the script on Windows with the following command:
.\WLANManager.ps1 -Install:System
The script may be installed to run as a user account (Install:User) or with local system account privileges (Install:System).
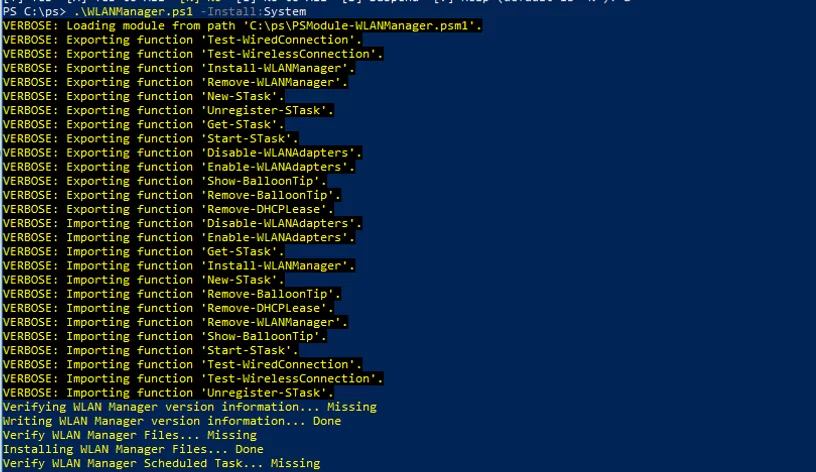
Verifying WLAN Manager version information… Missing
Writing WLAN Manager version information… Done
Verify WLAN Manager Files… Missing
Installing WLAN Manager Files… Done
Verify WLAN Manager Scheduled Task… Missing
Installing WLAN Manager Scheduled Task… Done
You can make the script notify a user with a pop-up notification when switching between Wi-Fi and LAN networks:
.\WLANManager.ps1 -Install:User -BalloonTip:$true
Make sure that a new WLAN Manager task has appeared in the Task Scheduler.
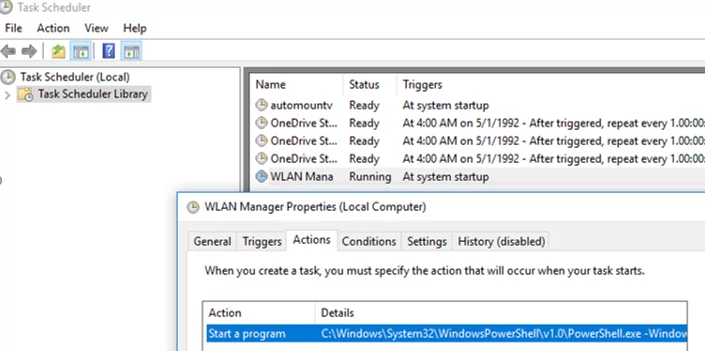
Restart your computer. After the startup, the Scheduler will start the C:\Program Files\WLANManager\WLANManager.ps1 script that checks network connections every second, and if a LAN connection is detected, all available Wi-Fi adapters will be disabled. If the LAN cable is disconnected, the script will automatically enable wireless Wi-Fi adapters.
WLAN Manager script works well on Windows 11, 10, 8.1, and 7.
.\WLANManager.ps1 Remove:System
Disable Non-Domain Wireless Networks When Connected to LAN via GPO
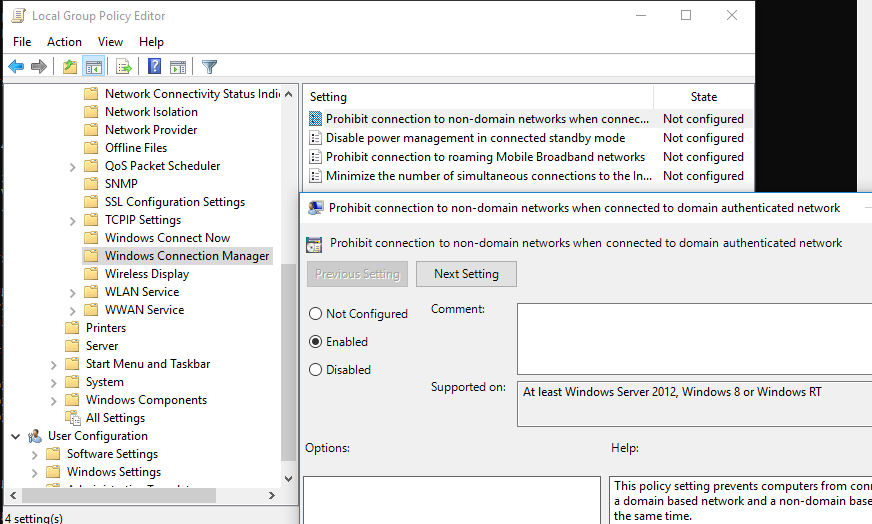
There is a separate setting in GPO that allows you to disable the Wi-Fi connections when a computer is connected to a corporate domain network via LAN. This policy is located in the following GPO section Computer Configuration -> Policies ->Administrative Templates -> Network ->Windows Connection Manager and called “Prohibit connection to non-domain networks when connected to domain authenticated network”.
The policy prevents computers from connecting to both a domain network and an untrusted non-domain network at the same time.
However, when this policy is enabled, you may experience problems when connecting to a Wi-Fi network if the additional interfaces are present on your computer. For example, loopback interface or virtual network adapters from desktop hypervisors (VMware Workstation, Hyper-V, VirtualBox, etc.)
You can also disable the use of Wi-Fi if there is an active Ethernet connection to the domain LAN. You can configure this behavior using the GPO option Minimize the number of simultaneous connections to the Internet or a Windows Domain under Computer Configuration -> Administrative Templates -> Network -> Windows Connection Manager. Enable the policy and select 3=Prevent Wi-Fi when on Ethernet.

9 comments
I trade the stock market and have a question. If I use a UPS and a wired internet connection and I have a power outage therefore losing the wired internet, will this procedure work to automatically connect to my hotspot wireless phone connection? This way I can manage my trading account before the computer shuts down.
You can use the WLAN Manager PowerShell script if during a power outage, your Ethernet connection status changes to disconnected. But in this case, your phone hotspot should be turned on constantly.
Can someone give a more in depth guide as to how to setup WLAN ? Some of the terminology is confusing…
I think the first script creates a scheduled task, the second is used as an action , but what is the trigger, need some help,please
Hi Steve, the Trigger is the Event ID in the Eventlog
(Event-ID: 32 — Network link is established) and (Event-ID: 27 – Network link is disconnected)
Hi , The script installed fine on my laptop but noticed an issue after installing it, if the user is in VPN (working from home) then the schedule task keeps on disconnecting the system from the WiFi network, by any chance would it be possible to include a VPN check so that when the user is connected to VPN from home the network stays connected.
Good day, thank you for this tip. May I know if Wi-Fi is automatically disabled because Ethernet is active, won’t this affect the Hotspot option as it needs to share Ethernet internet via Wi-Fi?
In the case of the Dell Latitude 5330 2-in-1, and assuming you have the latest BIOS/UEFI and drivers installed, automatic WiFi/ethernet switching can be enabled in the BIOS/UEFI by navigating to the BIOS SETUP menu:
1. In the BIOS SETUP menu, select “Connection” from the menu list on the left-hand side of the screen.
2. Scroll down to the “Wireless Radio Control” section.
3. When in the “Wireless Radio Control” section, set the “Control WLAN Radio” and “Control WWAN Radio” to ON.
4. Select APPLY CHANGES at the bottom of the screen and reboot.
When the WiFi is active and you then add a wired ethernet connection, the 5330 should detect it and switch the WiFi off, or switch the WiFi back on when the ethernet is disconnected. If the WiFi is switched off before any ethernet connection is added, it will stay off regardless.
Well, I think I will never find to how to disable Wi-Fi for one user, notebook or desktop.
For example, if this user has notebook and go at subway, he will not able to connect to any wireless network.
But, on the same notebook, the admin will be able.
I don’t think it’s so complicated, but nobody talk about that, or begin to write a book to explain simple thing.
Anyway!
You can block Wi-Fi connectivity for non-admin accounts by using the netsh filter:
netsh wlan add filter permission=denyall networktype=infrastructureAdd this command to the task scheduler to run when the computer starts.
Local admin can remove this filter
netsh wlan delete filter permission=denyall networktype=infrastructure