When updating the Windows 10 build using the Windows Update, the installation image of the new (or insider) Windows build is downloaded to the user’s computer in a new special image format – ESD (Electronic Software Download). ESD is an encrypted and compressed .WIM (Windows Imaging Format) image file.
This image distribution format was first used in Windows 8.1 for the online update of the operating system. Unlike a WIM file, an ESD image cannot be mounted and modified. Microsoft plans to use this format extensively for system deployment. Comparing to a WIM file, an .ESD file takes 30% less space, which is a big advantage when it is distributed over the Internet.
In this article, we will show how to decrypt and convert an ESD image of Windows 10 to a familiar ISO installation image that can be burned to an DVD or USB drive and used to cleanly install Windows 10 or perform an update.
How to get ESD file with Windows 10 image
Let’s find out where to get an ESD file. When upgrading Windows 8 to Windows 8.1, the install.esd file is downloaded from Microsoft repository in a background mode and is saved to the C:\Windows\SoftwareDistribution\Download\{some ID} directory.
You can get the Install.ESD file with the latest Windows 10 build by going to Start -> PC Settings -> Update and recovery -> Preview builds section on the installed system. If a new Windows 10 build is available for your system, you will be prompted to download and install a new image.

After the download is over, open Windows Explorer without clicking Install and go to C:\$Windows.~BT\Sources. Find Install.ESD here (it is hidden) and copy it into any other directory. This is the ESD file with the compressed image of the latest version of Windows 10 TP.
Run the system update to the new build, but don’t restart the computer. During the update process, Windows will download the files that are necessary to perform the update. After the download is complete, open Explorer and navigate to the C:\$Windows.~BT\Sources directory. Find the Install.ESD file in this directory (it is hidden) and copy it to any other directory. This is an .ESD file with a compressed image of the latest Windows 10 build.

To get information about which Windows images are inside the ESD file, you can use the standard DISM utility:
DISM /Get-WimInfo /WimFile:"C:\iso\install.esd"
Deployment Image Servicing and Management tool
 Version: 10.0.17134.1
 Details for image : C:\iso\install.esd
 Index : 1
 Name : Windows 10 Home
 Description : Windows 10 Home
 Size : 15,439,030,656 bytes
 Index : 2
 Name : Windows 10 Home Single Language
 Description :Windows 10 Home Single Language
Size : 15,439,078,082 bytes
Index : 3
Name : Windows 10 Education
Description :Windows 10 Education
Size : 15,662,641,239 bytes
Index : 4
Name : Windows 10 Pro
Description : Windows 10 Pro
Size : 15,662,520,267 bytes
The operation completed successfully.
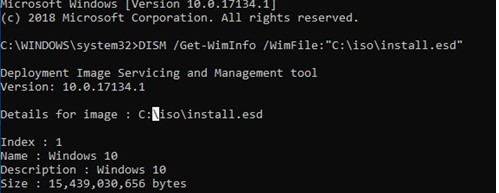
In our example, there are several system images inside the install.esd archive. For example, Windows 10 Pro has an index of 4.
Knowing the index of a Windows image in an ESD file, you can export it to a WIM file using the command:
dism /export-image /SourceImageFile:c:\iso\install.esd /SourceIndex:4 /DestinationImageFile: c:\iso\win10pro.wim /Compress:max /CheckIntegrity
 The resulting WIM file can be converted to an ISO image using third-party utilities.
ESD Decrypter Utility
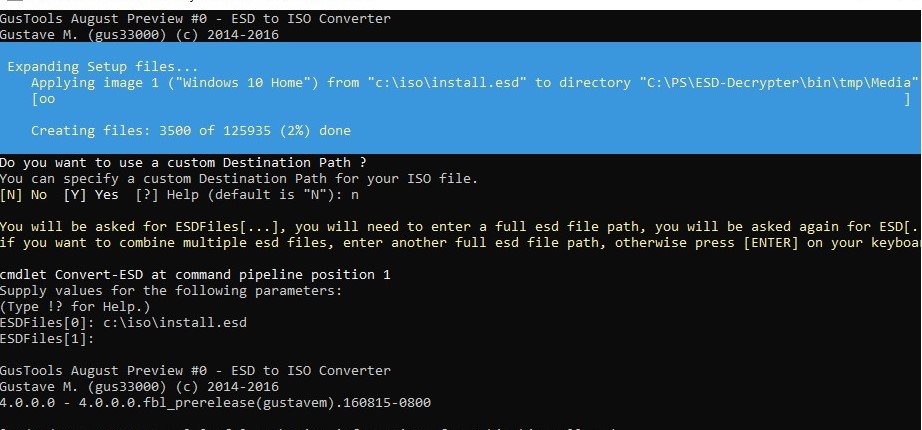
To convert an ESD image to an ISO file, we will use the command line utility ESD Decrypter (ESD ToolKit), which can be downloaded from GitHub: https://github.com/gus33000/ESD-Decrypter/releases/. The ESD Decrypter utility is based on PowerShell, so you can easily open its source code (the cdimage.exe tool is used to generate an ISO image from a WIM file).
- Extract the archive 4.0.0.0.fbl_prerelease.gustavem.160815-0800.zip into a local folder;
- Run the file ESDISO.bat as administrator;
- The wizard will ask you to specify the path to the CryptoKeys file with the keys to decrypt the ESD image and the path to the directory where the final ISO file should be placed (I did not specify these parameters, by pressing N two times);
- Next, specify the path to your ESD file and press Enter twice;
- Start the process of converting an image in ESD format to an ISO file. Depending on the performance of your system, the process will take from 20 to 30 minutes;

- After the script is finished, check that the installation ISO file with the Windows 10 image has appeared in the utility directory, which can be burned to DVD or the standard or UEFI bootable USB flash drive can be created.
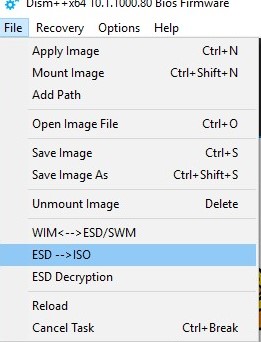
Dism++ Utility for Converting the Install.esd File
To convert an ESD image to an ISO file, you can use a simple and convenient graphical utility Dism ++ (https://www.chuyu.me/en/index.html), which does the same thing as the ESD Decrypter script, but has a more user-friendly graphical interface.
- Download and unzip the archive with the Dism++ utility;
- Run the executable file Dism ++ depending on your OS bitness (on Windows 10 x64 you need to run Dism++ x64.exe file);
- Accept the user agreement;
- Open the File menu and select the menu item Esd —> ISO;

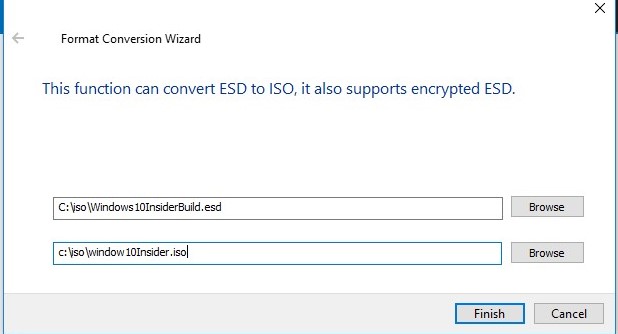
- Specify the path to your ESD file that you saved earlier. Then specify the directory and the name of the ISO file to be created;

- Click Finish button and wait until the .esd file converting is completed (it takes 10-15 minutes).
8 comments
I keep getting a DISM error when I try to convert Build 10074. What gives?
Please, show the full error code.
Also check for errors in Dism log file (can be found at C:\Windows\Logs\DISM\dism.log)
I keep getting a DISM error when I try to convert Build error 13
amigos basta apenas abrir o arquivo ESD com WINRAR e FAZER O SEGUINTE……………………SUBESTUIR ESD POR ISO DO ARQUIVO esd =ISO maiuscolo……………….
exe=windows.esd=windows.ISO
E ABRIR COM =DAEMON QUAUQUER ISO
open it with 7zip
link to dism++ is dead
DISM++ does not work with the modified ESD, shows “Only supports Microsoft’s Online’s ESD file into ISO file”.