By default, all 64-bit Windows versions prevent the installation of device drivers that are not signed with a valid digital signature. Unsigned drivers are blocked by the operating system. A digital signature ensures that the driver has been released by a trusted developer or vendor, and that its code hasn’t been modified.
There are several ways to disable driver signature verification for unsigned drivers in Windows (using a GPO, a test boot mode, etc). Today we’ll show how to sign any unsigned driver for Windows x64 (the guide is applicable for Windows 11, 10, 8.1, and 7).
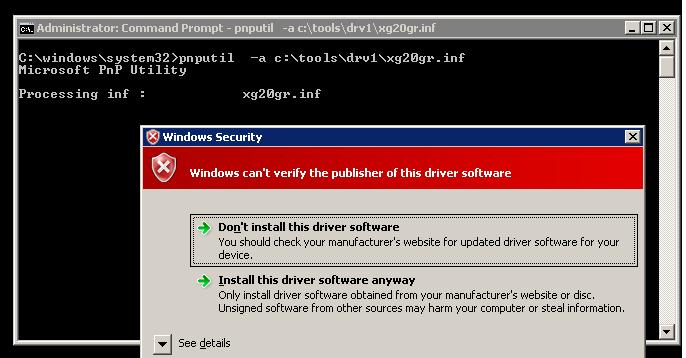
Suppose you have a certain unsigned device driver (without digital signature) for Windows 10 x64. In this example, it is the driver for a quite old graphics card. The archive with drivers for your Windows version has been downloaded from the vendor’s website (I was able to find the video driver version only for Windows Vista x64) and its contents have been extracted to the c:\tools\drv1\. Let’s try to install the driver by adding it to the Windows driver store with a built-in pnputil tool:
Pnputil –a c:\tools\drv1\xg20gr.inf
During driver installation, Windows 7 displays a warning that the operating system can’t verify the digital signature of this driver:
Windows can’t verify the publisher of this driver software.
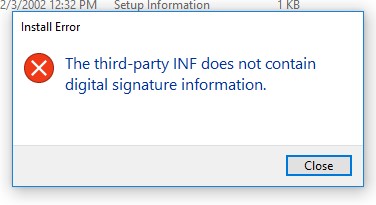
In Windows 10 (21H2) this warning doesn’t appear, but an error appears in the console:
Processing inf: xg20gr.inf
Adding the driver package failed: The third-party INF does not contain digital signature information.

If you right-click on the inf driver file and select Install when installing a driver from File Explorer, you receive an error:
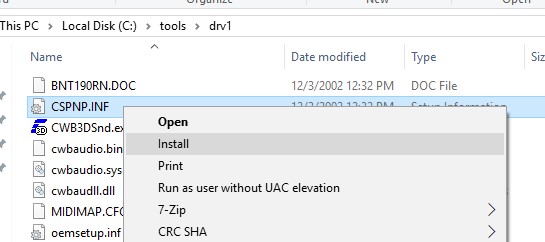
The third-party INF does not contain digital signature information.
Let’s try to sign this driver with a self-signed certificate.
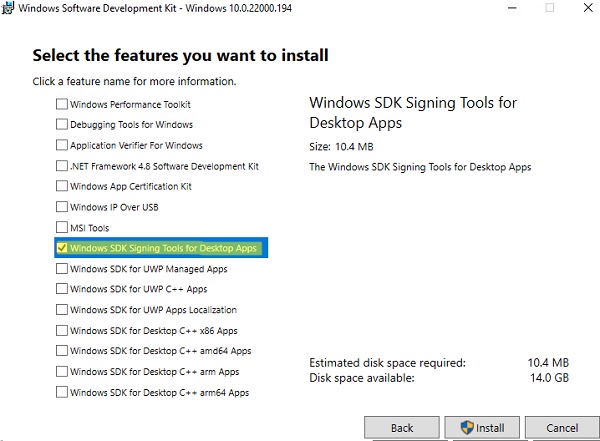
To generate a signature and sign the driver, you need to download and install the following Windows application development tools:
- Windows SDK (Software Development Kit) or Microsoft Visual Studio 2005+ for your Windows version. Install the Windows SDK Signing tools for Desktop Apps package which contains the
signtool.exe;
- Windows Driver Kit (WDK) — https://docs.microsoft.com/en-us/windows-hardware/drivers/download-the-wdk
Create a Self-Signed Driver Certificate
Create a C:\DriverCert folder at the root of the system drive.
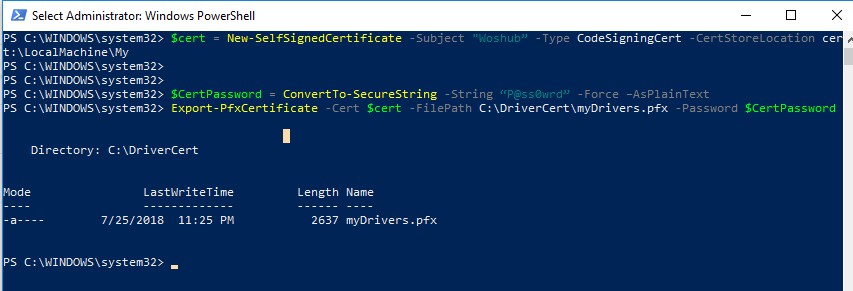
You can use the New-SelfSifgnedCertificate PowerShell cmdlet to create a code signing certificate. In this example, we will create a self-signed certificate with a validity period of 3 years.
$todaydate = Get-Date
 $add3year = $todaydate.AddYears(3)
 $cert = New-SelfSignedCertificate -Subject "WOSHUB” -Type CodeSigningCert -CertStoreLocation cert:\LocalMachine\My -notafter $add3year
Then you need to export this certificate to a pfx file with a password:
$CertPassword = ConvertTo-SecureString -String “P@ss0wrd” -Force –AsPlainText
 Export-PfxCertificate -Cert $cert -FilePath C:\DriverCert\myDrivers.pfx -Password $CertPassword
Since the certificate we created is self-signed, Windows doesn’t trust it by default. When you check the certificate store with the Sigcheck utility, this certificate will be displayed as untrusted, because it is not listed in the list of Microsoft Trusted Root Certificates (this list needs to be updated periodically).
Now you need to add the certificate to the Trusted Root store and to the Trusted Publisher certificates:
$certFile = Export-Certificate -Cert $cert -FilePath C:\DriverCert\drivecert.cer
 Import-Certificate -CertStoreLocation Cert:\LocalMachine\AuthRoot -FilePath $certFile.FullName
 Import-Certificate -CertStoreLocation Cert:\LocalMachine\TrustedPublisher -FilePath $certFile.FullName
In previous versions of Windows, you must use the makecert.exe tool from the Windows Software Development Kit (SDK) to generate self-signed certificates. In this case, the commands to create a certificate will look like this:
cd “C:\Program Files (x86)\Microsoft SDKs\Windows\v7.1\bin”
Create a self-signed certificate and private key, that is issued, for example, for the company WinOSHub:
makecert -r -sv C:\DriverCert\myDrivers.pvk -n CN="WinOSHub" C:\DriverCert\myDrivers.cer
During the creation of the certificate, the tool will prompt you to specify a password for the key. Let it be P@ss0wrd.
Create a public key for a publisher certificate (PKSC) we have created earlier:
cert2spc C:\DriverCert\myDrivers.cer C:\DriverCert\myDrivers.spc
Combine the public key (.spc) and the private key (.pvk) in a single certificate file with the format Personal Information Exchange (.pfx):
pvk2pfx -pvk C:\DriverCert\myDrivers.pvk -pi P@ss0wrd -spc C:\DriverCert\myDrivers.spc -pfx C:\DriverCert\myDrivers.pfx -po P@ss0wrd
Add the certificate to trusted:
certmgr.exe -add C:\DriverCert\myDrivers.cer -s -r localMachine ROOT
 certmgr.exe -add C:\DriverCert\myDrivers.cer -s -r localMachine TRUSTEDPUBLISHER
You can centrally deploy this certificate to client computers using Group Policy in an AD domain.
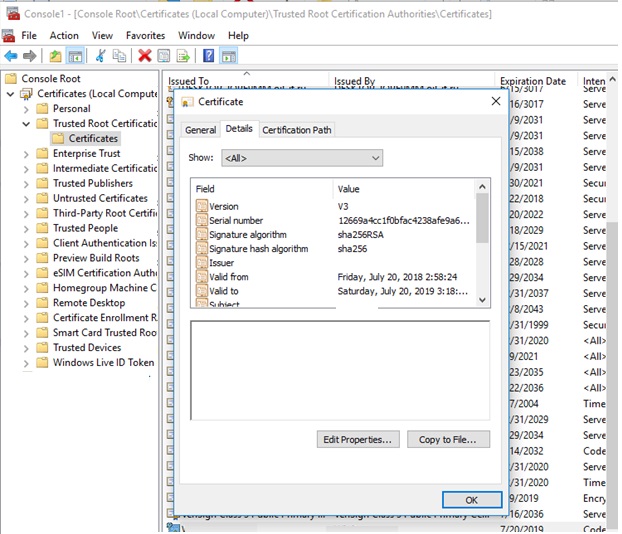
Open the machine’s local certificate management snap-in (certlm.msc) and verify that your certificate is in the Trusted Publishers and Trusted Root Certification Authorities.
Creating a Catalog File (CAT) for Signing a Driver Package
Create the directory C:\DriverCert\xg20 and copy all files from the folder into which the driver from the archive has been originally extracted (c:\tools\drv1\). Make sure that there are files with the extensions .sys and .inf among these files (in our case, they are xg20grp.sys and xg20gr.inf).
md C:\DriverCert\xg
 xcopy c:\tools\drv1\ C:\DriverCert\xg /i /c /k /e /r /y
Go to the directory:
cd “C:\Program Files (x86)\Windows Kits\10\bin\10.0.22000.0\x86”
Generate a CAT file (contains information about all the files in the driver package) on the base of the INF file. The inf2cat.exe tool (from the Windows Driver Kit, WDK) allows you to generate a CAT file for your platform:
inf2cat.exe /driver:"C:\DriverCert\xg20" /os:7_X64 /verbose
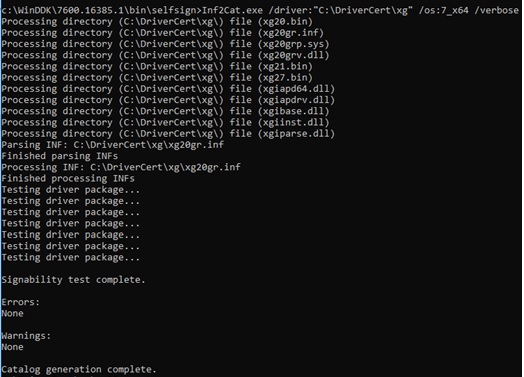
To make sure that the procedure was correct, check that the file C:\DriverCert\xg\xg20gr.cat has appeared in the target directory, and there are messages in the log:
Signability test complete.
and
Catalog generation complete.
Signability test failed.
Errors:
22.9.7: DriverVer set to incorrect date (must be postdated to 4/21/2009 for newest OS) in \hdx861a.inf

To fix the error, find the line with DriverVer = in the [Version] section and replace it with:
DriverVer=05/01/2009,9.9.9.9

If you get an error Missing AMD64 CatalogFile entry (for x64) or Missing 32-bit CatalogFile entry, then add the line CatalogFile=xg20gr.cat to the [Version] section of the .inf file.
Signing the Driver Package with a Self-Signed Certificate
Go to the following folder:
cd "C:\Program Files (x86)\Windows Kits\10\bin\10.0.22000.0\x64"
Sign the driver package (set of files) with the certificate you created earlier using Verisign as a timestamp service. The following command will sign the CAT file with a digital signature using a certificate stored in a password-protected .pfx file:
signtool sign /f C:\DriverCert\myDrivers.pfx /p P@ss0wrd /t http://timestamp.verisign.com/scripts/timstamp.dll /v C:\DriverCert\xg20\xg20gr.cat
On modern versions of Windows 10 and Windows 11, running this command will result in an error:
SignTool Error: No file digest algorithm specified. Please specify the digest algorithm with the /fd flag. Using /fd SHA256 is recommended and more secure than SHA1. Calling signtool with /fd sha1 is equivalent to the previous behavior. In order to select the hash algorithm used in the signing certificate's signature, use the /fd certHash option.
You need to use another command:
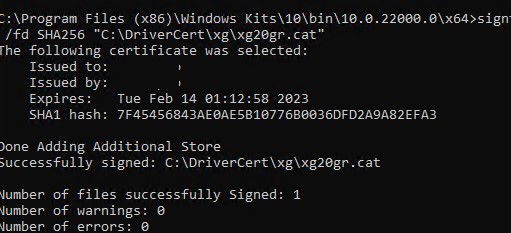
signtool sign /tr http://timestamp.digicert.com /td SHA256 /v /f C:\DriverCert\myDrivers.pfx /p P@ss0wrd "C:\DriverCert\xg\xg20gr.cat"
SignTool Error: An unexpected internal error has occurred, or Error information: SignerTimeStamp() failed. (-2147012865/0x80072eff), try a different timestamp server URL. Try any of the list:http://timestamp.comodoca.com/authenticode http://timestamp.globalsign.com/scripts/timstamp.dll http://timestamp.verisign.com/scripts/timstamp.dll http://tsa.starfieldtech.com http://www.startssl.com/timestamp
If the CAT file is signed successfully, the following message should appear:
Successfully signed: C:\DriverCert\xg\xg20gr.cat
Number of files successfully Signed: 1
The driver’s digital signature is contained in the .cat file referenced in the .inf file. You can check the digital signature of the driver in the cat file using the following command:
SignTool verify /v /pa c:\DriverCert\xg\xg20gr.cat
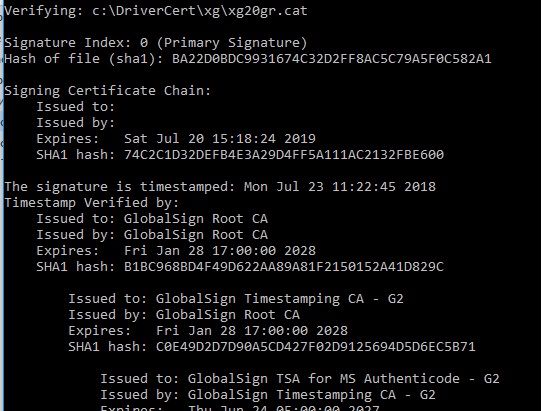
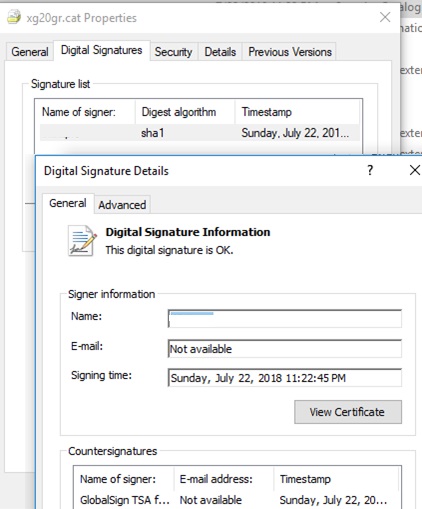
You can also see information about the certificate in the properties of the CAT file on the Digital Signatures tab.
If the certificate is not trusted (or has not been added to the Trusted Root Certificate Store), then an error will appear when running the SignTool verify command:
SignTool Error: A certificate chain processed, but terminated in a root certificate which is not trusted by the trust provider.
Installing a Self-Signed Driver on Windows
Try to install the driver we have signed again using the command:
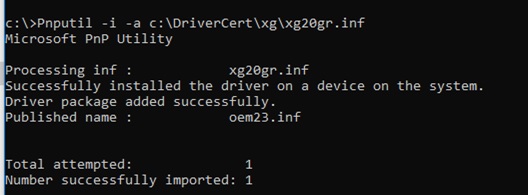
Pnputil –i –a C:\DriverCert\xg20\xg20gr.inf
Now you won’t see the warning about the missing digital signature of the driver.
Successfully installed the driver on a device on the system.
 Driver package added successfully.
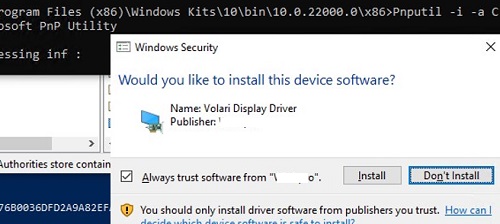
The following warning appears in Windows 10 and 11:
Would you like to install this device software?
Click “Install” to install the driver package on Windows.
If for some reason the driver is not installed, a detailed driver installation log is contained in the file C:\Windows\inf\setupapi.dev.log. This log file allows you to get more information about the driver installation errors. In most cases, there is a “Driver package failed signature validation” error. Most likely this means that the driver’s certificate is not added to the trusted certificates store.
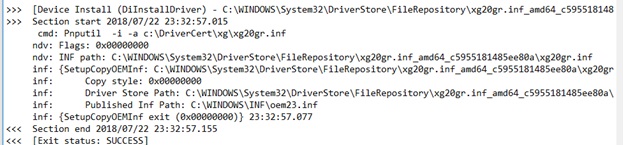
If the driver installation was successful, the setupapi.dev.log file should contain the following lines:
>>>  [Device Install (DiInstallDriver) - C:\WINDOWS\System32\DriverStore\FileRepository\xg20gr.inf_amd64_c5955181214aa12b\xg20gr.inf]
>>>  Section start 2018/07/22 23:32:57.015
cmd: Pnputil  -i -a c:\DriverCert\xg\xg20gr.inf
ndv: Flags: 0x00000000
ndv: INF path: C:\WINDOWS\System32\DriverStore\FileRepository\xg20gr.inf_amd64_c5955181214aa12b\xg20gr.inf
inf: {SetupCopyOEMInf: C:\WINDOWS\System32\DriverStore\FileRepository\xg20gr.inf_amd64_c5955181214aa12b\xg20gr.inf} 13:23:37.046
inf:      Copy style: 0x00000000
inf:      Driver Store Path: C:\WINDOWS\System32\DriverStore\FileRepository\xg20gr.inf_amd64_c5955181214aa12b\xg20gr.inf
inf:      Published Inf Path: C:\WINDOWS\INF\oem23.inf
inf: {SetupCopyOEMInf exit (0x00000000)} 13:23:37.077
<<<  Section end 2018/07/22 13:23:37.155
<<<  [Exit status: SUCCESS]
User-Mode and Kernel-Mode Drivers in Windows
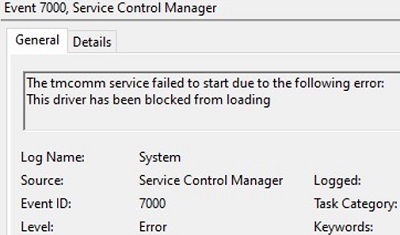
Let me remind you that in Windows the driver can be executed in a kernel-mode or in a user mode. Kernel-mode drivers signed this way won’t load when Windows boots on the UEFI device with Secure Boot enabled with the error:
Event ID: 7000
ERROR_DRIVER_BLOCKED
1275 (0x4FB)
This driver has been blocked from loading.
You can check if Secure Boot mode is enabled using the PowerShell command:
Confirm-SecureBootUEFI
![]()
All kernel-mode drivers loaded with SecureBoot enabled must be signed during the Microsoft certification process (WHQL – Windows Hardware Quality Lab). The reason is that when the kernel is loaded, UEFI cannot verify the certificates in the Windows local machine certificate store.
SignTool Error: Signing Cert does not chain to a Microsoft Code Verification Root.
Microsoft requires mandatory third-party driver certification under the Windows Hardware Compatibility Program starting with Windows 10 1607.
Self-signed user-mode drivers (usually printers, scanners, plotters, etc.) will work even with SecureBoot enabled.
For kernel-mode drivers, you will have to disable digital signature verification and boot Windows in a test mode with the bcdedit.exe commands:
bcdedit.exe /set /nointegritychecks on
 bcdedit.exe /set testsigning ON
43 comments
Unless you unable testmode (bcdedit /set testsigning on) to disable kernel drivers signature verification, Windows won’t allow the driver to load. You will not have the warning when installing the self-signed driver, but it won’t load.
I’ve tested it thoroughly, and it’s confirmed here and there.
You must add your self signed cert to Trusted Publishers and Trusted Root Certification Authorities containers in the local certificate store
I followed very carefully all these instructions, and i’m sorry to say that it doesn’t work: Window won’t allow the driver to run if it doen’t have a cross-signed signature.
It is confirmed here: minasi.com/newsletters/nws0903.htm
Mark Minasi: “Windows wants your cert to be cross-signed by Microsoft, which costs money, but you can tell Windows 7 (I’ve not tested Vista) to accept certs that aren’t signed by Microsoft with this command, executed from an elevated command prompt:
bcdedit /set testsigning on
This produces one side-effect: Windows shows “Test Mode” in the lower right-hand corner of the desktop.”
Here: ghisler.ch/board/viewtopic.php?t=24262&postdays=0&postorder=asc&start=15&sid=918bbb55edaeb08e6084af9d30a9ab5d
Flint: “I’ve read many discussions on programmers forums about the matter, everyone there confirmed that it was impossible to load unsigned or self-signed drivers in x64 (among those were many professionals, MVPs and driver programming experts).” (unless by enabling testmode, what is not recommanded because it is a security feature)
And here: msdn.microsoft.com/en-us/library/windows/hardware/ff544872%28v=vs.85%29.aspx
msdn.microsoft.com/en-us/library/windows/hardware/ff552299%28v=vs.85%29.aspx
I have also signed the driver itself (not only the cat file), to no avail.
I don’t know who made the test here, but this information is unaccurate: yes you won’t get a warning, the driver is installed, but it won’t be running.
interesting. please comment on signing windows 10. https://moln1.wordpress.com/2015/02/18/creating-self-signed-certificates-in-windows-10/
This worked great for me. There’s a known problem with Ricoh print drivers in which defaults set on the print server do not propagate to clients. Instead, Ricoh defaults need to be put into an RCF file included with the driver. Editing the RCF file breaks the digital signature, which causes clients to refuse to install the driver downloaded from the print server. Re-signing with a self signed certificate and distributing the certificate using group policy solved the problem.
Thanks so much for putting this article together. You made it easy for me to complete a complex process.
And I did test with Windows 10. It did work there, too.
Just wanted to say thanks for this.
I was able to self sign drivers for Win10 x64. One trick to remember is on the target PC to import the certificate into the “trusted root certification authorities” for “Local Computer”. Using certmgr -add did not seem to import to Local Computer, only Current User.
Thanks
Thanks for this method of self-signing a driver which won’t install due to Windows 10 signed driver installation firewall.
I had a very difficult time installing the Windows 7 SDK in Windows 10 because it kept complaining about the version of .NET Framework 4 was an incomplete version and I couldn’t install .NET Framework 4 because a newer version, 4.6.2 is installed and nothing I tried could deinstall it. What I did was expand the Windows 7 SDK and manually installed all of the modules I could then ran the installer which enabled me to fully install the Windows 7 SDK as an installation repair. As well, it is not in the “Program Files (x86)” folder, it is in the “Program Files” folder so change the instructions by removing “(x86)” from the command strings. After all that, which took a long time to figure out, the rest was a breeze. The only problem was that the date of the driver stated in the “.inf” file had to be updated to 04/21/2009 (at least) because it was too old for Windows 7 as it predated Windows 7. Now the 64bit driver for myAOpen FM56-EXV external serial voice capable modem is fully loaded in Windows 10.
I tried the steps, and it does what it says — it gets rid of the warning message when using pnputil.
It doesn’t make the driver work.
To understand why see this table in David Grayson’s excellent article:
http://www.davidegrayson.com/signing/#reqs
While you’re making the steps to “make it look good” by adding a Trusted Root Certification Authority, you’re still missing a “Microsoft Code Verification Root” because your Trusted Root is not recognized by Microsoft.
Great link, thanks!
I wish the guy had just put (insert your inf file to sign) in the how to instead of confusing the hell out of me by having me create a certificate for a driver and such weird names for stuff that I’m left unsure of which things I should change or commands to use for my libusb0.inf file im wanting to sign. FYI my laptop keyboard is broken I don’t have an external one and command line turn nointegritychecks or testsigning and others via elevated not elevated via PowerShell and every other way I can find or think of doesnt work and due to no keyboard I can’t tap option 7 and I can’t use my touchscreen or pad thingy u know mouse pad thing below keyboard. I’m at burnout stage from all this and installing this app that app searching for just makecert failing then installing the wrong version of visual studio on installing visual studio reinstalling the right version etc… Etc… Its 3am so no I can’t go buy a keyboard atm
You absolutely made my day!!! – Great Article. Worked for me like a charm! Thanks a lot for your input!
Please avoid to spread false informations on the web!
All this does not work and cannot work on 64bit Windows 10 (tested on a third-party PCSC kernel driver)
Except all of this does work on 64bit Windows 10, so maybe reiterate on what you mean, such as “I am too illiterate and need to be held by hand” :^)
Here are some snippets of some commands I had to rewrite, just for some reference. I had renamed the .cat to ass in the .ini file of the driver I wanted to install.
pvk2pfx -pvk C:\DriverCert\mydrivers.pvk -pi password -spc C:\DriverCert\mydrivers.spc -pfx C:\DriverCert\mydrivers.pfx -po password
“C:\WinDDK\7600.16385.1\bin\selfsign\inf2cat.exe” /driver:”C:\DriverCert\Grabber” /os:10_X64 /verbose
“C:\Program Files (x86)\Windows Kits\10\bin\10.0.19041.0\x64\signtool.exe” sign /f C:\DriverCert\\mydrivers.pfx /p password /t _http://time.certum.pl/ /v C:\DriverCert\Grabber\ass.cat
The certificate was installed manually into both Trusted Root and Trusted Publishers
I haven’t bothered pasting the rest of the commands I used, but all in all, with some tweaking, everything works perfectly for me. Used it to install a MT4169 ‘Video Grabber’ driver for W10 64x
Worked on Windows 10 ,1803 using the enterprise SDK. Obviously, some commands need to be changed and you have to add the ROOT cert to the store or this will not be trusted!!!
I can use multi-partitionned SD cards in Windows 10 1803 without any additional driver. Checked on Home and Pro versions.
This really only works if test mode is on when adding the cert to the trusted publishers and trusted root certification authority. So basically just have test mode on all the time. It’s better than rebooting every time you want to use it and disabling driver verification.
Good day.
Where i can find inf2cat.exe? After install all needed software, in thus folder only hrml file with information that this process now is part of build process.
Windows 10 1803
This does not seem to work on Windows 10 when SecureBoot is enabled. If SecureBoot is enabled the digital signatures details on the .cat file generated will say “A certificate chain processed, but terminated in a root certificate which is not trusted by the trust provider.” If you right click and try to install the INF file it claims there is a problem with the signature.
I was able to get it to work on a Windows 10 VMware machine where SecureBoot was not enabled. I googled the error message further and found that with SecureBoot enabled, the driver MUST be signed by Microsoft’s WHQL certification process. So in order for this to work you will have to go into your BIOS and disable Secure Boot.
Thanks for this info!
This 100% absolutely Works!!! 🙂 Thank you so much. Did this for an MS 2016 Server. Old plotter drivers. Thank you, Thank you, Thank you!
This worked for me on windows 10 Pro 64 bit, thanks a ton!
Just a small thing, in some places “MyDriver” and “Driver” are used interchangeably, please fix that for people who don’t get things intuitively.
I’ve fixed this. Thanks!
It works for me on Windows 10 Pro 64bit too. Thanks a lot.
completely fake information. installing is succeeded, but never working normally. this is possible only when testsigning is on or when old driver was already signed by another legal code certificates
Thanks a lot for this guide. Only using your method I could install win7 on uefi class 3: the key to forcing a custom video driver at the installation of windows was to sign it with a selfmade certificate and then add the certificate to the registry of the installation. This way the video driver will be used at first boot, being able to complete the installation while you disable standard vga to ensure full compatibility with uefi.
Thanks a lot for the guide. I was able to install the unsigned driver on my windows 10 without disabling the digital signature verification.
After spending a Sunday trying to do it myself on Windows 10, I came across your article. Worked brilliantly, thank you!! My Windows kit was in C:\Program Files (x86)\Windows Kits\10\bin\10.0.19041.0\x64\ and as I was using Windows 10, used
Inf2Cat.exe /driver:”C:\DriverCert\xg20″ /os:10_X86,10_X64 /verbose
I’ve tried three times, but it does not work. Certification process works until I do “signtool.exe verify /v /pa mydriver.cat”, then it says:
SignTool Error: A certificate chain processed, but terminated in a root certificate which is not trusted by the trust provider.
Number of files successfully Verified: 0
Number of warnings: 0
Number of errors: 1
I also installed the certificate and CertMgr does say it’s valid. Until I connect my device and install my drivers, then in Device Manager the yellow “!” shows up and says that the driver can’t be trusted.
What can I do to fix this?
Yes, ms crap ! The reason why is this necessary, vendors do not want to have additional costs and they don’t sign drivers cos MS want money, and the fact MS OS uses security policy rules (perfect for root viruses) and not root file security like in Linux ! The perfect platform for abandoning a bit older hardware that might still be performing well. This way MS controls what can windows run and what not and that might be against what user want ( i wonder how long will Win7 still be around, if even XP is still alive). So if MS is controlling hardware, why wtf they do not go to closed architecture ? I dont want to be limited if there are drivers that can run what so ever hardware and they aren’t signed cos MS is greedy piece of ass ? On the other hand they want Win on every imaginable devices ???
I am down to a problem that seems alot of people are having and wondering if there is a fix.
following the Steps exactly using the 7.1 and another try with the newest version of 10, everything is working but the it tells me successfully signed after, note i changed the server because it was giving me timeout response and ofc the cat file name to my driver.
Signtool sign /f C:\DriverCert\myDrivers.pfx /p mypass /t _http://timestamp.comodoca.com/authenticode /v C:\DriverCert\xg20\kmdfsamples.cat
the verify line was showing root verification error line that was fixed after i imported the certificate in trusted user and it shows as in the picture “This signature is OK”.
I can now install the driver, i need to manually update a driver and i select my inf file, but device manager is telling me this does not have digital signature. so i am able to install but the driver does not work/load with the following error.
“Windows cannot verify the digital signature …… (code 52)” why when the signature told me it was OK i am not sure. so my question should the cat file name be the same name of the driver .inf and .sys files or it is fine to be different? will this help, why device manager does not recognize the signature?
i attempted the Pnputil –i –a C:\DriverCert\xg20\firefly.inf but noticed that the cmd showed successfully imported but nothing was installed, so i opened the logs C:\Windows\inf\setupapi.dev.log and found out an error that the INF file hash is not stored in the catalog, then i looked at my catalog before signing inside C:\DriverCert\xg20 to find out that there was 4 security catalogs each file inf and sys is twice with different hashes, then after signing they became only two. i do not know why this is happened also why the catalog has 4 hashes to begin with.
latest update i realized that the code generate a cat file so i removed the old one and it worked, but it doesn’t just work still refuse to accept it, i will try more tomorrow and check the log thoroughly i am recieving root certificate error again but the verify is working perfectly, the hash error is gone
Bottom line it will not work, my driver need to run in kernal mode, the certifacate verification using signtool verify /v /kp c:\DriverCert\xg20\kmdfsamples.cat shows the next error
SignTool Error: Signing Cert does not chain to a Microsoft Root Cert.
there is no way around it to my knowledge update me if there is a way around this, i just want to install stupid mouse driver because my mouse driver is bugged. but when i go into testmode most game’s anti cheat just prevent me from even opening the game so microsoft, the games and the mouse company all on me xD and btw the mouse driver was bugged it was a stupid redragon brand the bug was caused by the mouse software and inverted the motion of the mouse in the x direction.
After signing the cat file with timestamp
(./signtool sign /f C:\DriverCert\myDrivers.pfx /p mypass /t _http://timestamp.comodoca.com/authenticode /v C:\DriverCert\x\mp59g.cat)
verification
(.\signtool.exe verify /v /pa C:\DriverCert\x\mp59g.cat)
gives me an error:
SignTool Error: A certificate chain processed, but terminated in a root
certificate which is not trusted by the trust provider.
Number of files successfully Verified: 0
Number of warnings: 0
Number of errors: 1
Any clue?
OK, the order in the article were swapped for the following commands:
./certmgr.exe -add C:\DriverCert\myDrivers.cer -s -r localMachine ROOT
./certmgr.exe -add C:\DriverCert\myDrivers.cer -s -r localMachine TRUSTEDPUBLISHER
.\signtool.exe verify /v /pa C:\DriverCert\x\mp59g.cat
Now it’s fine.
Successfully verified: C:\DriverCert\x\mp59g.cat
Number of files successfully Verified: 1
Number of warnings: 0
Number of errors: 0
For most people that are looking to sign a driver package that includes a .sys driver (which is… nearly every driver), I’ve got bad news for you. This can’t be made to work, because the Windows kernel can’t accept a self-signed driver – even if you add yourself to the trusted chain. The reason being: at boot time, when those drivers are loaded, there’s no access to the trusted certificate store; it has to rely on the certs baked into the kernel.
I spent so much time downloading the riduclously bloated SDK and WDK in order to get access to the inf2cat and signtool files… nobody on the internet seems to have ever thought to bundle those up and make them more readily available. Why? Probably because this procedure never resulted in success. 🙁
See here: https://stackoverflow.com/questions/27720613/can-i-install-self-signed-drivers-on-64-bit-windows-without-test-mode-if-the-sel
So, dead end, failboat. If you want to use drivers for old gear, you’ve got to globally disable driver signature enforcement on the whole system (yeah, that’s real secure – good job, Microsoft). Instead of just giving people the ability to sign a known-good driver and still prevent tampering across the rest of the system, MS needs you to totally remove all protection in order to get one driver to work. Classic.
Hi this procedure is it impossible making with buying certificate on Global sign?
I had to add `-HashAlgorithm ‘SHA256’` to the New-SelfSignedCertificate commandlet
and then used `/fd SHA256` as well as `/td SHA256` which works
Also used /os:10_x64 (noting that the cat file was driver64.cat when created.
Hi, I am trying to install the Hitachi cfadisk driver for having a SDXC card as fixed (basic) drive, everything seems to work OK, but when I try to build the cat using inf2cat.exe I get following errors:
Signability test failed.
Errors:
22.9.4: Missing AMD64 CatalogFile entry (CatalogFile.ntamd64, CatalogFile.nt, CatalogFile) from [Version] section in cfasdxc\cfadisk.inf
Warnings:
22.9.10: cfadisk.sys in [cfadisk_copyfiles] is missing from [SourceDisksFiles] section in cfasdxc\cfadisk.inf; ok if file source is provided via LayoutFile in [Version].
22.9.10: disk.sys in [gendisk_copyfiles] is missing from [SourceDisksFiles] section in cfasdxc\cfadisk.inf; ok if file source is provided via LayoutFile in [Version].
How can I solve the AMD64 Catalog entry? I looked in the cfadisk.inf file and there is nothing about it on it.
Thanks
hi, any possible solution for avoid that error and be able to build the .cat file?
Hi, I followed the guide up to the point of “Signing the Driver Package with a Self-Signed Certificate”. At this point, when trying to execute the command below
signtool sign /f C:\DriverCert\myDrivers.pfx /p P@ss0wrd /t http://timestamp.verisign.com/scripts/timstamp.dll /v C:\DriverCert\xg20\xg20gr.cat
I received the following message:
The following certificate was selected:
Issued to:
Issued by:
Expires: Wed Aug 13 16:25:30 2031
SHA1 hash:
Done Adding Additional Store
SignTool Error: File not found: C:\DriverCert\xg\xg20gr.cat
Number of files successfully Signed: 0
Number of warnings: 0
Number of errors: 1
Does anyone know why this has not worked?
Your problem is described here:
SignTool Error: File not found: C:\DriverCert\xg\xg20gr.catJust check the path to the file: C:\DriverCert\xg\xg20gr.cat. I think the driver file is different in your case.