Windows updates are released as packages with the MSU or CAB file extensions. If the Windows Update service is not working (or disabled), you can manually download and install the necessary cumulative or security updates for your system. In this article, we’ll show how to download and offline install Windows updates in MSU or CAB formats.
How to Manually Download the MSU Windows Update File?
Microsoft released security updates and patches in the CAB (Windows cabinet) file format. This is the format in which your computer receives updates from Microsoft update servers or the local WSUS server. To make the manual distribution of separate updates using Microsoft Update Catalog more convenient, these CAB files are packaged in a special MSU format (Microsoft Update Standalone Installer Package).
You can download MSU Windows updates files (and sometimes CAB files) or files for other Microsoft products from Microsoft Update Catalog (https://www.catalog.update.microsoft.com/). Go to Microsoft Update Catalog, find and download the update you need. For example, I want to install the 2022-05 Servicing Stack Update for Windows 10 Version 21H2 for x64-based Systems (KB5014032). Click the Download button.
![]()
Move the file ssu-19041.1704-x64_70e350118b85fdae082ab7fde8165a947341ba1a.msu you have downloaded to the C:\temp folder. Rename it to the shorter name windows10.0-kb4056887-x64.msu.
Installing Windows Update from MSU File
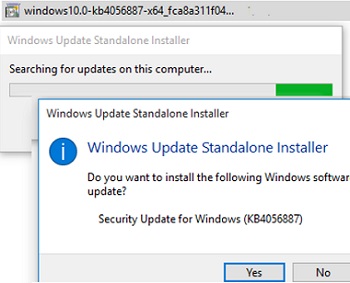
To start the installation of a Windows update package, just double-click the MSU file you have downloaded. If the update is applicable to this computer, a Windows Update Standalone Installer window will open, where you will be prompted to confirm the update installation.
The update is not applicable to your computer” when installing an MSU update. The reasons for this error are discussed in detail in the article at the link.You can also install the MSU update package from the command line using the wusa.exe tool.
To install the update in a silent mode (a user won’t see any pop-up windows) with a delayed restart, open the command prompt as administrator and run the following command:
wusa.exe c:\Temp\windows10-21h2-kb5014032.msu /quiet /norestart
After a while, check that the update has been successfully installed:
wmic qfe list | findstr 5014032
![]()
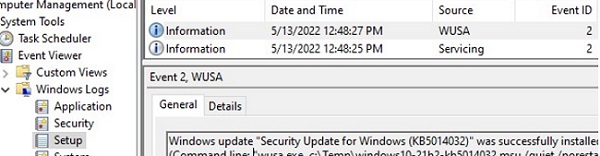
Or you can find an entry with Event ID 2 from the WUSA source in the Event Viewer -> Windows Logs -> Setup:
Windows update "Security Update for Windows (KB5014032)" was successfully installed. (Command line: "wusa.exe c:\Temp\windows10-21h2-kb5014032.msu /quiet /norestart")
How to Extract a CAB File from an MSU Update Package?
If the Windows Update service (wuausrv) is not working correctly, you will not be able to install the update from the MSU file. In this case, you can manually unpack the MSU package, extract the CAB update file from it, and manually install it on Windows.
In order to extract the MUS package into the C:\Temp\kb4056887 folder, run this command (you have to create this folder in advance):
expand -f:* “C:\Temp\windows10.0-kb4056887-x64.msu” C:\Temp\kb4056887
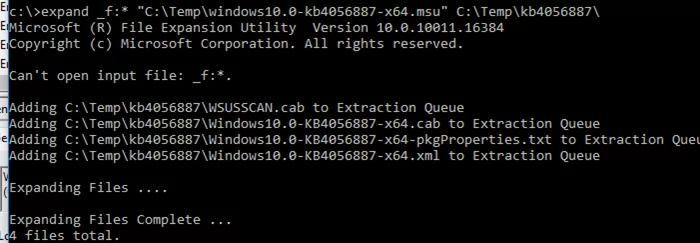
Microsoft (R) File Expansion Utility Version 10.0.10011.16384
 Copyright (c) Microsoft Corporation. All rights reserved.
 Adding C:\Tmp\kb4056887\WSUSSCAN.cab to Extraction Queue
 Adding C:\Tmp\kb4056887\Windows10.0-KB4056887-x64.cab to Extraction Queue
 Adding C:\Tmp\kb4056887\Windows10.0-KB4056887-x64-pkgProperties.txt to Extraction Queue
 Adding C:\Tmp\kb4056887\Windows10.0-KB4056887-x64.xml to Extraction Queue
 Expanding Files ….
 Expanding Files Complete …
 4 files total.
As you can see, 4 file types have appeared in the folder:
- An .xml file (Windows10.0-KB4056887-x64.xml) – contains MSU package metadata and used by wusa.exe;
- A .cab file (Windows10.0-KB4056887-x64.cab — one or more) – is an cabinet (archive) with Windows update;
- *pkgProperties.txt file (Windows10.0-KB4056887-x64-pkgProperties.txt) – contains package properties (release date, architecture, package type, a link to the KB, etc.).
You can also open any MSU file with the 7-ZIP and extract the CAB file from it.

Install a CAB Update File on Windows 10/11
You can install a CAB update file in two ways.
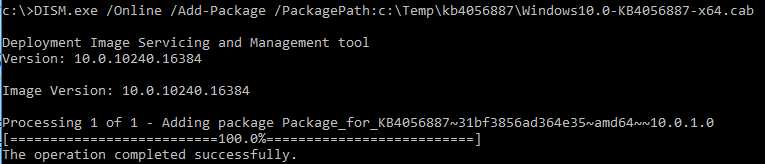
The most common way to install an update from a CAB file is using DISM.exe. The installation command can look like this:
DISM.exe /Online /Add-Package /PackagePath:c:\Temp\kb4056887\Windows10.0-KB4056887-x64.cab
Deployment Image Servicing and Management tool
Version: 10.0.10240.16384
Image Version: 10.0.10240.16384
Processing 1 of 1 — Adding package Package_for_KB4056887~31bf3856ad364e35~amd64~~10.0.1.0
[==========================100.0%==========================]
The operation completed successfully.
If you have to install a CAB package in a silent mode with a later restart, use the following DISM command:
start /wait DISM.exe /Online /Add-Package /PackagePath: c:\Temp\kb4056887\Windows10.0-KB4056887-x64.cab /Quiet /NoRestart
The DISM.exe /Add-Package command allows you to install an MSU update as well (only the offline Windows image is supported). You can use the /PackagePath parameter to specify a path to the directory where the MSU and CAB update files are stored. DISM will recursively scan the specified directory and subfolders and installs any found CAB and MSU update packages into the Windows image.
To install CAB files in a Windows image, you can use the PowerShell command Add-WindowsPackage -Online -PackagePath "C:\win10_kb123456.cab" instead of the DISM /Add-Package command.
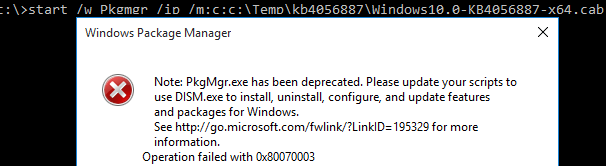
On Windows 8 and Windows 7, you can install a CAB update using the Pkgmgr command:
start /w Pkgmgr /ip /m:c:"c:\Temp\kb4056887\Windows10.0-KB4056887-x64.cab"
Note: The PkgMgr.exe has been deprecated. Please update your scripts to use dism.exe to extract, install, uninstall, configure and update features and packages for Windows. Operation failed with 0x80070003.
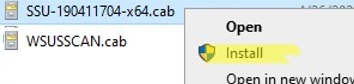
You can add the option to install CAB files to the File Explorer context menu. To do this, import the following *.reg file into the registry:
Windows Registry Editor Version 5.00
[-HKEY_CLASSES_ROOT\CABFolder\Shell\RunAs]
[HKEY_CLASSES_ROOT\CABFolder\Shell\RunAs]
@="Install CAB"
"HasLUAShield"=""
[HKEY_CLASSES_ROOT\CABFolder\Shell\RunAs\Command]
@="cmd /k dism /online /add-package /packagepath:\"%1\""
Now to install the CAB file you just need to select Install from the context menu.
Bulk Install Multiple MSU or CAB Update Files with PowerShell/Batch
If you need to install multiple CAB or MSU updates on a computer at once, you can use BAT and PowerShell scripts. Thanks to such scripts, you don’t have to install updates manually one by one.
Create a directory on your drive and copy all the Windows MSU update files that you need to install into it. Run the install_msu.bat script in order to install all MSU updates from the specified folder:
Set Folder="C:\updates"
 for %%f in (%Folder%\*.msu) do (
 wusa.exe %%f /quiet /norestart
 )
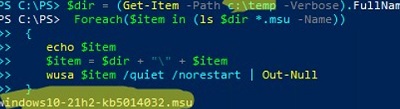
Similarly, you can use the following PowerShell script to install MSU updates from a specified folder:
$dir = (Get-Item -Path c:\updates -Verbose).FullName
 Foreach($item in (ls $dir *.msu -Name))
 {
 echo $item
 $item = $dir + "\" + $item
 wusa $item /quiet /norestart | Out-Null
 }
This guide for manually installing cumulative or any other Windows updates using MSU and CAB files applies to all supported Windows OS versions: Windows 11/10/8.1/7 and 2022/2019/2016/2012R2/2008R2.
6 comments
For example this error code:
Error Code: 0x80070422
Copy and paste the following command from Run
slui.exe 0x2a 0x80070070020
..and I get the description of that error, as shown in this screenshot:
https://web.archive.org/web/20180724065556/https://i.imgur.com/lE08VIw.png
DISM.exe method works in Windows 7 as well.
Thanks colleagues
Not working – error 0x800f0818 error ! MS crap !
Doesn’t work install from official Win11 ISO image with DISM command from: \sources\sxs where the famous donet3.5 cab file locates ! MS going insane !!! Tested on fresh latest WIn11 install. Let some HACKERS deploy ISO image file with dontnet crap already installed and enabled ! Microsoft is plane stupid ! Gong back to win 10 ! At least i can install what i need and want and have control over OS on my god dam hardware and not Microsoft ! In future we do use Linux with Windows subsystem if developers doesn’t deploy their software to Linux (they all use Linux for coding purposes, what a total mess) !
This is not a dotnet but “dont-net” coz it doesn’t install at all !