This post explains several methods for blocking access to specific websites, domains, URLs, or IP addresses on a Windows computer without using third-party tools. The most effective way to block websites is typically to configure restriction policies at the network gateway level (e.g., routers or Wi-Fi access points) or through third-party software (e.g., content filters, DNS filters, or parental controls). For this task, we will use only built-in Windows tools and PowerShell scripts to block unwanted websites.
Block Websites Using the Hosts File in Windows
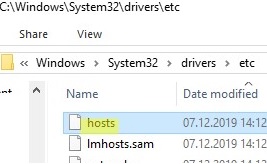
The most well-known method for blocking a specific website on a Windows computer is to redirect traffic to that website to an invalid IP address by adding a fake entry to the hosts file. The hosts file is located in the %windir%\system32\drivers\etc\ directory (path can be changed via registry parameter DataBasePath under the registry key HKLM\SYSTEM\CurrentControlSet\Services\Tcpip\Parameters).
To edit the host file, open it in the elevated text editor. For example, run the PowerShell console as an administrator and execute the following command:
notepad $env:SystemRoot\System32\drivers\etc\hosts
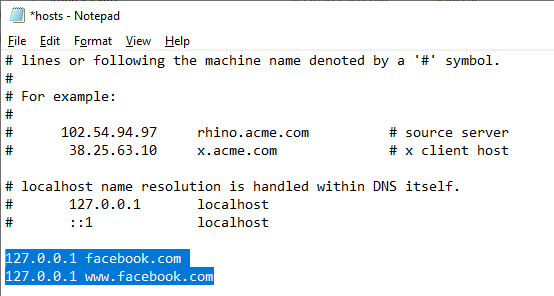
To block a specific website (for example, facebook.com), add these entries to the hosts file:
127.0.0.1 facebook.com
127.0.0.1 www.facebook.com
Save the file and purge the client’s local DNS cache:
ipconfig /flushdns
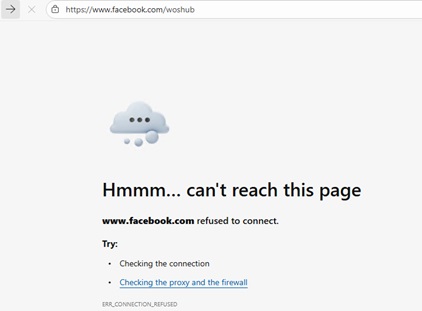
After this, the ERR_CONNECTION_REFUSED/ Page not found / Page not available message will appear when trying to open the facebook.com website in any browser.
The following PowerShell functions can be used to automate adding or removing blocked websites from the hosts file.
Function BlockSiteHosts ( [Parameter(Mandatory=$true)]$Url) {
 $hosts = "$env:SystemRoot\System32\drivers\etc\hosts"
 $is_blocked = Get-Content -Path $hosts |
 Select-String -Pattern ([regex]::Escape($Url))
 If(-not $is_blocked) {
 $hoststr="127.0.0.1 ” + $Url
 Add-Content -Path $hosts -Value $hoststr
 }
 }
Function UnBlockSiteHosts ( [Parameter(Mandatory=$true)]$Url) {
 $hosts = "$env:SystemRoot\System32\drivers\etc\hosts"
 $is_blocked = Get-Content -Path $hosts |
 Select-String -Pattern ([regex]::Escape($Url))
 If($is_blocked) {
 $newhosts = Get-Content -Path $hosts |
 Where-Object {
 $_ -notmatch ([regex]::Escape($Url))
 }
 Set-Content -Path $hosts -Value $newhosts
 }
 }
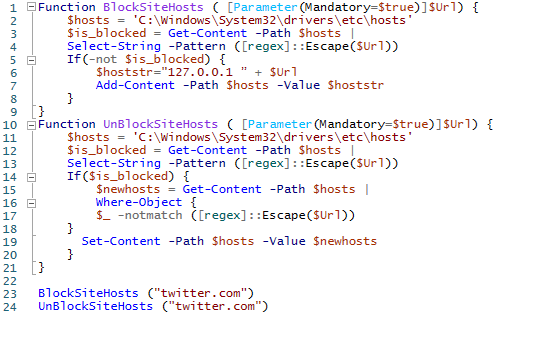
Add these functions to your PowerShell profile file (Microsoft.PowerShell_profile.ps1). Then, to add a website to the blocked ones, run the following command:
BlockSiteHosts ("facebook.com")
To unblock the website:
UnBlockSiteHosts ("facebook.com")
How to Block Websites or URLs via Group Policy
Group Policies (GPOs) can be used to block users from accessing specific websites on their browsers. The only caveat is that each browser has its own set of Group Policy templates, which are not compatible with other browsers. Therefore, the administrator must first prevent the launch of any browsers except those permitted by AppLocker, SRP, or other software restriction policies.
Now, let’s look at how to block a website in the Microsoft Edge browser:
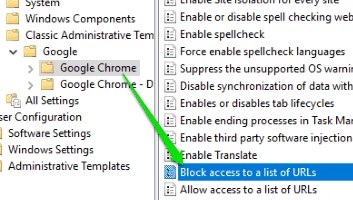
- Download and install the administrative GPO templates for the Microsoft Edge browser. (learn more about installing ADMX templates in Windows)
- Open the local Group Policy Editor (
gpedit.msc) or the Group Policy Management Console (gpmc.msc) if you want to block access to websites on multiple machines in the domain. - Go to Computer Configuration -> Policies -> Administrative Templates -> Microsoft Edge.
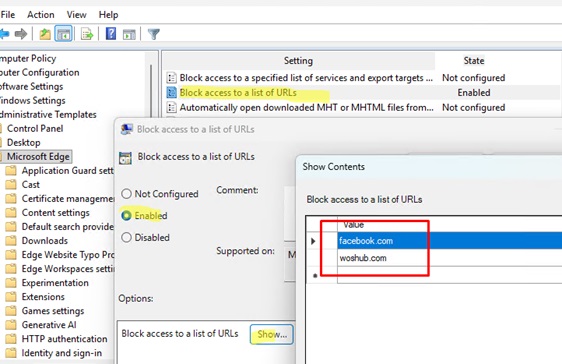
- Select the Block access to a list of URLs option, click “Show“, and add a list of website addresses to block.

- Save the policy settings and then update them on the client:
gpupdate /force
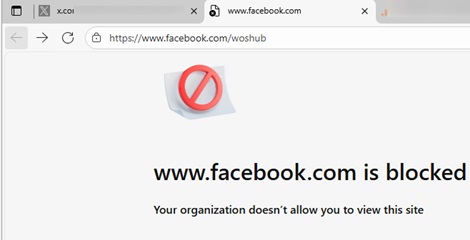
If a user tries to open a blocked website using the Microsoft Edge browser, the following message will appear:
Website is blocked
Your organization doesn’t allow you to view this site.
If Google Chrome is your primary browser, you need to download and install the ADMX policies for Chrome. Then, configure the Block access to a list of URLs parameter.
GPOs for browsers allow you to create flexible site access restrictions and/or exceptions, depending on whether you want to implement a white or blacklist of sites.
How to Block a Website IP Address in Windows Defender Firewall
You can use the built-in Windows Firewall rules to block specific websites or domains. The main disadvantage of this method is that you won’t be able to use the name of a domain or website URL in the blocking rule. Windows Firewall only allows you to specify an IP address or subnet as the source or destination.
First, you have to find the IP address of the website you want to block. Resolve the sitename to IP using the command:
nslookup x.com
or
Resolve-DnsName x.com
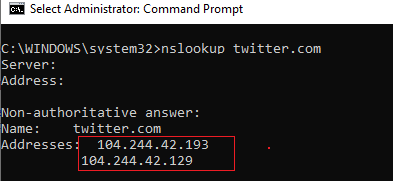
Several IP addresses were returned for the domain. You have to block them all.
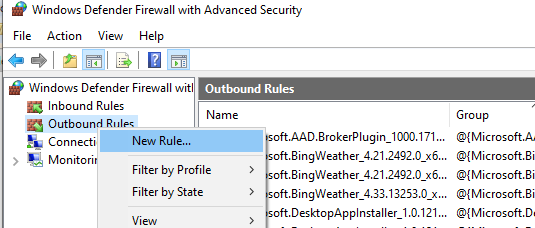
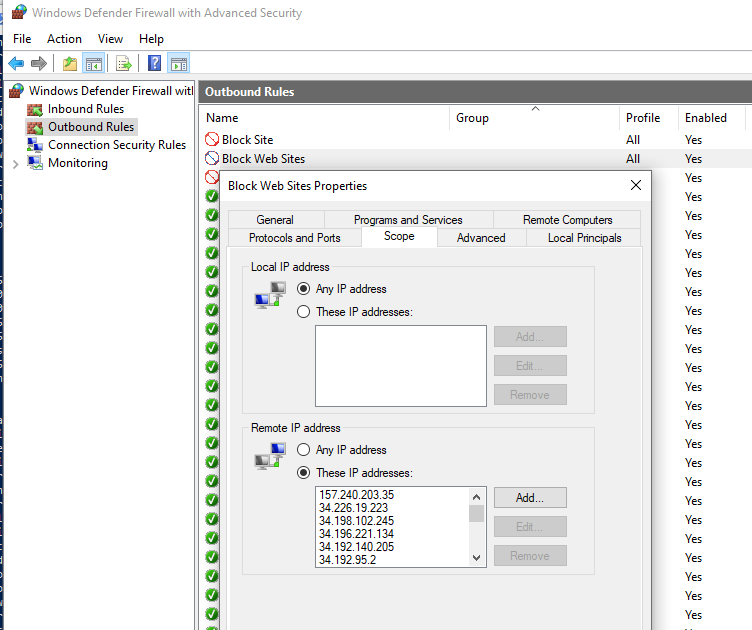
Run the Windows Defender Firewall management console (firewall.cpl ).
In the Outbound Rules section, create a new rule with the following settings:
- Rule Type: Custom
- Program: All programs
- Protocol Type: Any
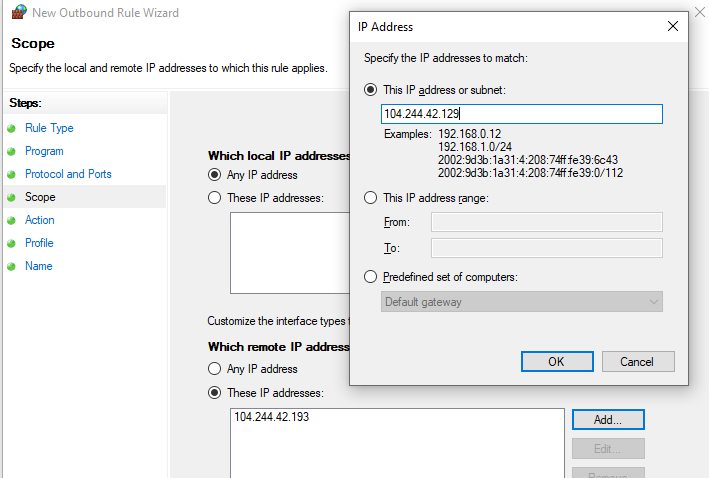
- Scope: In the “Which remote IP addresses does this rule apply to?” section, select “These IP addresses” -> Add. In the next window, add the IP addresses, subnets, or a range of IP addresses you want to block.
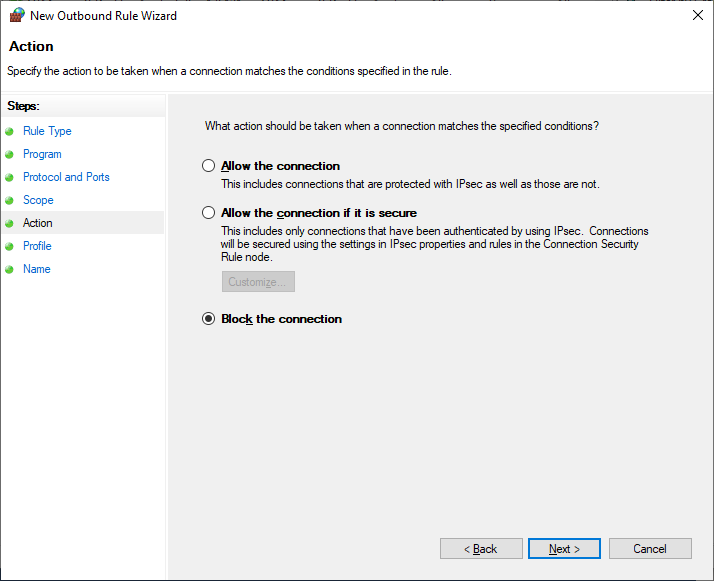
Click OK -> Next -> Action -> Block the connection.
Leave all options selected in the list of firewall profiles (network types) to which this rule applies. Then specify the rule name and save it.
In an Active Directory (AD) domain, you can use a Group Policy Object (GPO) to deploy a firewall rule that blocks websites on users’ computers. However, this is not rational. It is better to filter websites on your Internet access router (gateway).
Blocking Websites in Windows Firewall with PowerShell
You can use PowerShell to create a firewall rule that blocks outgoing connections to a particular website.
New-NetFirewallRule -DisplayName "Block Site" -Direction Outbound –LocalPort Any -Protocol Any -Action Block -RemoteAddress 104.244.42.129, 104.244.42.0/24

The Resolve-DnsName PowerShell cmdlet can automatically resolve a website name to an IP address.
Resolve-DnsName "x.com"| Select-Object -ExpandProperty IPAddress
Use the following script to resolve the site name to an IP address and immediately add a rule blocking access to it.
$SitesToBlock = "facebook.com","instagram.com","youtube.com"
 $IPAddress = $SitesToBlock | Resolve-DnsName -NoHostsFile | Select-Object -ExpandProperty IPAddress
 New-NetFirewallRule -DisplayName "Block Web Sites" -Direction Outbound –LocalPort Any -Protocol Any -Action Block -RemoteAddress $IPAddress
Make sure that an outbound block rule has appeared in the Windows Firewall console.
This article is mostly a brain-training exercise. To restrict access to websites within a corporate network, filtering must be implemented at the internet access gateway or proxy server level. It is not as effective to block website access at the host level.
3 comments
Two points:
1. Resolving an URL to an IP and then blocking that IP is hardly a guarantee of prevention. In some cases, there are many IPs that lead to URL, in some cases an IP leads to many URLs which may be ones you need or want to get access to. You should mention this aspect when you talk about that aspect of things.
2. I just ran into the oddest scenario which has me now pointing undesirable URLs to an IP address in my local net that my DHCP server will never assign (nor will I) vs. the loopback interface (127.0.0.1). Why?
Well, I found with some of the google stuff I was trying to block and routed to 127.0.0.1, when I did a netstat -s or netstat -a -n -o, I observed that there were a bunch of connections targeted at the name the google software was looking for that had *CONNECTED* to something on 127.0.0.1 (both the local and foreign addresses were on the loopback interface). I bet there are apps that you want to block that act both as client and server so looping back forms a connection back to your own machine. While this does keep those attempts back within your machine, it still seems undesirable.
My solution here was to identify a network address locally that DNE and never will (outside my DHCP allocation pool, will not be statically created by me – which also implies that I have entire control over the network which I do) and then use the hosts file to send these requests to a dead end. Is that better than having them loopback, never hit the network, and connect to something locally? I really don’t know. I am hoping with the address translation from an URL to a host in the hosts file (to a dead address on the network) and then using Windows Defender to block outgoing requests for that dead IP, that combination will result in the firewall just quietly eating the outside connect requests so a) there will be no connections back to my machine in loopback and b) there will be no extra connection requests firing into the local network (because Defender blocked them).
Just some extra strategies for the thought experiment. I do appreciate the article for the knowledge you have conveyed – thank you.
One further point: If you don’t control the network, there are still ‘reserved’ internet address ranges that for the most part are not supposed to be used in normal networks. It is possible for you to use one of those ranges to send the requests to (as it isn’t likely to catch a host on your network) and then kill that address with IP based blocking in Defender Firewall.
Note, do not use the Link Address range (which is used for when a DHCP server is not available and DHCP clients are trying to assign themselves (no central direction) an IP address that does not conflict with another using trial-error-retry with new address approach). Leave that address band alone, but there are still other reserved address ranges you could use. I’d still put a Firewall block on outgoing traffic to those just to not put things onto your local net and make your router/switch/access point/etc have to make a decision about what to do with that traffic (why waste the devices time?). Block it locally as an outgoing address on your box.
In MOST cases, this approach should not impede any local software.
One somewhat useful (depends on how machines on your network setup ping handling) way to test a reserved address on your local net would be to ping it from the command line. That would tell you if it was occupied if you got a ping response. (Does not tell you nothing might be there if you do not – machine could be off temporarily or be set not to return ICMP echoes when pinged). But if you do get a response on a reserved internet address, try another. There are 3 or 4 ranges with a lot of addresses in them in the list of reserved addresses.
(PS I’m talking IPv4 here – haven’t looked into any reserved address ranges in IP V6)
Not sure how out of date this is, but the directory structure in REGEDIT is not the same. I am running windows 10.
I would suggest specifying the windows OS version in this, or just deleting it. Neither will happen probably. Just another Orphaned webpage on the vast superhighway of information.